07 Player Ship Model
Now that our camera is looking really slick, let's bring in the most prominent element on the screen - the player's ship. Like the UFO model, this free model also game from TuboSquid. You don't need to download and uncompress it. I've already included it in the assets folder.
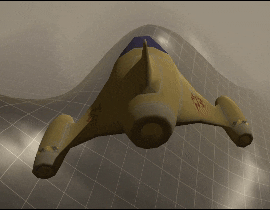
If you look in Assets/Models/ShipA and drag the shipA_OBJ model into your scene in front of your camera, you can see what it looks like.
It looks really flat and dull compared to the other elements. Let's fix it!
See if you can remember what was needed to get the UFO model looking good. Try it yourself, then go thru the steps below to see if you forgot anything.
The ship is way too big compared to the UFO.
-
Select the shipA_OBJ model (not the document of the same name) and in the Inspector change the model's Scale Factor to 1/6 and Apply the change.
-
Re-adjust your ship's position or camera position so that you're getting a good look at the ship in the game window.
-
To make the texture editable, expand the ship model in your assets folder by pressing the triangle on the right side. Then right-click on shipA_mat and choose Extract From Prefab and just accept the same folder you're already in.
-
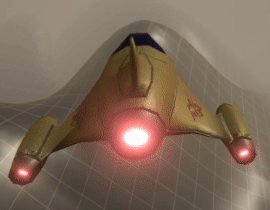
Select the now extracted shipA_mat object in assets and you'll see in the Inspector that the Albedo (Diffuse) color map is already set-up by default. That's how the ship is getting different colors. This model comes with 3 additional texure maps: Illumination (Emission), Normal, and Specular
-
In the material's Emission* settings click the checkbox to enable emission. For Global Illumination choose Realtime
-
Drag the shipA_1024_I image into the Emission - Color. This is used for the inside of the engines. These should now appear bright white.
-
To make them glow, click on the Emission - HDR and set the Intensity to about 4. You can also experiment with the color here.
-
Drag the normal map into the textures Normal Map box. Click the button that says Fix this image so that it's imported as a normal map.
-
Drag the Specular (shinyness) map onto the texture's Metallic map box, and set the Smoothness to about 0.5.
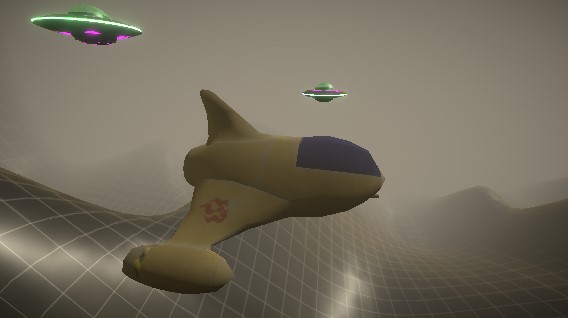
Here's a comparison of how it looked originally, and with our upgraded textures: