03 UFO Model
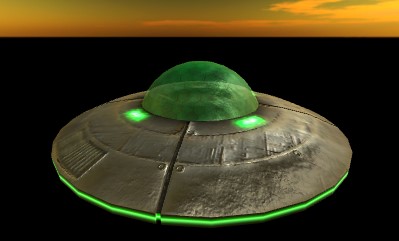
In this step, we're going to import a 3D Mesh object for our enemy UFO. The original free model came from TurboSquid, but a cleaned-up version of this is already included in the project you cloned at the beginning of this tutorial. We want it to end up looking like this:

Similar to the steps we took for getting the skyboxes from the internet, when this model was originally downloaded from TurboSquid it was in a ZIP file. That zip file was decompressed and the contents were copied into the /Assets/Models/Ufo folder in this project. So that step is already done for you.
Even though these FBX files are somewhat comparable between the applications used to make them and game engines like Unity, there is usually some fiddling needed to import the model for use in a game.
If you open that AssetsModels/Ufo folder in unity you'll see it contains the Model (the 3D shape) as well as a bunch of texture images. Just take the model object and drag it onto the scene.
One of the most common problems with imported models is that they're in the wrong scale for our game. In our case I'm expecting the UFO to be about 10m wide. But when we dragged it into our scene it's actually 60m wide. We could scale the game object, but it's better to get it right in the import settings.
-
Select the Low_poly_UFO model in the assets folder.
-
In the Inspector window find the Scale Factor value, and set this to 1/6
-
Press the Apply button at the bottom of the inspector
Any instances of the UFO that you have in your scenes will now be 10m wide.
Success! But... Our UFO doesn't look nearly as nice as the image above.
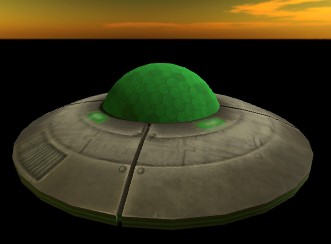
Look close, and you'll see it has these problems:
- The dome over the cockpit is not transparent, so we can't see inside.
- The green lights aren't glowing
- The metal surface is dull, not reflective. It just looks flat. :(
At least we're seeing different shades of color. The dome is green and the body is grey with some lines on it. This color is coming from the Diffuse map, or what Unity refers to as the Albedo map.
If you expand the Ufo model by clicking on the triangle on it's right side you'll see the model contains 4 meshes and two materials.

Click on the first material and look in the inspector. You'll see a preview ball of that material, and you'll see the albedo has already been set to one of the texture images.
If you look in the Ufo asset folder you'll see there are 6 images.
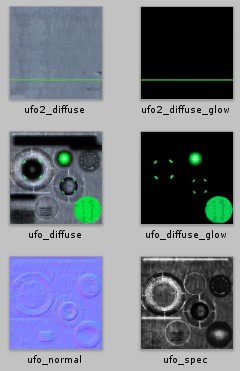
Two of these images are albedo (diffuse) and are already in use. We need to apply the other 4 ourselves. The first material Ufo_Texture is actually going to use 3 more images! The 2nd material Ufo_Texture2 only needs one more image. Looking at the first texture Ufo_Texture:
-
Right-click the material and select "Extract From Prefab". This will give us a copy that we can edit. When asked for a folder, just pick the one we're already in.
-
Do the same for the 2nd material, then we can close up the ufo model by clicking the triangle on it again.
-
Select the UFO_texture
-
Drag the ufo_normal iamge into the Normal Map value in the inspector. It will show a warning that this is not imported properly, and there's a Fix Now button. The Normal Map is a special type of image that encodes the angle that light will bounce off this part of the model. This makes a flat low poly mesh seem to have much higher resolution. It adds grooves and bumps. There's a number next to the image which is usually 1. You can play with this to adjust how much of a bump effect you want. I'm going to go with 0.6.
-
Drag the ufo_spec texture onto the Metallic texture map box. And set the Smoothness to about 0.5. The Specular map indicates what part of the material should be shiny, and what parts should be dull.
-
Click the checkbox next to Emmission. This means that part of our material are going to emit light. Drag the ufo_diffuse_glow image onto the Emmission Color. And for Global Illumination choose Realtime.
Now let's work on the 2nd texture.
-
Select UFO_texture2
-
Enable Emmission and drag in our ufo2_diffuse_glow iamge.
That's all that's needed on that one. It's looking a lot better. But the dome still isn't transparent. If you select the first texture again, in the inspector change the Rendering Mode to Transparent. This makes the dome somewhat transparent, but it also messes up the body. It's like we can see thru the metal. We need a separate material for the glass and metal.
-
Select UFO_texture in assets and press CTRL+D to duplicate it. Press F2 and rename this to UFO_Glass.
-
Select the original UFO_texture texture that we messed up above and change it back from Transparent to Opaque. This will be our metal texture.
-
In the UFO in your scene, in the Mesh Renderer area, expand the Materials and change Element 0 to our UFO_Glass Material.
Much better!