Using the Entity Service Data Control
In this section we will discuss how you can use the bean data control that you created on top of your entity service classes to build AMX pages with complete CRUD functionality.
To create a list view you can drag and drop the collection element named after the entity from the data control palette onto your page as a MAF List View.
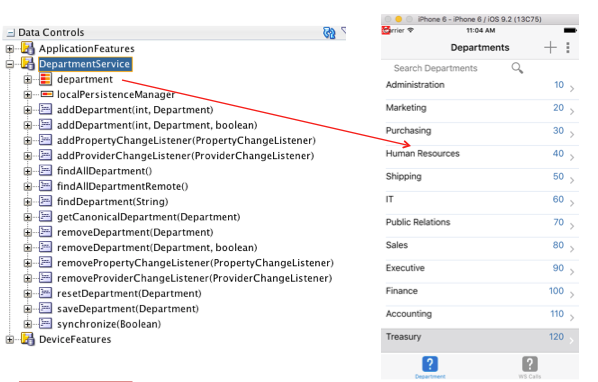
Note that by default the list view will only show data if you have checked the Auto-Query checkbox on the Runtime Options panel in the wizard and the Find All Resource has been defined in the CRUD Rest Resources panel. If this is not the case, it is your own responsibility to execute a data control method that triggers a REST call that receives the data you want to show in the list view. You can do this by executing a method activity in your task flow before you navigate to the list view page, or you can add a button to the page that executes such a method.
To filter the rows shown in the list view, you have the following options:
- Use the AMPA standard quick search functionality
- Add your own custom filter method to the entity service class.
To use the standard AMPA quick search functionality, you drag and drop the find[EntityName] method as a MAF parameter Form onto your AMX page.
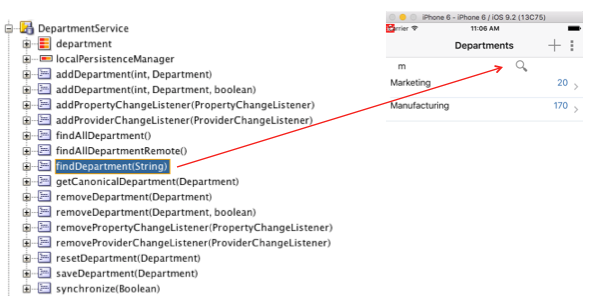
This will create both a quick search input field and a button to execute the find[EntityName] method.
The value entered in the quick search field is then used to query rows in the underlying table in the SQLite database. The query is case-insensitive and by default AMPA will search each VARCHAR column in the table that has a value that starts with the quick search value. If at least one column has a match, the row is added to the query result.
You can instruct AMPA to only search a specific set of columns rather than all VARCHAR columns. You can do this by overriding method getQuickSearchAttributeNames in your entity service class. Here is an example that only searches for employee first name and last name:
@Override
protected List<String> getQuickSearchAttributeNames()
{
  List<String> attrs = new ArrayList<String>();
  attrs.add("lastName");
  attrs.add("firstName");
  return attrs;
}
Note that we specify the entity attribute names, not the underlying table columns names.
If you want to create a custom search area in your page, for example, you want two search fields to filter on employee last name and job title, then you can create a custom method like this in your service class:
public void findEmployees(String lastName, String jobTitle)
{
  DBPersistenceManager pm = new DBPersistenceManager();
  Map<String,String> searchAttrs = new HashMap<String,String>();
  searchAttrs.put("lastName",lastName);
  searchAttrs.put("jobId",jobTitle);
  List<Employee> result = pm.find(Employee.class,searchAttrs);
  setEntityList(result);
}
You can then drag and drop this method from the data control as a MAF Parameter Form to get the two search fields. For more filter options see section Using Filtered Entity Lists.
###Refreshing the List with Latest Server Data
You can refresh your list view with latest data from the server by dragging and dropping the find[EntityName]Remote method onto your page as a MAF Button or MAF Link.
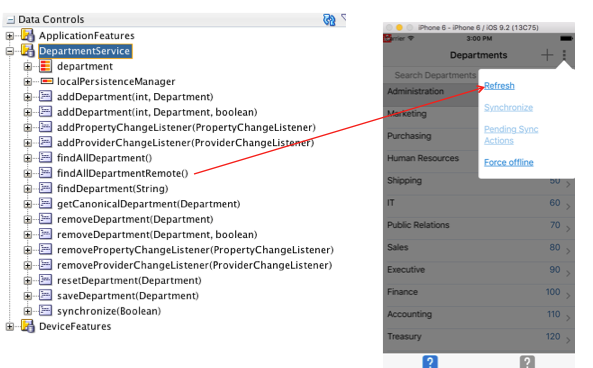
After you have done this, you can also use the underlying method binding in the page definition to implement the common pull-to-refresh pattern (and remove the button or link again if you only want to offer pull-to-refresh):
<amx:refreshContainer id="rc1" pullText="Pull to refresh" busyText="Refreshing departments..."
                      actionListener="#{bindings.findAllDepartmentRemote.execute}">
  <amx:listView var="row" value="#{bindings.department.collectionModel}"
     ...
  </amx:listView>
</amx:refreshContainer>
If the Remote Read in Background checkbox is checked in the Runtime Options panel, the REST call to refresh the data will be made in a background thread and as a result the spinning wheel and busyText of the refreshContainer will only be visible for a split second. If you want this to be visible for the duration of the REST call, you need to execute the REST call in the foreground. You can do thisby unchecking the Remote Read in Background checkbox, but that would change all GET REST calls to be executed in the foreground for this entity which might be undesirable. You can also switch to the foreground for just this REST call by creating a new method in your service class like this:
public void findAllDepartmentRemoteInForeground()
{
  setDoRemoteReadInBackground(false);
  super.doRemoteFindAll();
  setDoRemoteReadInBackground(true);
}
You should then drag and drop your custom method onto your page instead of the standard findAll[entityName]Remote method. Note that by doing this, the user will not be able to use the application until the REST call has completed.
If this is undesirable, you can also use the technique described in section Using a Visual Indicator for Running Background Tasks.
##Creating a Form Layout
To create a form layout you can drag and drop the collection element named after the entity from the data control palette onto your page as either a MAF Form or MAF Read-only Form.
In the example below, we dragged and dropped the department collection as MAF Form, and the nested employees collection as list view.
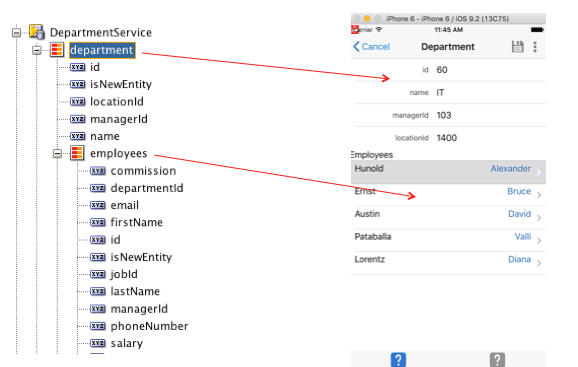
Note that if you navigate from a list view to a form view, then Oracle MAF will automatically set and preserve the current row across your pages as long as you drag and drop using the same collection element in your data control to create both the list view and form layout.
##Creating a New Entity Instance You can use the standard Create operation underneath a collection element to create a new instance and add it to the collection.
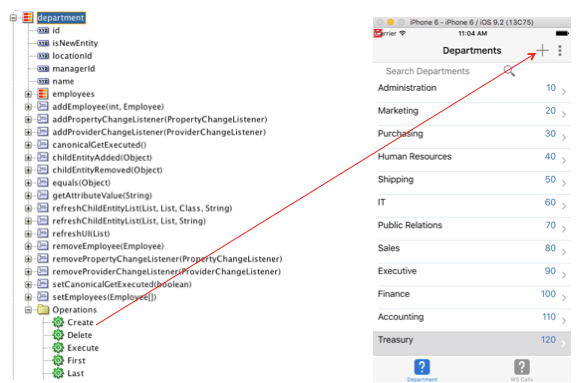
When the Create operation is executed, the new entity instance will automatically become the current row in the associated iterator binding and as a result your form layout will show empty fields. Furthermore, Oracle MAF will automatically call the add[EntityName] method in the entity service class. AMPA has auto-generated this method for you, and you can add custom logic to it, for example to set some default values:
public void addDepartment(int index, Department department)
{
  addEntity(index, department);
  // default manager of new department to Steven King
  department.setManagerId(new BigDecimal(100));
}
##Deleting an Entity Instance You can use the standard Delete operation underneath a collection element to delete an instance and remove it from the collection.
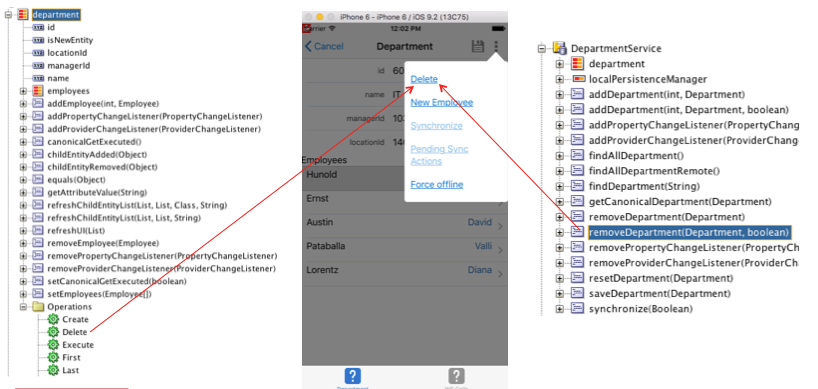
When the Delete operation is executed, Oracle MAF will automatically call the remove[EntityName] method in the entity service class. AMPA has auto-generated this method for you including code to call the REST Delete Resource as specified in the Runtime Options panel, and code to remove the underlying row from the SQLite database. You can also add custom logic to it, for example to delete associated child rows:
public void removeDepartment(Department department)
{
  removeEntity(department);
  // remove employees in this department from local DB
  DBPersistenceManager pm = new DBPersistenceManager();
  for (Employee emp : department.getEmployees())
  {
    pm.removeEntity(emp, true);
  }
}
##Saving an Entity Instance You can use the save[entityName] method to save an entity instance.
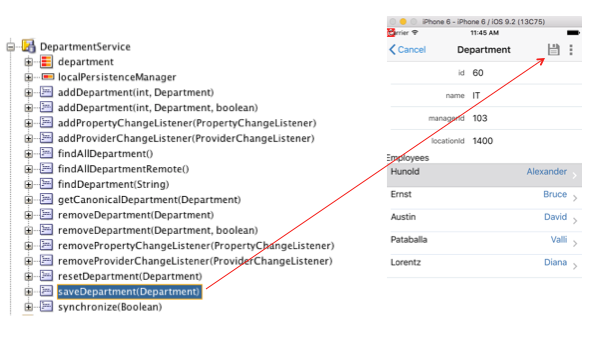
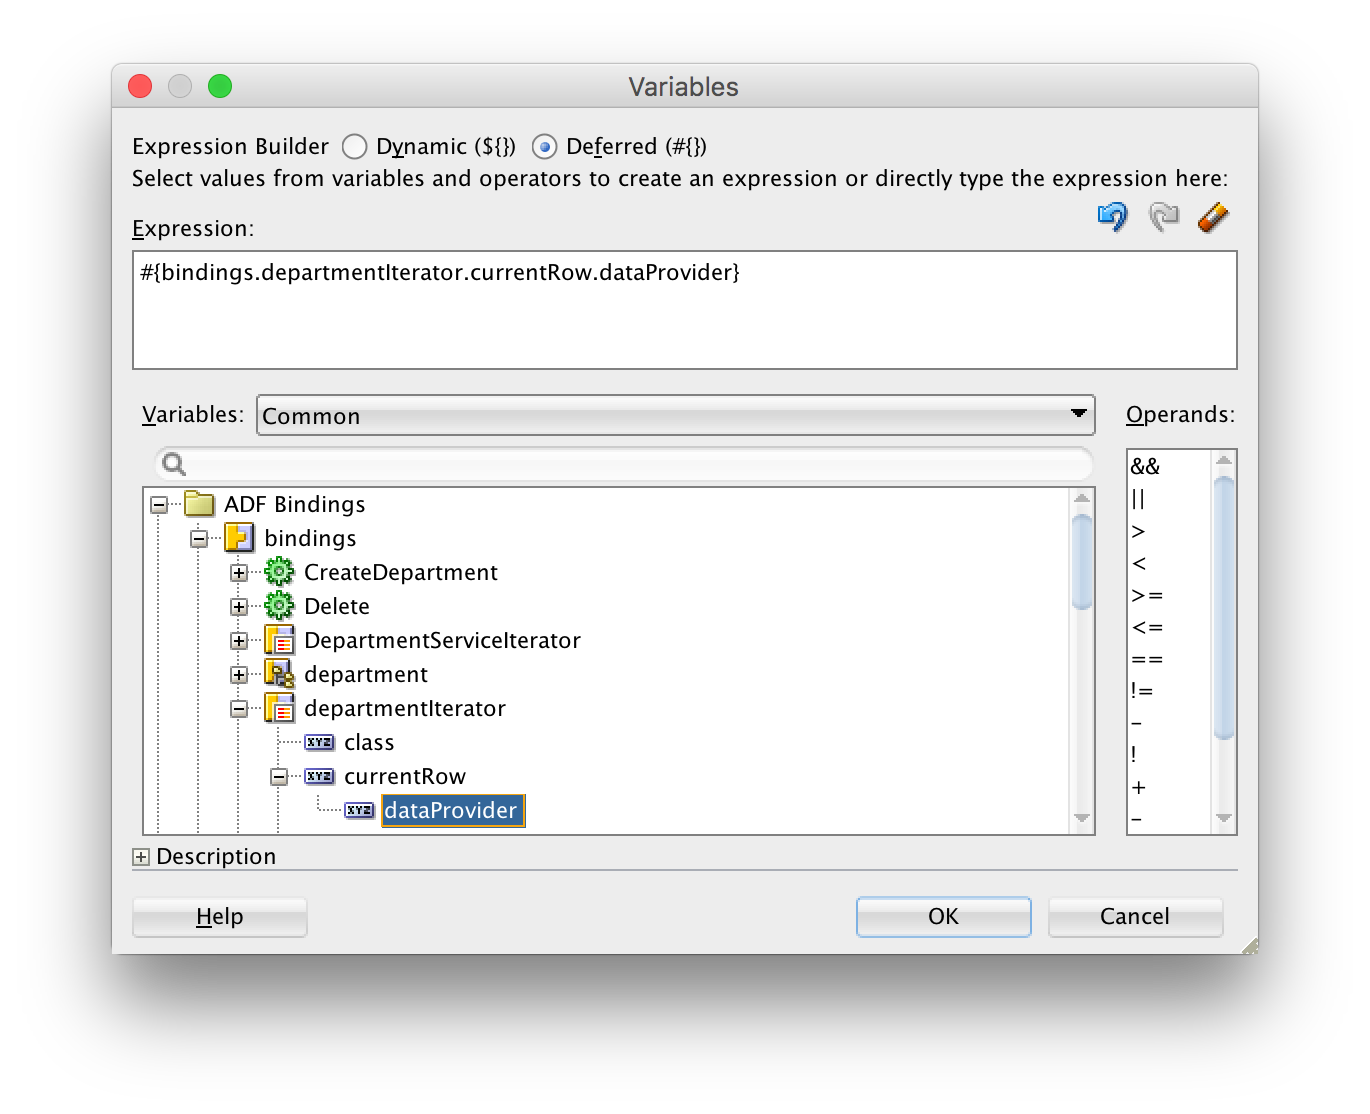
When you drag and drop the save[entityName] method, you need to provide an EL expression for the entity instance argument that is passed into the method. The expression can be constructed using the EL builder by expanding the appropriate iterator binding, and selecting the currentRow.dataProvider element as shown below:
AMPA will save the entity both locally in SQLite database, and it will call the Create Resource , Update Resource or Merge Resource depending on the entity new state and the configurations made in the CRUD Rest Resources panel.
##Cancelling Entity Changes
You can use the reset[entityName] method to undo changes made to an entity instance that is not yet saved.
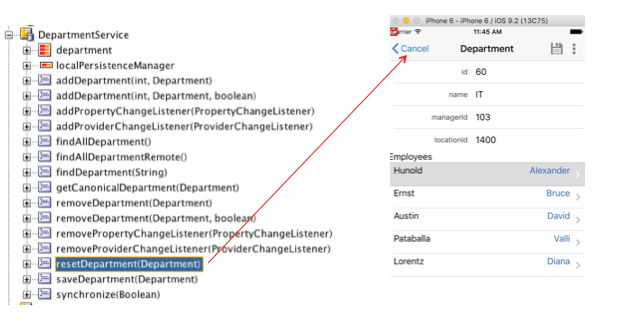
When you drag and drop the reset[entityName] method, you need to provide an EL expression for the entity instance argument that is passed into the method. See the previous section on saving an entity instance for instructions.
To undo the changes, AMPA will query the row from the SQLite database and re-apply the column values to the entity instance and refresh the user interface. To undo the creation of a new entity instance and remove the instance from the list again, it is best to use the Delete operation. The reset will only work on a new entity instance if the primary key value is already set.
##Using the Entity State Attribute for Conditional Rendering and Behavior
Every entity has an additional attribute isNewEntity that holds the entity state, you can drag and drop this attribute once as a MAF Output Text to get the binding in your page definition, and then you can remove the output text again from your page. You can then use the attribute binding in EL expression to conditionally show/hide or enable/disable UI elements or properties.
_This allows you to create one AMX Form page that is used for both creating and updating entity instances. _
For example, you can use the isNewEntity binding to conditionally show a page title like this:
<amx:outputText value="#{bindings.isNewEntity.inputValue ? 'Create Department' : 'Edit Department'}"
Or you can use it to make insert-only attributes read-only in edit mode:
<amx:inputText value="#{bindings.id.inputValue}" label="#{bindings.id.hints.label}"
               readOnly="#{!bindings.isNewEntity.inputValue}"  inputType="number" id="it1">
Or you can use it to hide a delete button for new entities:
<amx:commandButton actionListener="#{bindings.Delete.execute}" text="Delete"
                     rendered="#{!bindings.isNewEntity.inputValue}" id="cb1"/>
Or you can use it to conditionally execute a reset for an existing entity, or a delete for a new entity when clicking on a cancel button to undo pending changes:
  <amx:commandButton actionListener="#{bindings.resetDepartment.execute}" text="Cancel" action="__back"
                     rendered="#{!bindings.isNewEntity.inputValue}" id="cb1"/>
  <amx:commandButton actionListener="#{bindings.DeleteDepartment.execute}" text="Cancel" action="__back"
                     rendered="#{bindings.isNewEntity.inputValue}" id="cb2"/>