Skip to content
Merged
Show file tree
Hide file tree
Changes from all commits
Commits
File filter

Filter by extension

Filter by extension

Conversations
Failed to load comments.
Loading
Jump to
Jump to file
Failed to load files.
Loading
Diff view
Diff view
Original file line number Diff line number Diff line change
Expand Up @@ -24,10 +24,10 @@ Testsigma displays informative tutorials while onboarding new users. By default,

1. From the left navigation bar, go to to **Settings > Preferences**.

![Navigate to Preferences](https://s3.amazonaws.com/static-docs.testsigma.com/new_images/projects/applications/Pref_Button_OT.png)
![Navigate to Preferences](https://s3.amazonaws.com/static-docs.testsigma.com/new_images/projects/faqs/update_onboarding_tutorials_1.png)

2. Disable the toggle on **Disable Onboarding Tutorials**.

![Onboarding Tutorial Toggle](https://s3.amazonaws.com/static-docs.testsigma.com/new_images/projects/applications/DisableToggle_OT.png)
![Onboarding Tutorial Toggle](https://s3.amazonaws.com/static-docs.testsigma.com/new_images/projects/faqs/update_onboarding_tutorials_2.png)

---
6 changes: 3 additions & 3 deletions src/pages/docs/agent/connect-android-local-devices.md
Original file line number Diff line number Diff line change
Expand Up @@ -51,15 +51,15 @@ Testsigma allows you to run tests on your local Android devices in addition to T


6. Navigate to **Agents** page in Testsigma app and click on the registered agent.
![Agents](https://s3.amazonaws.com/static-docs.testsigma.com/new_images/projects/applications/slaapge.png)
![Agents](https://s3.amazonaws.com/static-docs.testsigma.com/new_images/projects/test_cases/update_android_device_1.png)


7. Under **Devices**, you can see the device that is connected to the registered agent as shown below.
![Devices](https://s3.amazonaws.com/static-docs.testsigma.com/new_images/projects/applications/sladevices.png)
![Devices](https://s3.amazonaws.com/static-docs.testsigma.com/new_images/projects/test_cases/update_android_device_2.png)


8. To execute android tests on this Device, you can select the **Connected Machine** and **Device**.
![Connected Machine](https://s3.amazonaws.com/static-docs.testsigma.com/new_images/projects/applications/slacmd.png)
![Connected Machine](https://s3.amazonaws.com/static-docs.testsigma.com/new_images/projects/test_cases/update_android_device_3.png)


[[info | NOTE:]]
Expand Down
35 changes: 14 additions & 21 deletions src/pages/docs/agent/trigger-tests-locally.md
Original file line number Diff line number Diff line change
Expand Up @@ -34,39 +34,32 @@ With Testsigma, you can execute the tests on local devices from another device u
## **Steps to Trigger Tests on Local Devices**

1. Install and register **Testsigma Agent** on the target machine.
![Install Agent](https://s3.amazonaws.com/static-docs.testsigma.com/new_images/projects/applications/laltsagins.png)
![Install Agent](https://s3.amazonaws.com/static-docs.testsigma.com/new_images/projects/collaboration/update_trigger_1.png)

1. Navigate to **Test Plans** from the **Dashboard** and select the Test Plan where you want to add local machines.
![Test Plans](https://s3.amazonaws.com/static-docs.testsigma.com/new_images/projects/applications/lalnavtp.png)
2. Navigate to **Test Plans** from the **Dashboard** and select the Test Plan where you want to add local machines.
![Test Plans](https://s3.amazonaws.com/static-docs.testsigma.com/new_images/projects/collaboration/update_trigger_2.png)

1. Click on **Edit**.
![Edit](https://s3.amazonaws.com/static-docs.testsigma.com/new_images/projects/applications/laledit.png)
3. Click on **Edit**.
![Edit](https://s3.amazonaws.com/static-docs.testsigma.com/new_images/projects/collaboration/update_trigger_3.png)

1. On the **Add Test Suites & Link Machine Profiles** sections, click on **Link Test Machine**.
![Link Test Machines](https://s3.amazonaws.com/static-docs.testsigma.com/new_images/projects/applications/lalltms.png)
4. On the **Add Test Suites & Link Machine Profiles** sections, click on **Link Test Machine**.
![Link Test Machines](https://s3.amazonaws.com/static-docs.testsigma.com/new_images/projects/collaboration/update_trigger_4.png)

1. On **Select test machine profiles** overlay, click on **Add Machine**.
![Add Machine](https://s3.amazonaws.com/static-docs.testsigma.com/new_images/projects/applications/lalatm.png)
5. On **Select test machine profiles** overlay, click on **Add Machine**.
![Add Machine](https://s3.amazonaws.com/static-docs.testsigma.com/new_images/projects/collaboration/update_trigger_5.png)

1. On **Add test machine/device profile** overlay, add **Name**, select **Local Devices**, active agent on **Connected Machine** dropdown, and **Browser**. Click on **Create Profile**.
![Create Profile](https://s3.amazonaws.com/static-docs.testsigma.com/new_images/projects/applications/lalcp.png)
6. On **Add test machine/device profile** overlay, add **Name**, select **Local Devices**, active agent on **Connected Machine** dropdown, and **Browser**. Click on **Create Profile**.
![Create Profile](https://s3.amazonaws.com/static-docs.testsigma.com/new_images/projects/collaboration/update_trigger_6.png)
Comment on lines +45 to +52
Copy link
Copy Markdown
Contributor

Choose a reason for hiding this comment

The reason will be displayed to describe this comment to others. Learn more.

⚠️ Potential issue | 🟡 Minor

Tighten wording for clarity in setup instructions.

Line 45 and Line 51 read awkwardly and may confuse users during profile configuration. Recommend a grammar cleanup.

✏️ Proposed doc wording fix
-4. On the **Add Test Suites & Link Machine Profiles** sections, click on **Link Test Machine**. 
+4. In the **Add Test Suites & Link Machine Profiles** section, click **Link Test Machine**. 

-6. On **Add test machine/device profile** overlay, add **Name**, select **Local Devices**, active agent on **Connected Machine** dropdown, and **Browser**. Click on **Create Profile**. 
+6. In the **Add test machine/device profile** overlay, enter a **Name**, select **Local Devices**, choose an active agent from the **Connected Machine** dropdown, and select a **Browser**. Then click **Create Profile**.
📝 Committable suggestion

‼️ IMPORTANT
Carefully review the code before committing. Ensure that it accurately replaces the highlighted code, contains no missing lines, and has no issues with indentation. Thoroughly test & benchmark the code to ensure it meets the requirements.

Suggested change
4. On the **Add Test Suites & Link Machine Profiles** sections, click on **Link Test Machine**.
![Link Test Machines](https://s3.amazonaws.com/static-docs.testsigma.com/new_images/projects/collaboration/update_trigger_4.png)
1. On **Select test machine profiles** overlay, click on **Add Machine**.
![Add Machine](https://s3.amazonaws.com/static-docs.testsigma.com/new_images/projects/applications/lalatm.png)
5. On **Select test machine profiles** overlay, click on **Add Machine**.
![Add Machine](https://s3.amazonaws.com/static-docs.testsigma.com/new_images/projects/collaboration/update_trigger_5.png)
1. On **Add test machine/device profile** overlay, add **Name**, select **Local Devices**, active agent on **Connected Machine** dropdown, and **Browser**. Click on **Create Profile**.
![Create Profile](https://s3.amazonaws.com/static-docs.testsigma.com/new_images/projects/applications/lalcp.png)
6. On **Add test machine/device profile** overlay, add **Name**, select **Local Devices**, active agent on **Connected Machine** dropdown, and **Browser**. Click on **Create Profile**.
![Create Profile](https://s3.amazonaws.com/static-docs.testsigma.com/new_images/projects/collaboration/update_trigger_6.png)
4. In the **Add Test Suites & Link Machine Profiles** section, click **Link Test Machine**.
![Link Test Machines](https://s3.amazonaws.com/static-docs.testsigma.com/new_images/projects/collaboration/update_trigger_4.png)
5. On **Select test machine profiles** overlay, click on **Add Machine**.
![Add Machine](https://s3.amazonaws.com/static-docs.testsigma.com/new_images/projects/collaboration/update_trigger_5.png)
6. In the **Add test machine/device profile** overlay, enter a **Name**, select **Local Devices**, choose an active agent from the **Connected Machine** dropdown, and select a **Browser**. Then click **Create Profile**.
![Create Profile](https://s3.amazonaws.com/static-docs.testsigma.com/new_images/projects/collaboration/update_trigger_6.png)
🤖 Prompt for AI Agents
Verify each finding against the current code and only fix it if needed.

In `@src/pages/docs/agent/trigger-tests-locally.md` around lines 45 - 52, Reword
the two awkward sentences in the docs to be clearer: change "On the **Add Test
Suites & Link Machine Profiles** sections, click on **Link Test Machine**."
(from the Add Test Suites & Link Machine Profiles step) to something like "In
the Add Test Suites & Link Machine Profiles section, click Link Test Machine."
and change "On **Add test machine/device profile** overlay, add **Name**, select
**Local Devices**, active agent on **Connected Machine** dropdown, and
**Browser**." (from the Add test machine/device profile step) to a clearer
sequence such as "In the Add Test Machine/Device Profile overlay, enter a Name,
choose Local Devices, select the active agent from the Connected Machine
dropdown, and pick a Browser, then click Create Profile." Ensure the revised
sentences replace the originals in
src/pages/docs/agent/trigger-tests-locally.md.


1. Click on **Save Selection**.
![Save Selection](https://s3.amazonaws.com/static-docs.testsigma.com/new_images/projects/applications/lalss.png)
7. Click on **Save Selection**.
![Save Selection](https://s3.amazonaws.com/static-docs.testsigma.com/new_images/projects/collaboration/update_trigger_7.png)

Now, your test plan is ready for execution from any machine.

[[info | NOTE:]]
| You can edit & add the local machines to test suites from any device, provided you have the agent active in the target machine.

8. Navigate to the same test plan from any machine with the same account and click on **Run Now** to execute the Test Plan.
![Run Test Plan](https://s3.amazonaws.com/static-docs.testsigma.com/new_images/projects/applications/lalnmrn.png)


<br>


Here’s a quick GIF demonstrating triggering tests on local devices.
![Trigger Test Plans](https://s3.amazonaws.com/static-docs.testsigma.com/new_images/projects/applications/TriggerTP.gif)
![Run Test Plan](https://s3.amazonaws.com/static-docs.testsigma.com/new_images/projects/collaboration/update_trigger_8.png)

---
4 changes: 2 additions & 2 deletions src/pages/docs/collaboration/manage-execution-stops.md
Original file line number Diff line number Diff line change
Expand Up @@ -41,10 +41,10 @@ Super Admins control the stopping of executions by users in **Usage Details** an
## **Enabling Stop Executions Preference**

1. Navigate to **Settings** > **Preferences**.
![Preferences](https://s3.amazonaws.com/static-docs.testsigma.com/new_images/projects/applications/Enabling_Stop_Executions_Preference_1.1.png)
![Preferences](https://s3.amazonaws.com/static-docs.testsigma.com/new_images/projects/collaboration/update_control_execution_1.png)

2. Enable the toggle switch for the **Control Who Can Stop Executions** feature flag, which will be toggled off by default.
![Enable](https://s3.amazonaws.com/static-docs.testsigma.com/new_images/projects/applications/Enabling_Stop_Executions_Preference_2.png)
![Enable](https://s3.amazonaws.com/static-docs.testsigma.com/new_images/projects/collaboration/update_control_execution_2.png)


[[info | NOTE:]]
Expand Down
24 changes: 8 additions & 16 deletions src/pages/docs/configuration/manage-access.md
Original file line number Diff line number Diff line change
Expand Up @@ -12,9 +12,6 @@ contextual_links:
- type: link
name: "Prerequisites"
url: "#prerequisites"
- type: link
name: "Interactive Demo"
url: "#interactive-demo"
- type: link
name: "Managing Access"
url: "#managing-access"
Expand All @@ -41,32 +38,27 @@ Admin in the Testsigma account can grant temporary access to the Testsigma Suppo

---

## **Interactive Demo**

<div>
<script async src="https://js.storylane.io/js/v2/storylane.js"></script>
<div class="sl-embed" style="position:relative;padding-bottom:calc(57.41% + 25px);width:100%;height:0;transform:scale(1)">
<iframe loading="lazy" class="sl-demo" src="https://app.storylane.io/demo/nis6mcirsivm?embed=inline" name="sl-embed" allow="fullscreen" allowfullscreen style="position:absolute;top:0;left:0;width:100%!important;height:100%!important;border:1px solid rgba(63,95,172,0.35);box-shadow: 0px 0px 18px rgba(26, 19, 72, 0.15);border-radius:10px;box-sizing:border-box;"></iframe>
</div>
</div>

---

## **Managing Access**

1. From the **Dashboard**, go to **Settings > Admin Settings > Manage Access**.
![Manage Access](https://s3.amazonaws.com/static-docs.testsigma.com/new_images/projects/configuration/update_label_1.png)

2. In the **Manage Access** section, click **Allow Access**.
![Allow Access](https://s3.amazonaws.com/static-docs.testsigma.com/new_images/projects/configuration/update_label_2.png)

3. Select the **Access Type** from the available options.
![Access Type](https://s3.amazonaws.com/static-docs.testsigma.com/new_images/projects/configuration/update_label_3.png)

4. In the **Describe the Issue** field, briefly explain the reason for providing access.
![Describe the Issue](https://s3.amazonaws.com/static-docs.testsigma.com/new_images/projects/configuration/update_label_4.png)

5. Select the consent checkbox and click **Submit** to grant access.
![Submit](https://s3.amazonaws.com/static-docs.testsigma.com/new_images/projects/configuration/update_label_5.png)

6. View the **Current Status** and **Access Expiry** information on the same page.

7. Click **Manage** to update or revoke access as needed.
![Manage](https://s3.amazonaws.com/static-docs.testsigma.com/new_images/projects/configuration/update_label_7.png)

---

Expand All @@ -85,10 +77,10 @@ Admin in the Testsigma account can grant temporary access to the Testsigma Suppo
## **View Access Logs**

- View access-related logs by clicking **Activity** in the **Utility Panel**. The system stores logs for 3 years.
![Access Logs](https://s3.amazonaws.com/static-docs.testsigma.com/new_images/projects/manage-access/Manage_Access_Button.png)
![Access Logs](https://s3.amazonaws.com/static-docs.testsigma.com/new_images/projects/configuration/update_label_8.png)

- You can also view logs in the relevant test cases, elements, test suites, and test plans for actions performed by **Testsigma Guest**.
![Action Logs](https://s3.amazonaws.com/static-docs.testsigma.com/new_images/projects/applications/Test_New.png)
![Action Logs](https://s3.amazonaws.com/static-docs.testsigma.com/new_images/projects/configuration/update_label_9.png)


---
6 changes: 3 additions & 3 deletions src/pages/docs/continuous-integration/codeship-ci.md
Original file line number Diff line number Diff line change
Expand Up @@ -61,11 +61,11 @@ Testsigma offers powerful webhooks for triggering Testsigma executions remotely
![configure test pipelines in codeship CI](https://docs.testsigma.com/images/codeship-ci/configure-test-pipelines-codeship-CI.png)


1. Go to the Testsigma Executions page to get the execution ID. Refer to the [documentation on getting the execution ID](https://testsigma.com/docs/continuous-integration/get-test-plan-details/) and [documentation on generating API keys](https://testsigma.com/docs/configuration/api-keys/) as shown below:
![Get Test Plan ID](https://s3.amazonaws.com/static-docs.testsigma.com/new_images/projects/applications/trineid.png)
6. Go to the Testsigma Executions page to get the execution ID. Refer to the [documentation on getting the execution ID](https://testsigma.com/docs/continuous-integration/get-test-plan-details/) and [documentation on generating API keys](https://testsigma.com/docs/configuration/api-keys/) as shown below:
![Get Test Plan ID](https://s3.amazonaws.com/static-docs.testsigma.com/new_images/projects/continuous_integration/update_codeship_1.png)


1. Replace the **&lt;execution-ID&gt;**, **&lt;Username&gt;** and **&lt;Password&gt;** in the following script:
7. Replace the **&lt;execution-ID&gt;**, **&lt;Username&gt;** and **&lt;Password&gt;** in the following script:

Perl
Copy link
Copy Markdown
Contributor

Choose a reason for hiding this comment

The reason will be displayed to describe this comment to others. Learn more.

⚠️ Potential issue | 🟡 Minor

Fix the incorrect language label.

The code block is labeled as "Perl" but contains a bash script (indicated by the #!/bin/bash shebang and bash syntax). This mismatch could confuse users.

📝 Proposed fix
-Perl
+Bash

Or use the standard markdown code fence identifier:

-Perl
+```bash
📝 Committable suggestion

‼️ IMPORTANT
Carefully review the code before committing. Ensure that it accurately replaces the highlighted code, contains no missing lines, and has no issues with indentation. Thoroughly test & benchmark the code to ensure it meets the requirements.

Suggested change
Perl
Bash
🤖 Prompt for AI Agents
Verify each finding against the current code and only fix it if needed.

In `@src/pages/docs/continuous-integration/codeship-ci.md` at line 70, The code
block is mislabeled "Perl" but begins with the bash shebang "#!/bin/bash";
update the markdown fence label from "Perl" to "bash" (or "sh") for the block
that contains the "#!/bin/bash" shebang so syntax highlighting matches the
script, e.g., replace the "Perl" identifier with "bash" or use a triple-backtick
fence labeled bash.


Expand Down
17 changes: 8 additions & 9 deletions src/pages/docs/elements/android-apps/record-multiple-elements.md
Original file line number Diff line number Diff line change
Expand Up @@ -38,15 +38,15 @@ When automating test cases for an android application, you can capture multiple
## **Steps to Record Multiple Elements**

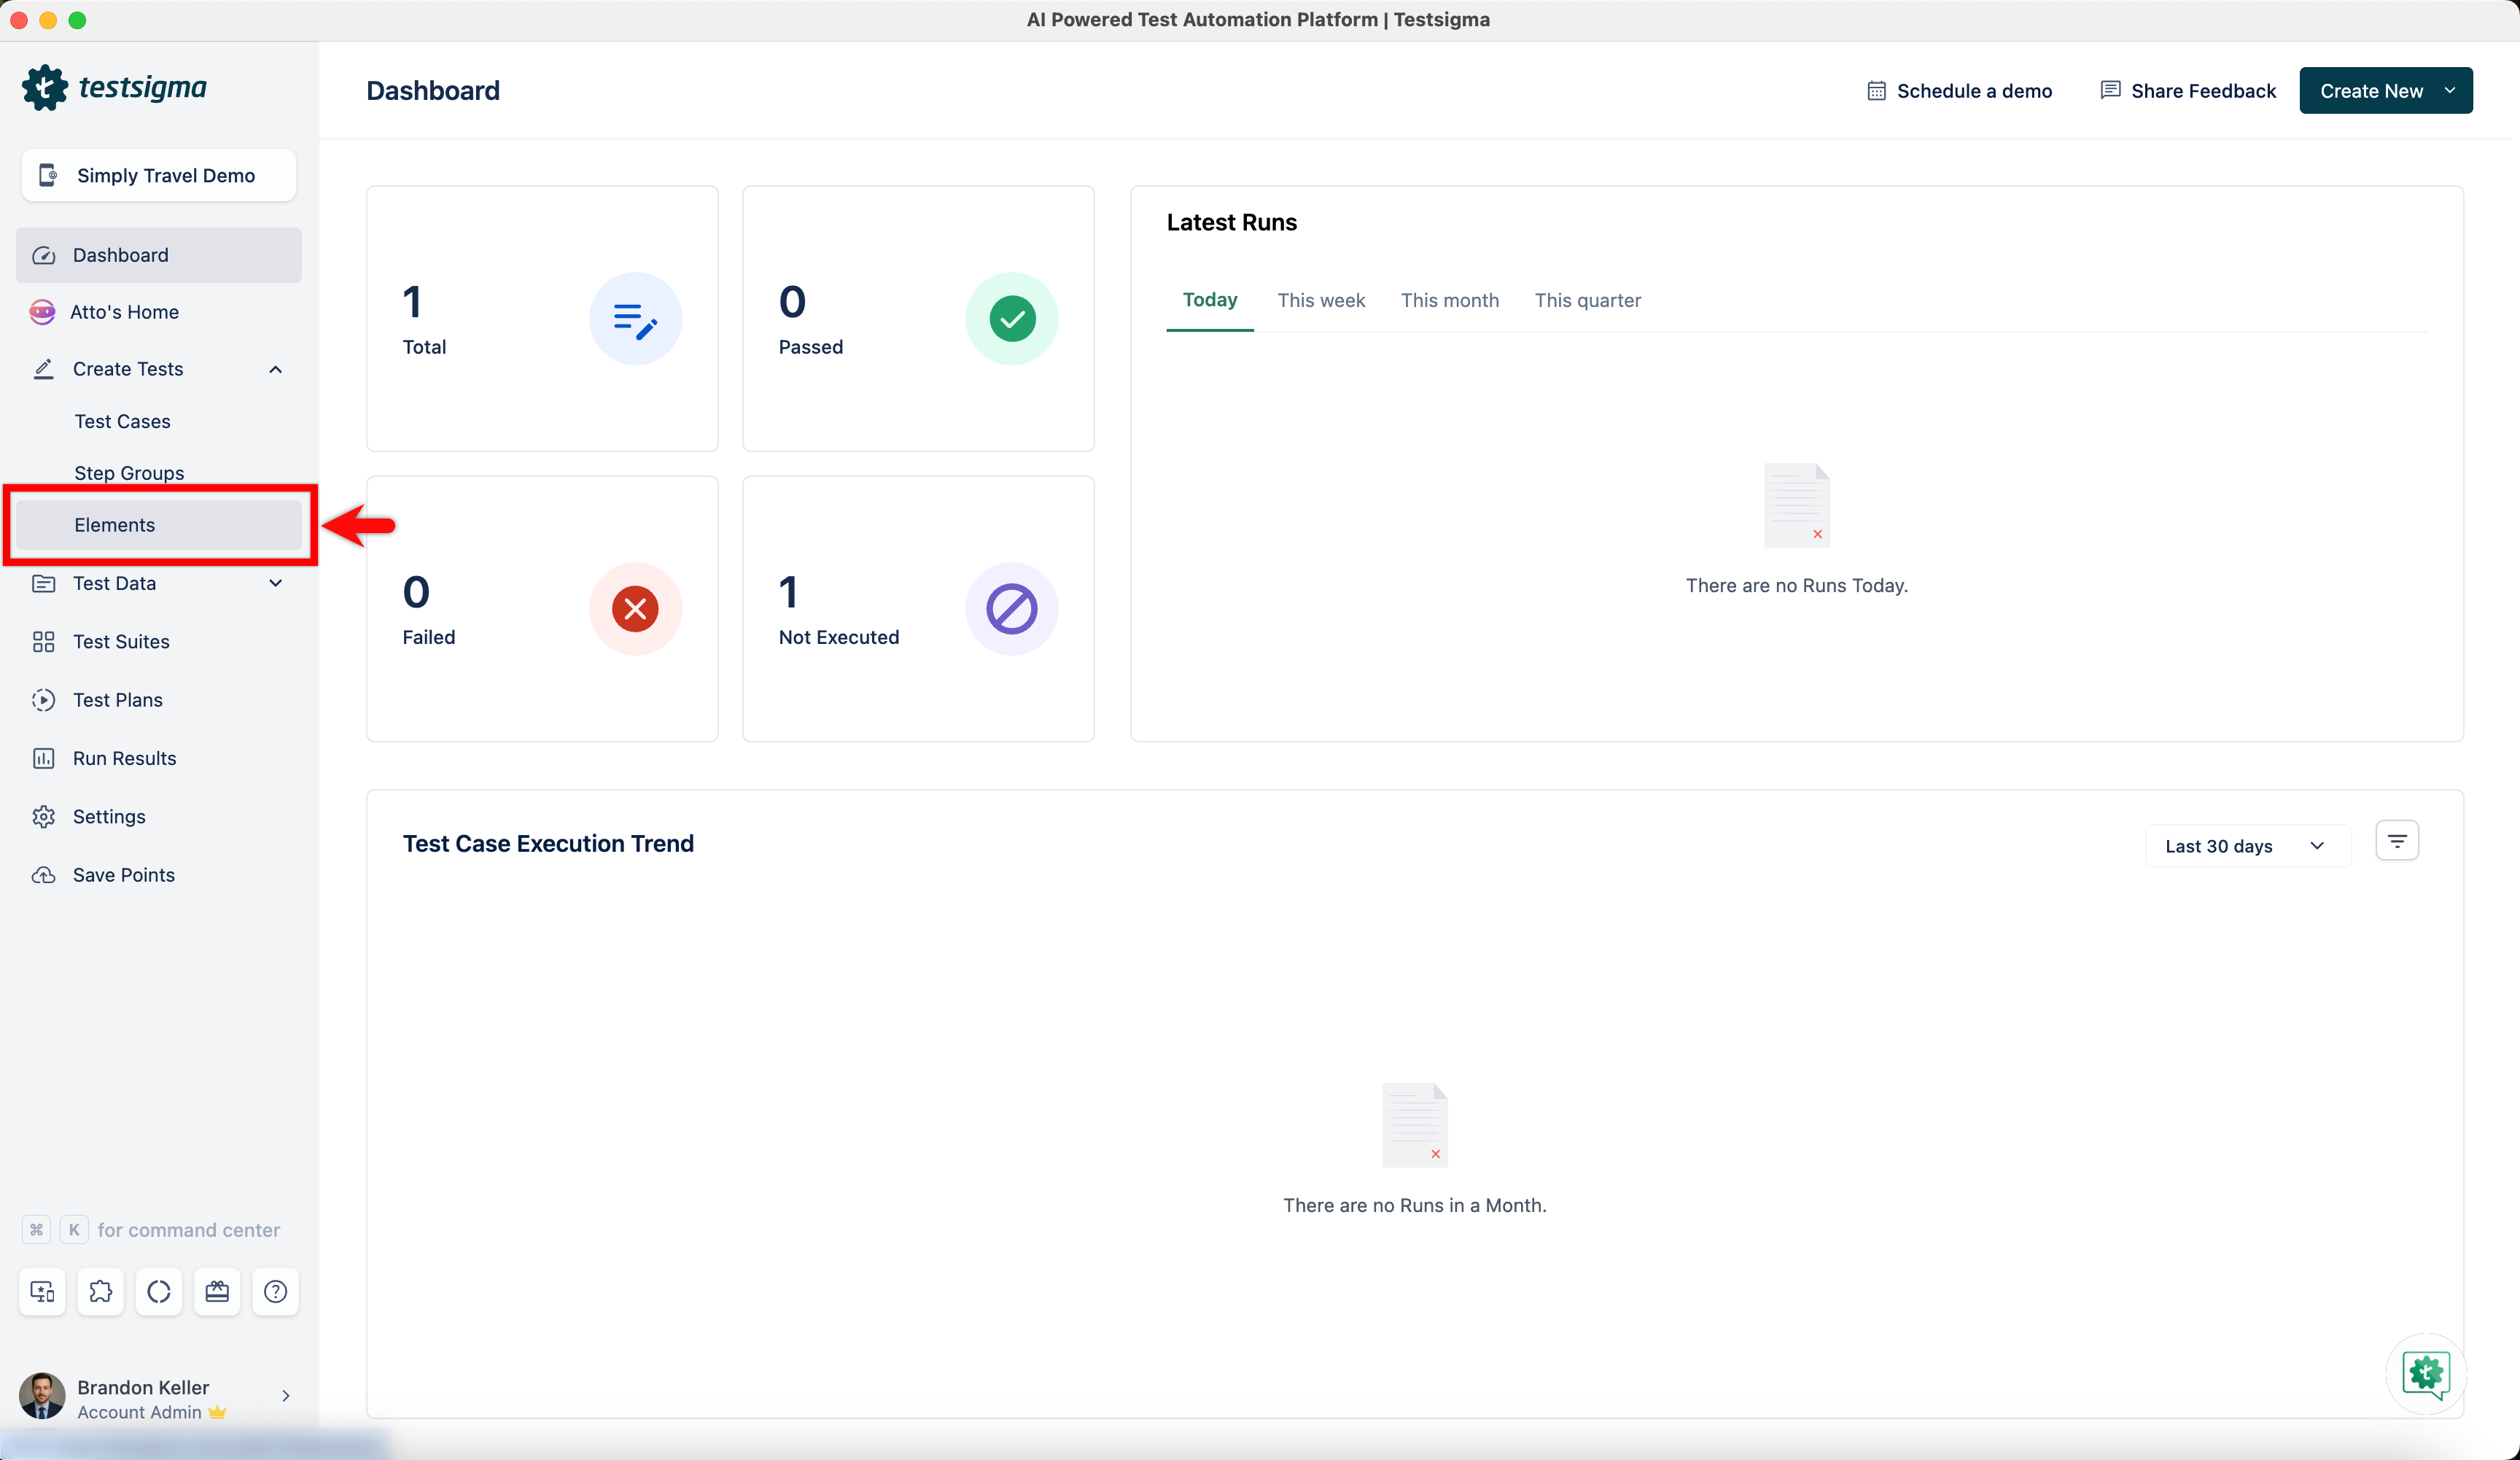
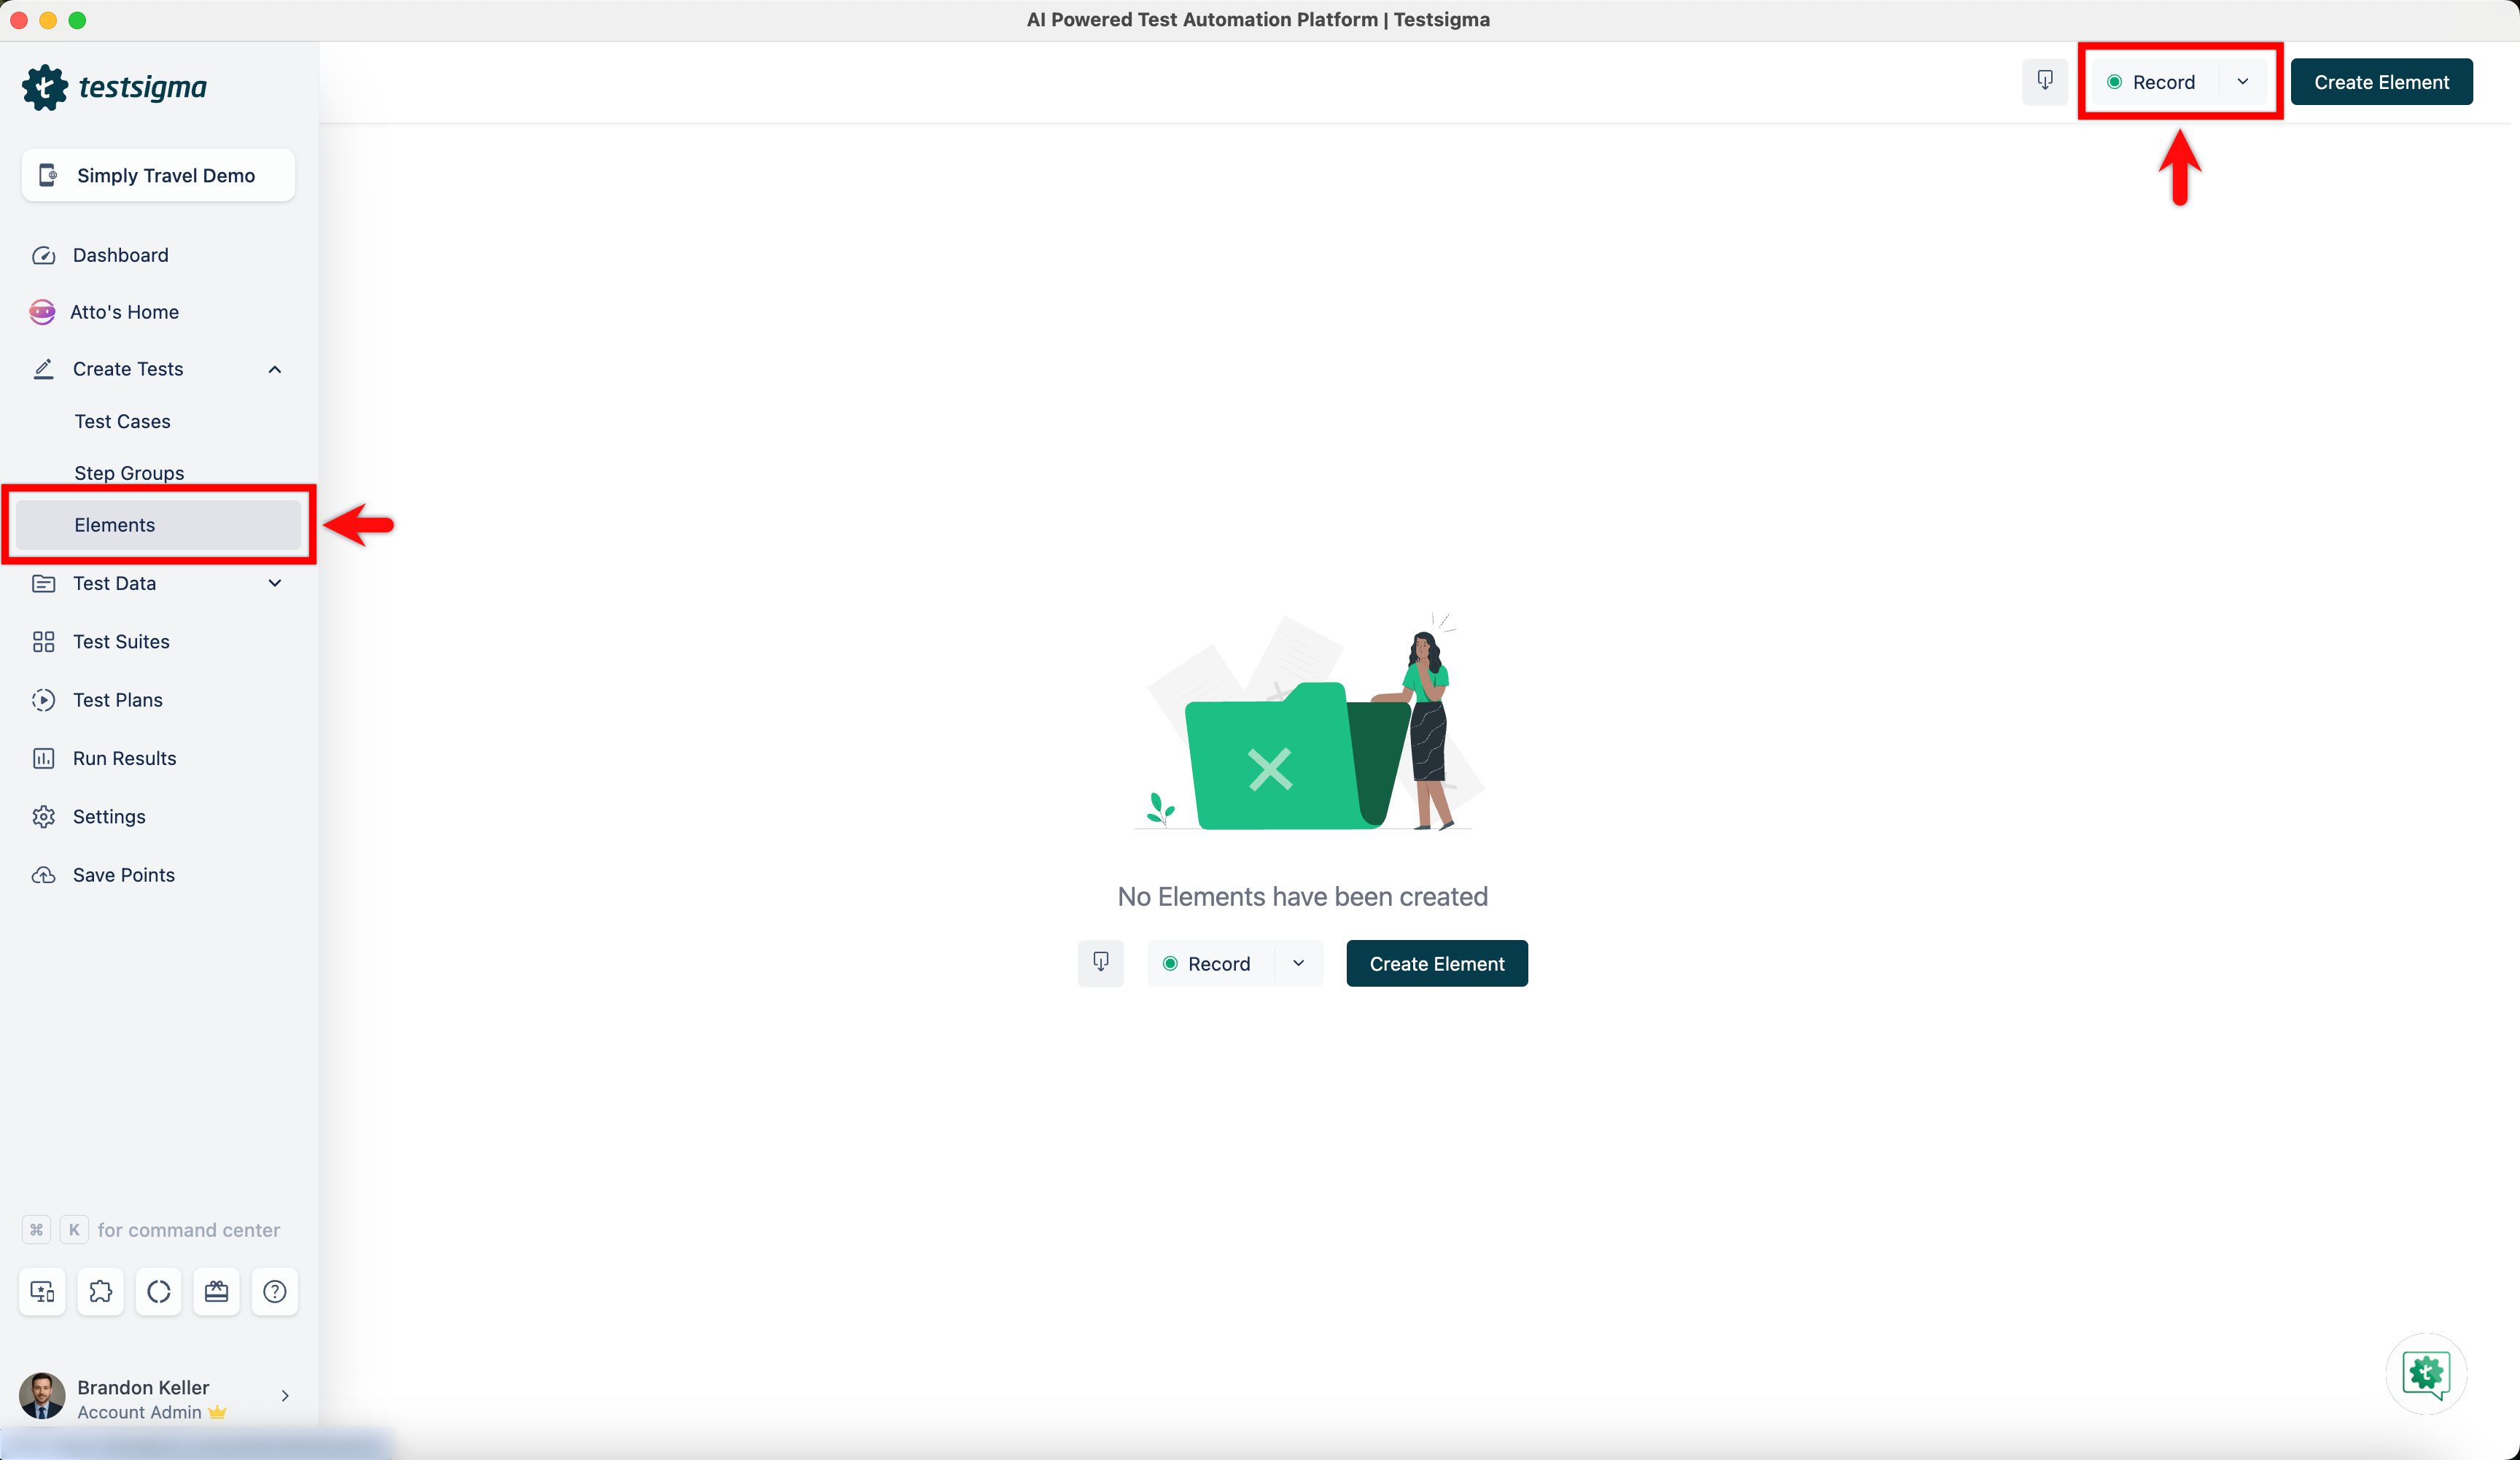
1. From the left navigation bar, go to **Create Tests > Elements**.
![Elements](https://s3.amazonaws.com/static-docs.testsigma.com/new_images/projects/applications/reandnavelm.png)
![Elements](https://s3.amazonaws.com/static-docs.testsigma.com/new_images/projects/elements/update_elements_android_1.png)


2. Click on **Record**.
![Record](https://s3.amazonaws.com/static-docs.testsigma.com/new_images/projects/applications/andelmcorec.png)
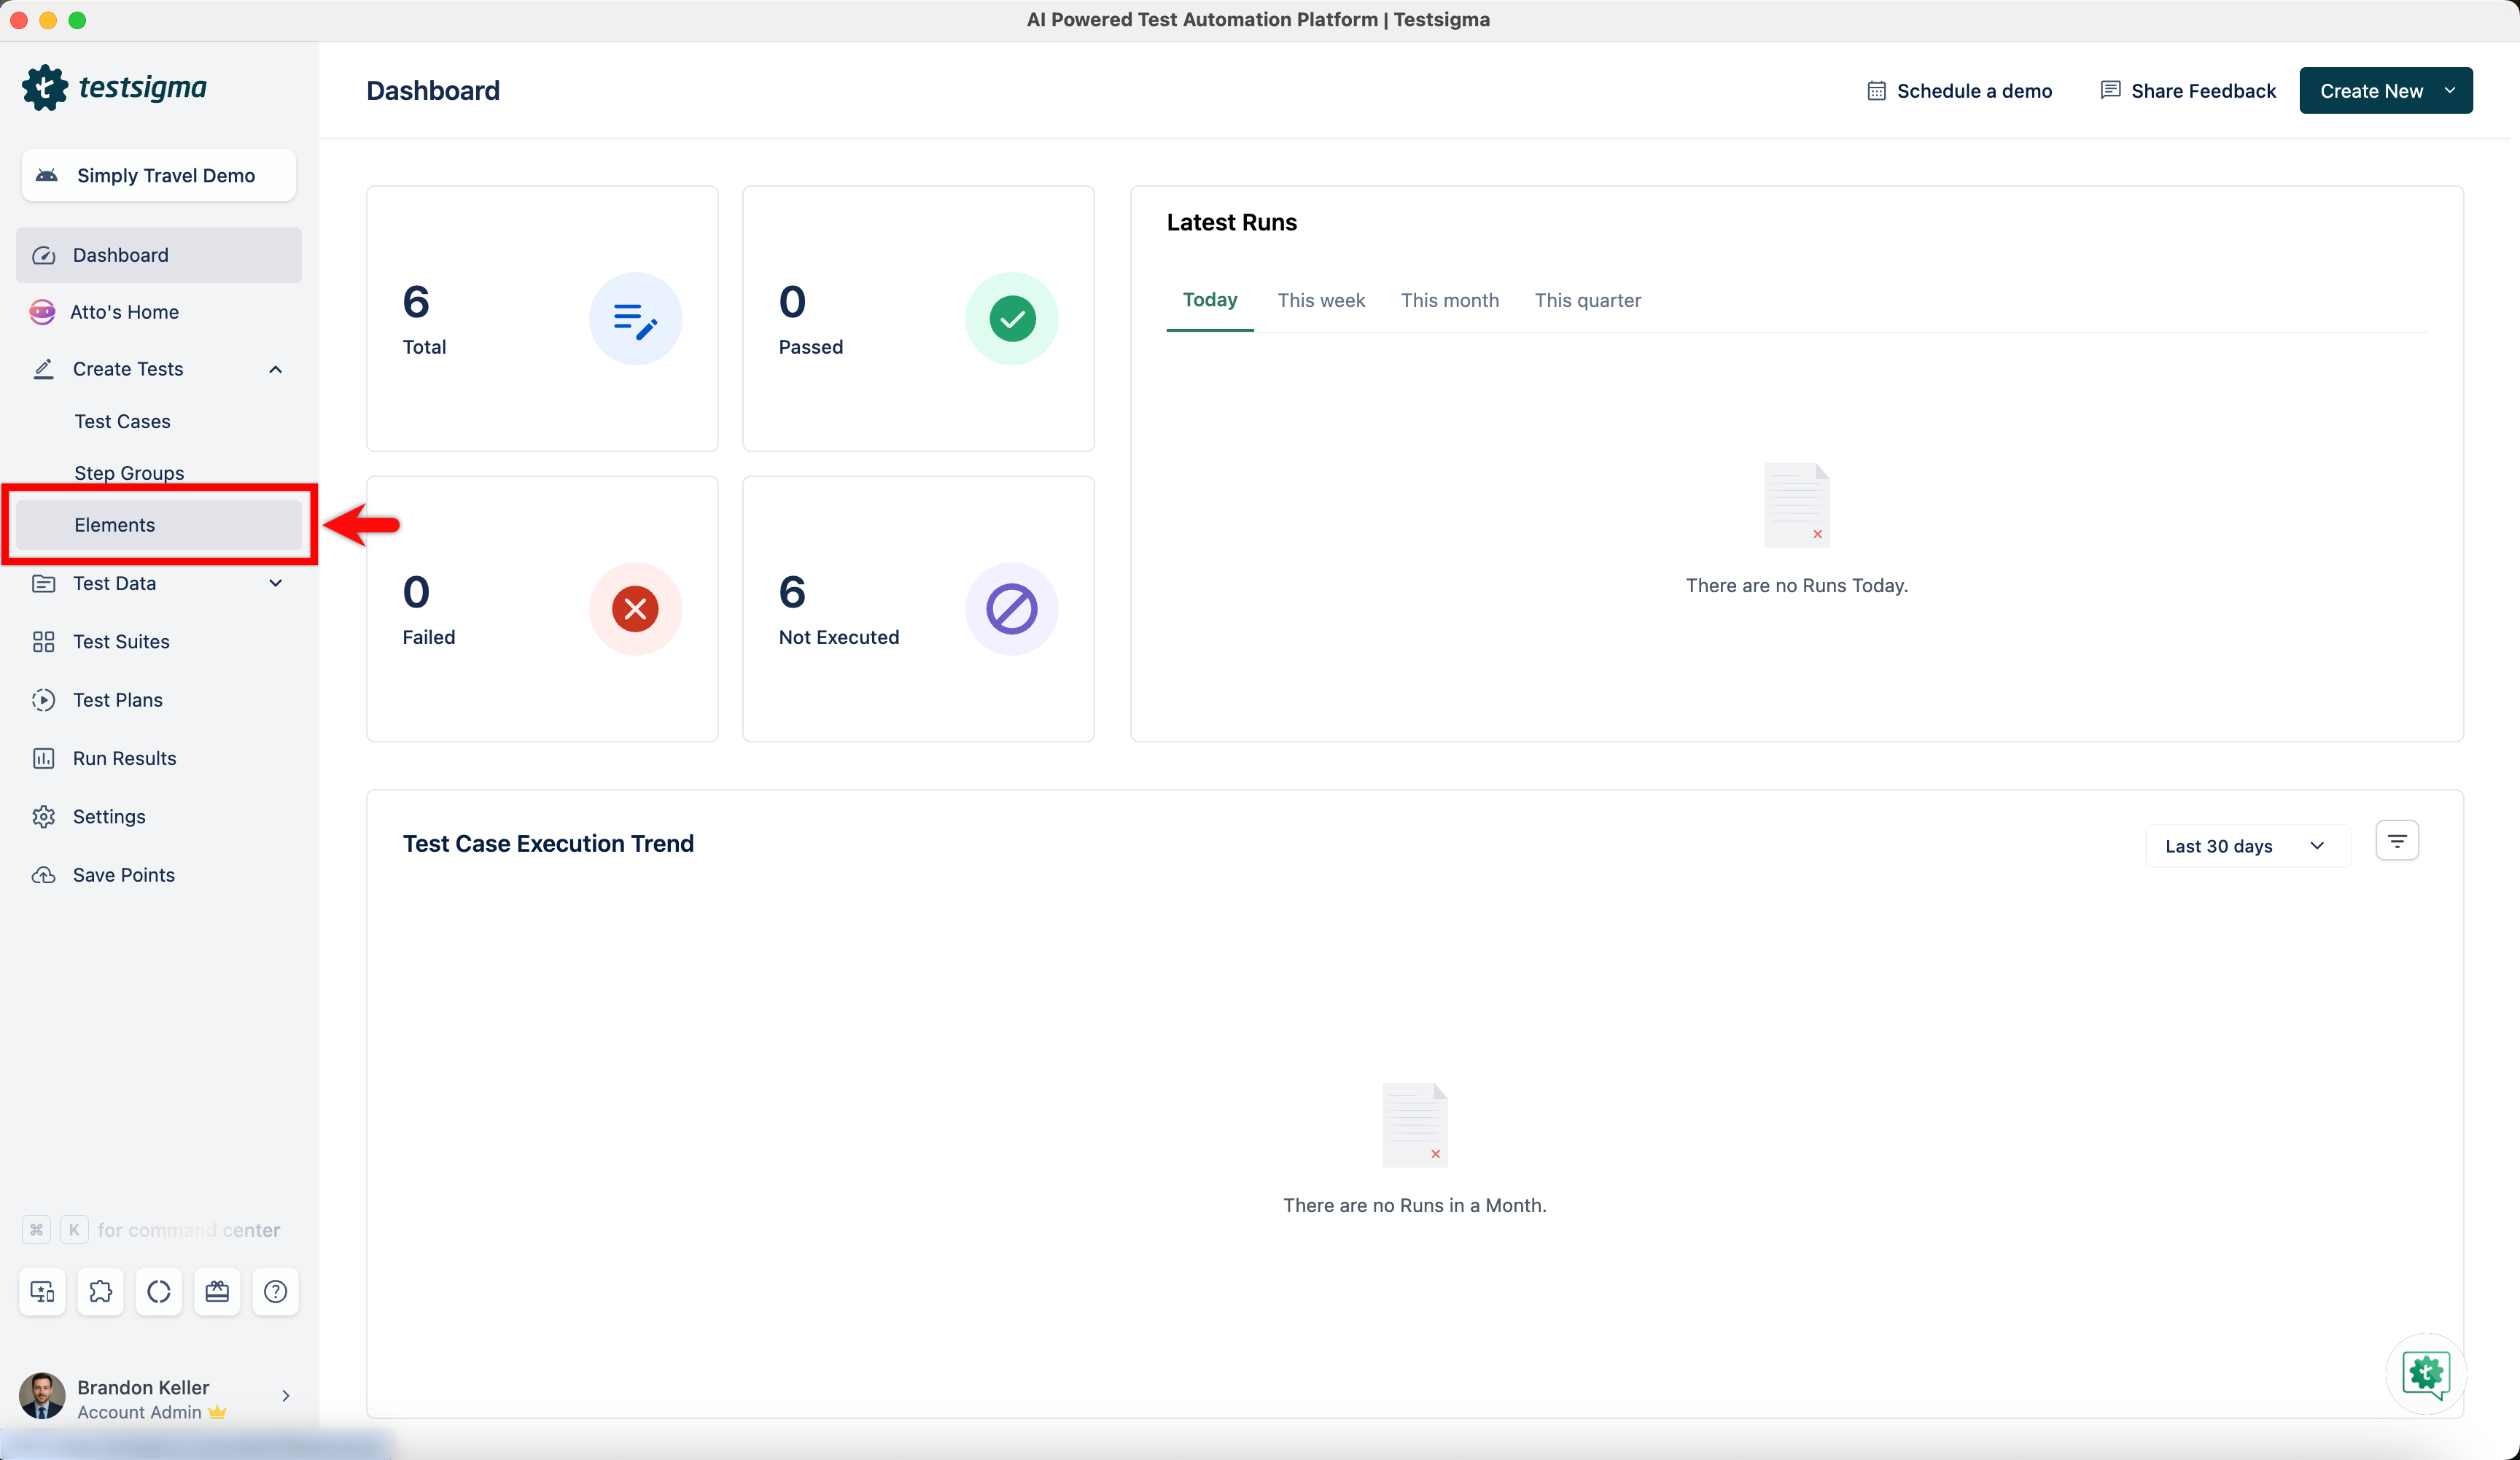
2. Click **Record**.
![Record](https://s3.amazonaws.com/static-docs.testsigma.com/new_images/projects/elements/update_elements_android_2.png)


3. On **Record Elements** overlay, select **Test Lab**, **Test Machine**, **Upload App Source** and click on **Record**.
![Record](https://s3.amazonaws.com/static-docs.testsigma.com/new_images/projects/applications/andelmreovdtls.png)
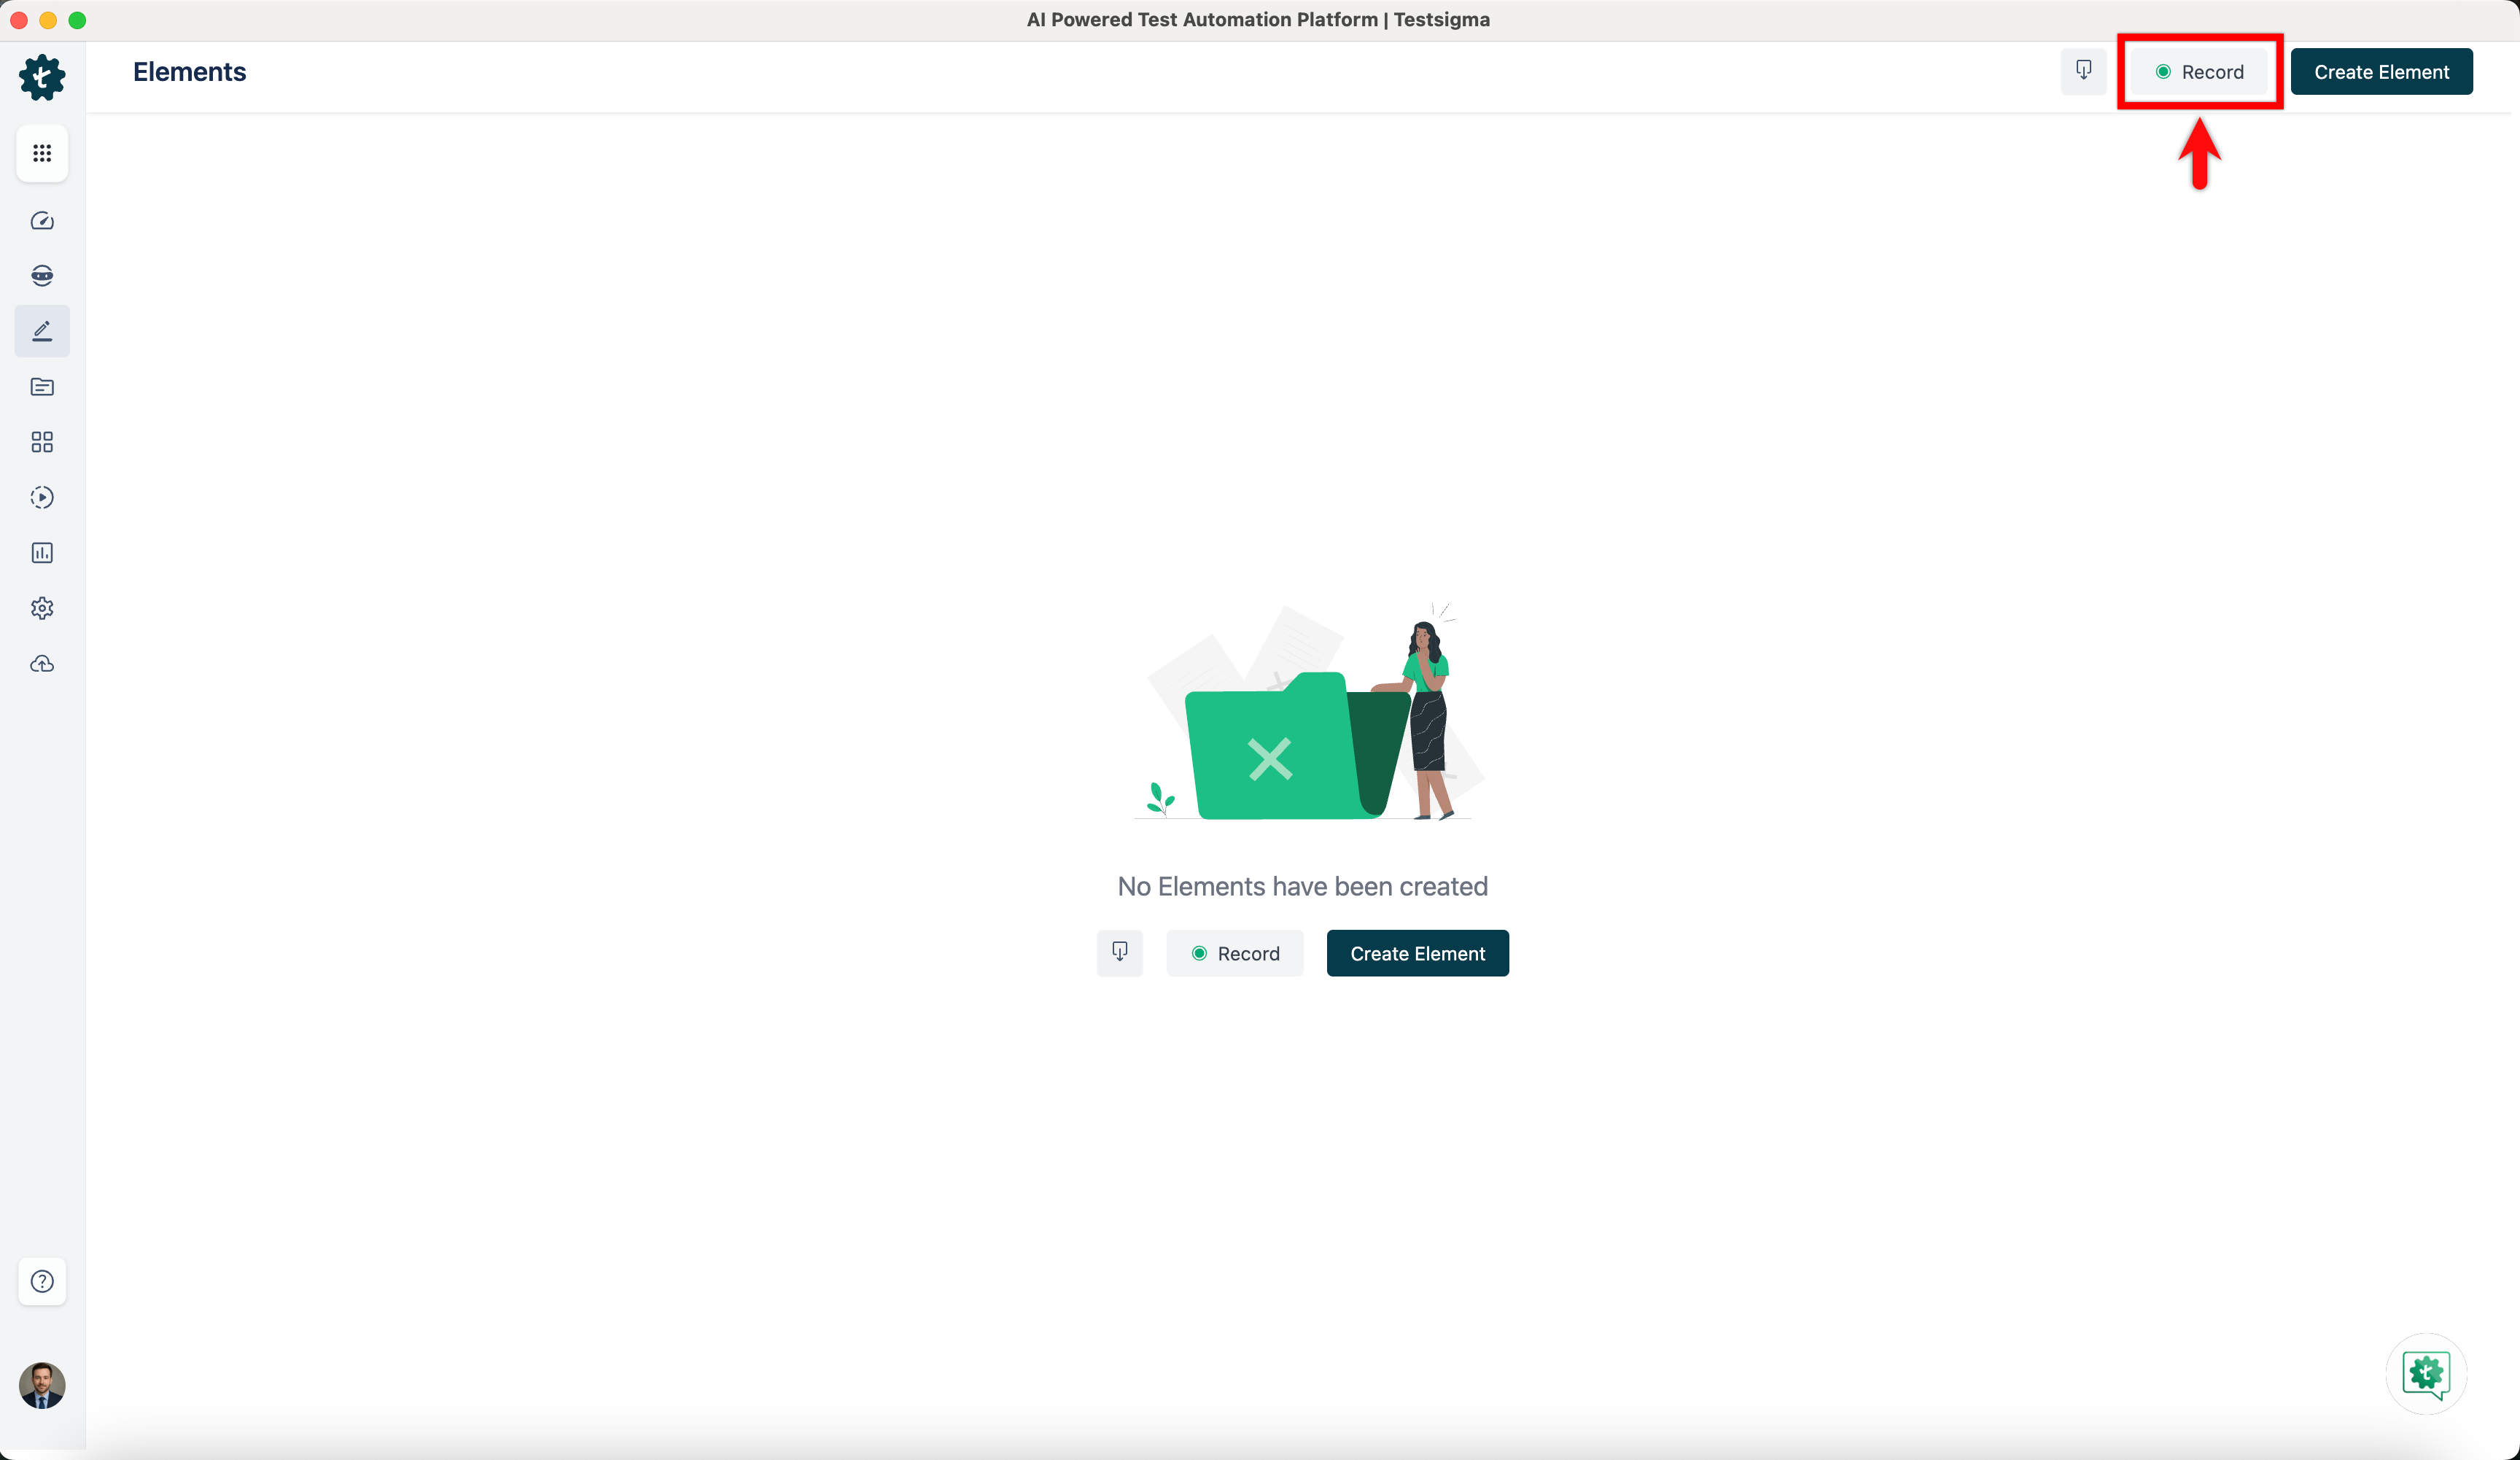
3. In the **Record Elements** overlay, select **Test Lab**, **Test Machine**, **Upload App Source** and click on **Record**.
![Record](https://s3.amazonaws.com/static-docs.testsigma.com/new_images/projects/elements/update_elements_android_3.png)


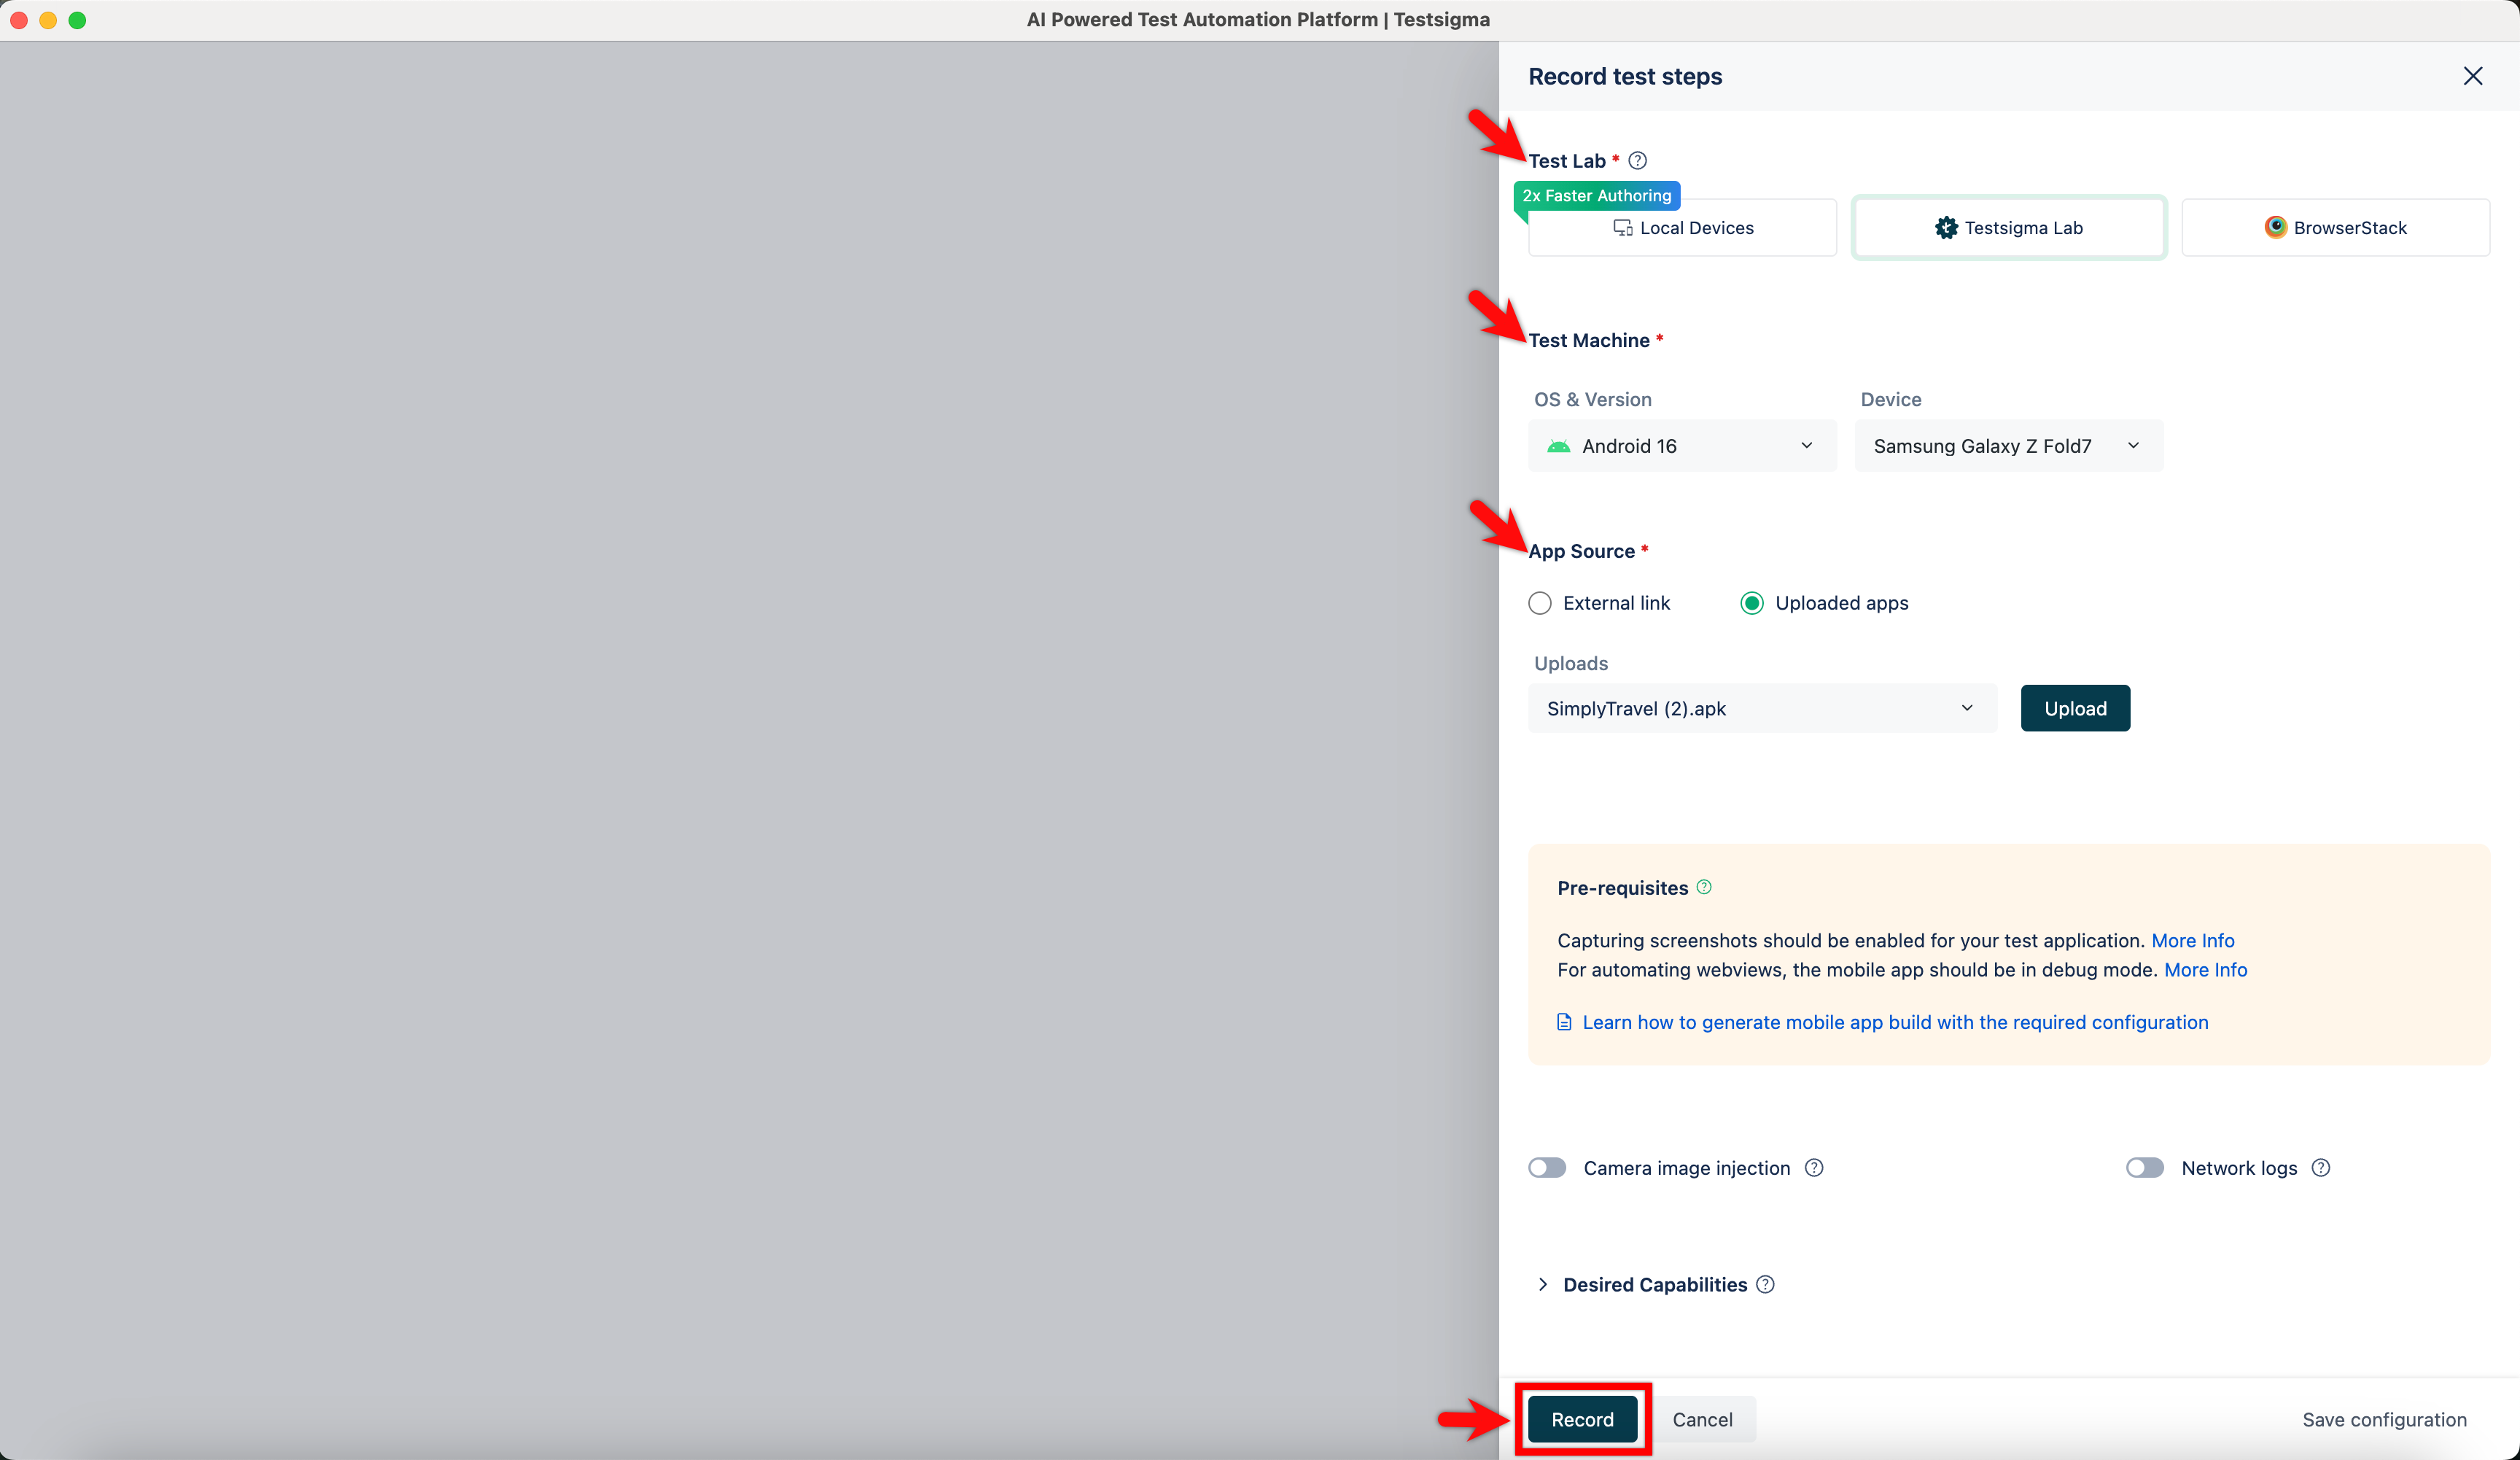
4. Wait for the app to load fully.
Expand All @@ -55,11 +55,11 @@ When automating test cases for an android application, you can capture multiple
5. Once the app is loaded, click on element you want to capture.


6. On the **Create Element** section, validate the **Name**, **Screen Name**, **Element Type**, and the **Value**.
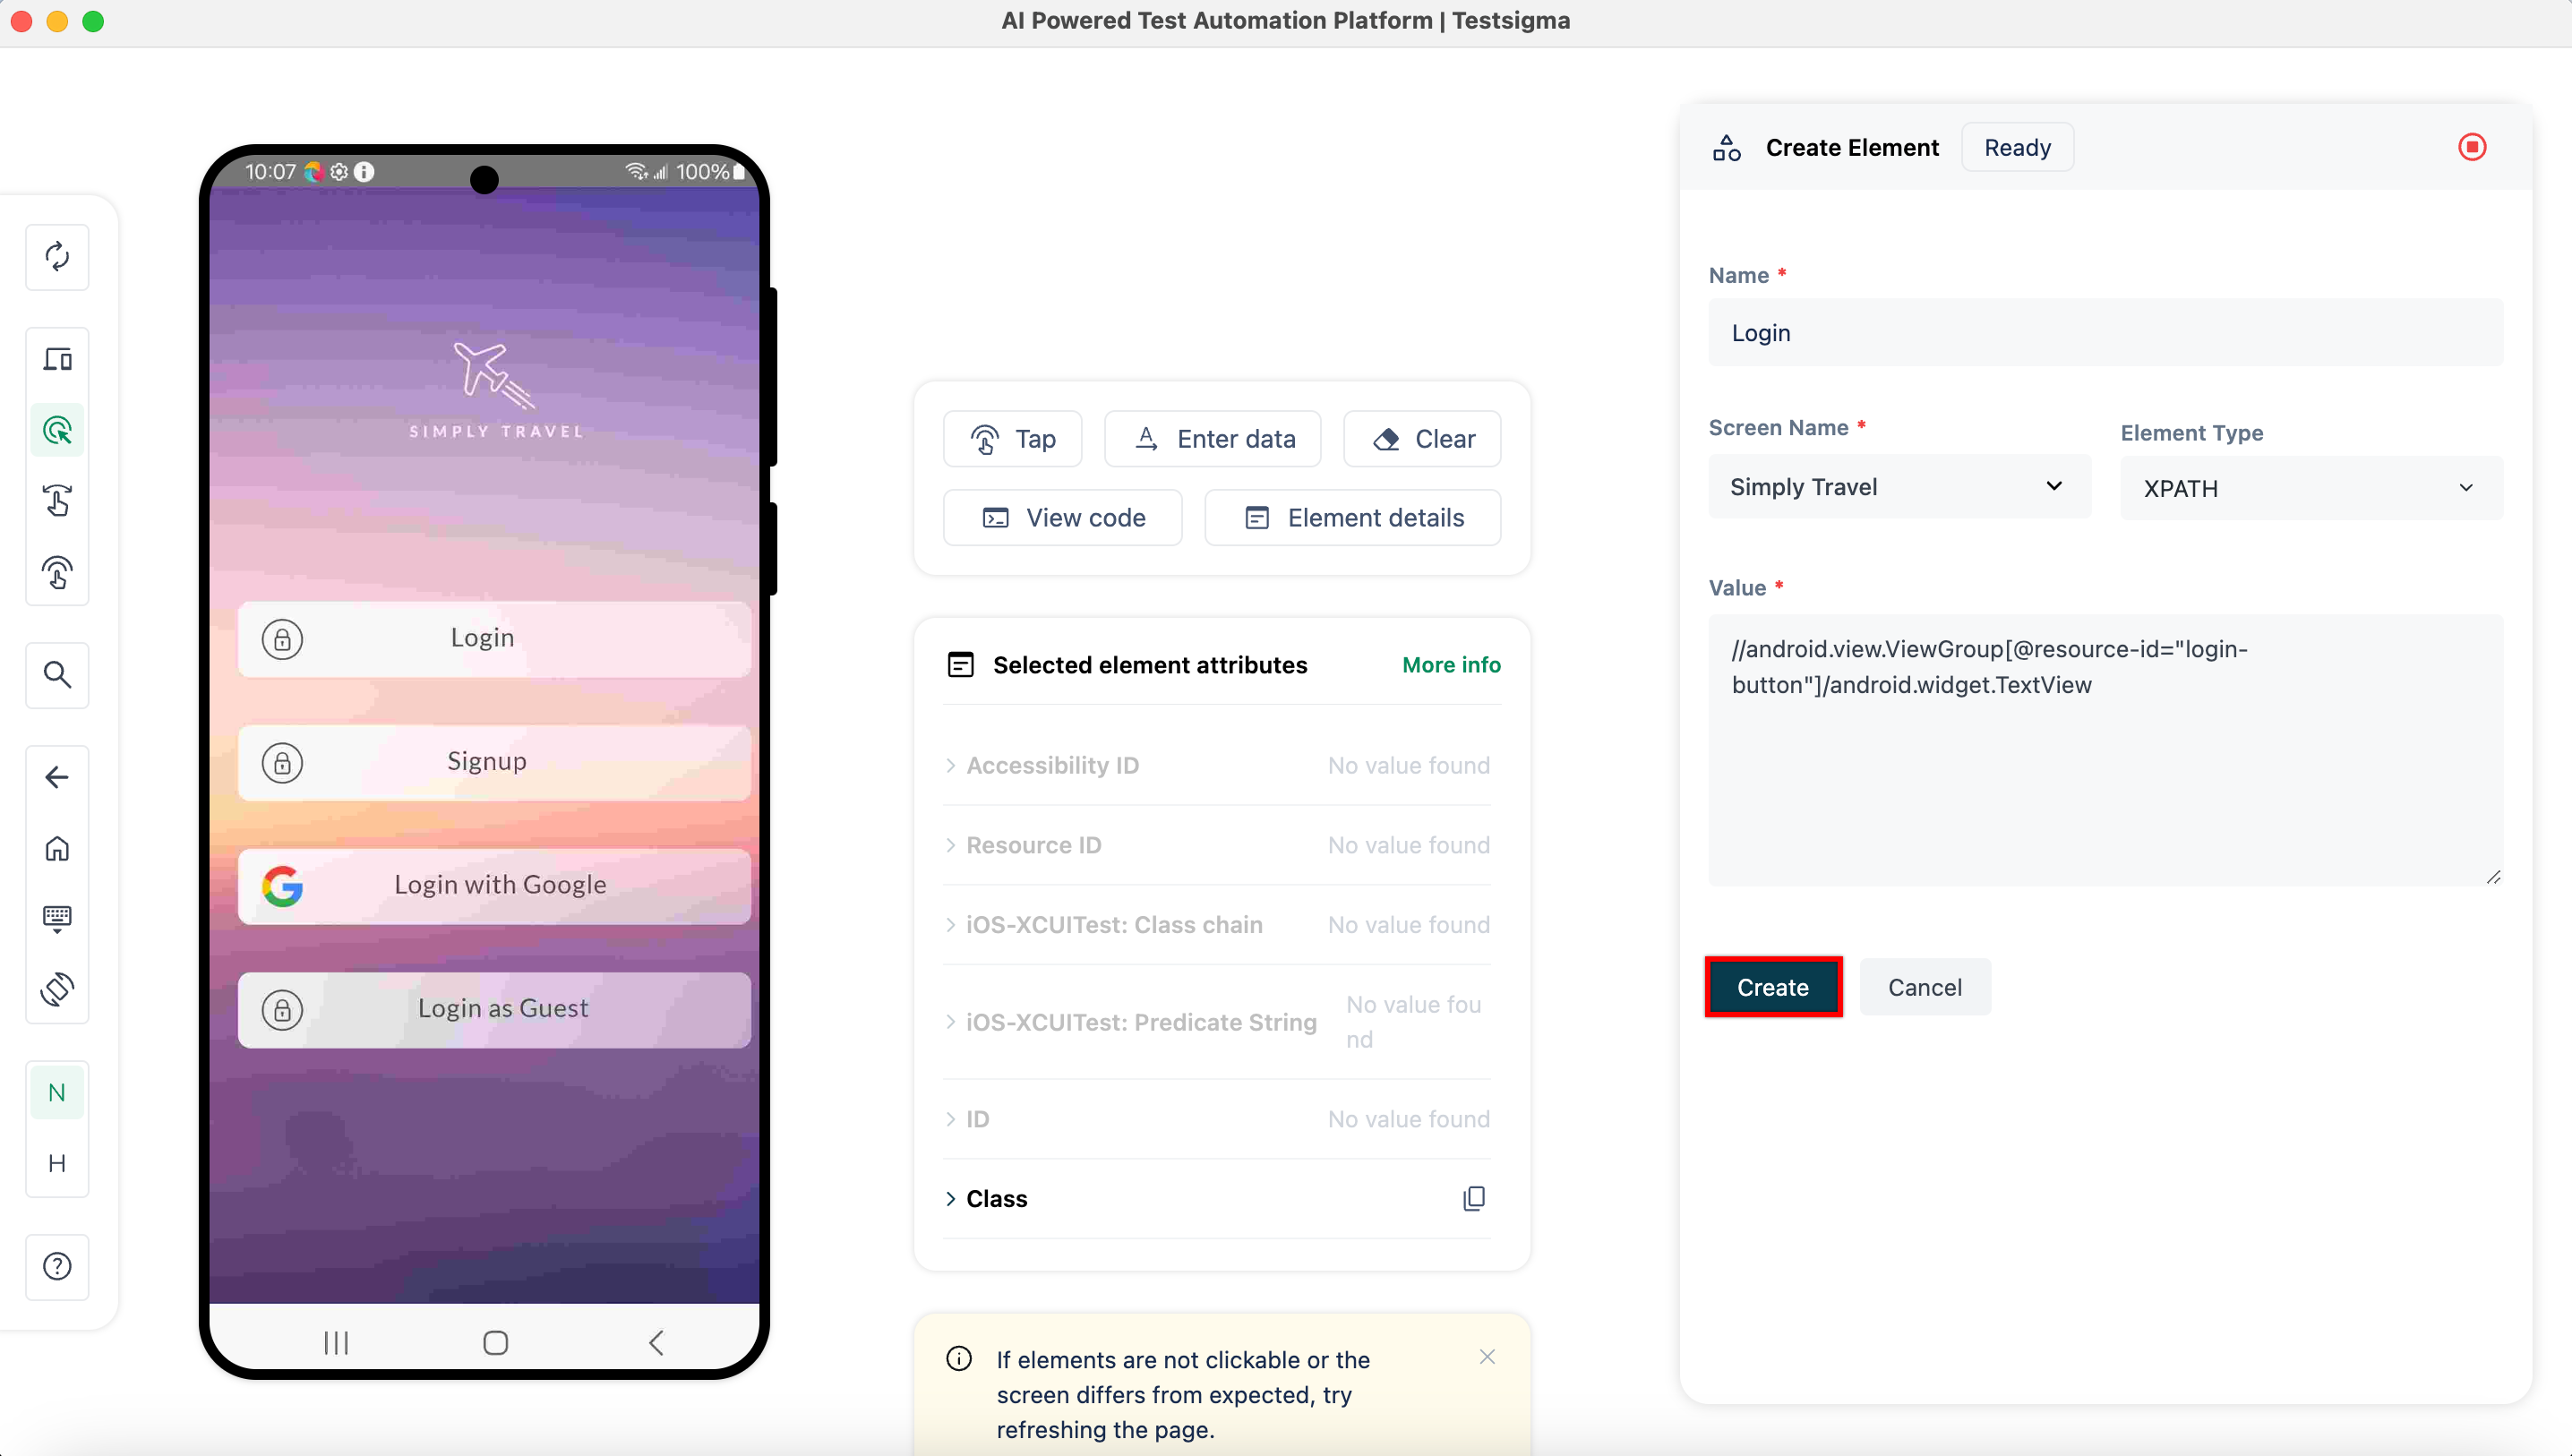
6. In the **Create Element** section, validate the **Name**, **Screen Name**, **Element Type**, and the **Value**.
![Create Element](https://s3.amazonaws.com/static-docs.testsigma.com/new_images/projects/applications/andelmcelm.png)


7. Click on **Create**.
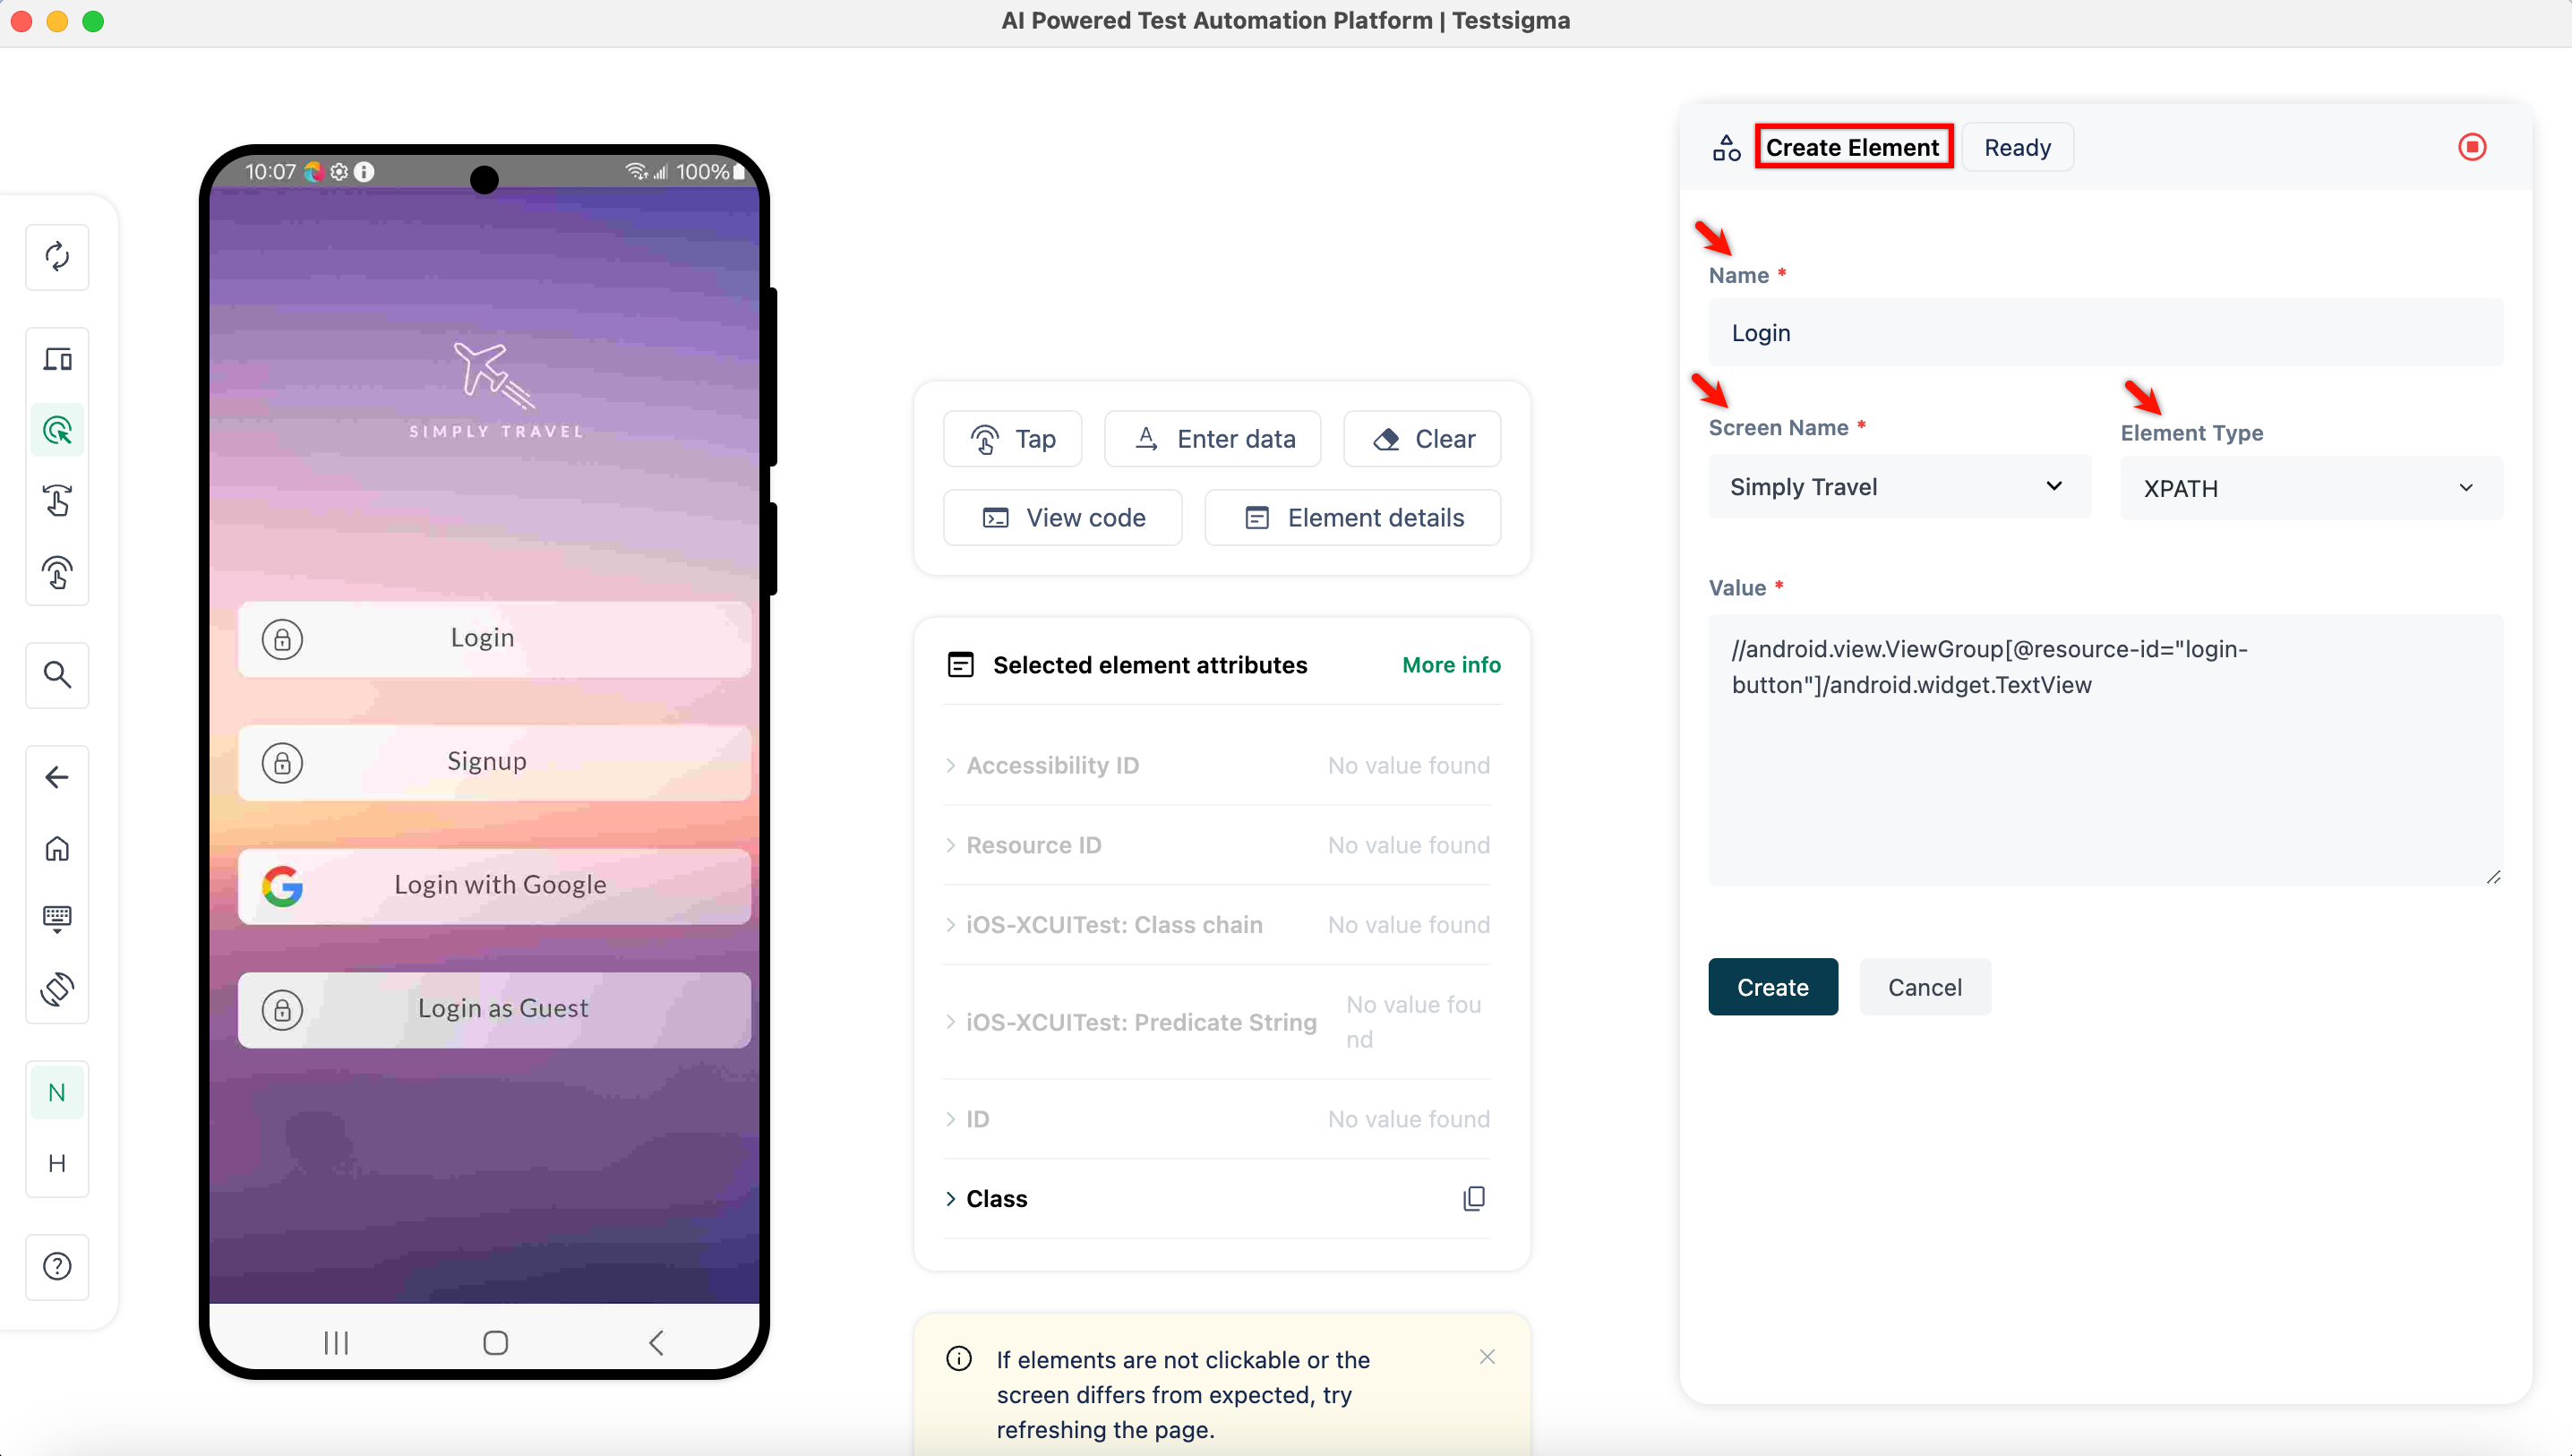
7. Click **Create**.
![Create](https://s3.amazonaws.com/static-docs.testsigma.com/new_images/projects/applications/andelmcocelm.png)


Expand All @@ -69,10 +69,9 @@ When automating test cases for an android application, you can capture multiple

9. Repeat steps 5 to 7 for every element you want to capture.

10. Once you have captured the elements, click on **Stop Recording**.
10. Once you have captured the elements, click **Stop Recording**.
Copy link
Copy Markdown
Contributor

Choose a reason for hiding this comment

The reason will be displayed to describe this comment to others. Learn more.

⚠️ Potential issue | 🟡 Minor

Fix spacing in Step 10 for cleaner rendering.

Line 72 has extra spaces (10. Once... and click **Stop Recording**). Please normalize to single spaces.

🤖 Prompt for AI Agents
Verify each finding against the current code and only fix it if needed.

In `@src/pages/docs/elements/android-apps/record-multiple-elements.md` at line 72,
Step 10 contains double spaces around the ordinal and before the bold text;
update the line that currently reads "10.  Once you have captured the elements,
click  **Stop Recording**." to use single spaces: "10. Once you have captured
the elements, click **Stop Recording**." — locate the markdown line containing
"Once you have captured the elements" and "Stop Recording" and normalize the
spacing accordingly.

![Stop Recording](https://s3.amazonaws.com/static-docs.testsigma.com/new_images/projects/applications/andelmall.png)

11. You'll be redirected to the **Elements** page, where you can see all recorded elements.
![All Elements](https://s3.amazonaws.com/static-docs.testsigma.com/new_images/projects/applications/andelmallelms.png)

---
Original file line number Diff line number Diff line change
Expand Up @@ -36,27 +36,26 @@ In dynamic websites, elements can have varying attributes/properties across sess

## **Steps to Create an Element**

1. Navigate to **Create Tests > Elements**.
![Elements](https://s3.amazonaws.com/static-docs.testsigma.com/new_images/projects/applications/mwaecnavel.png)
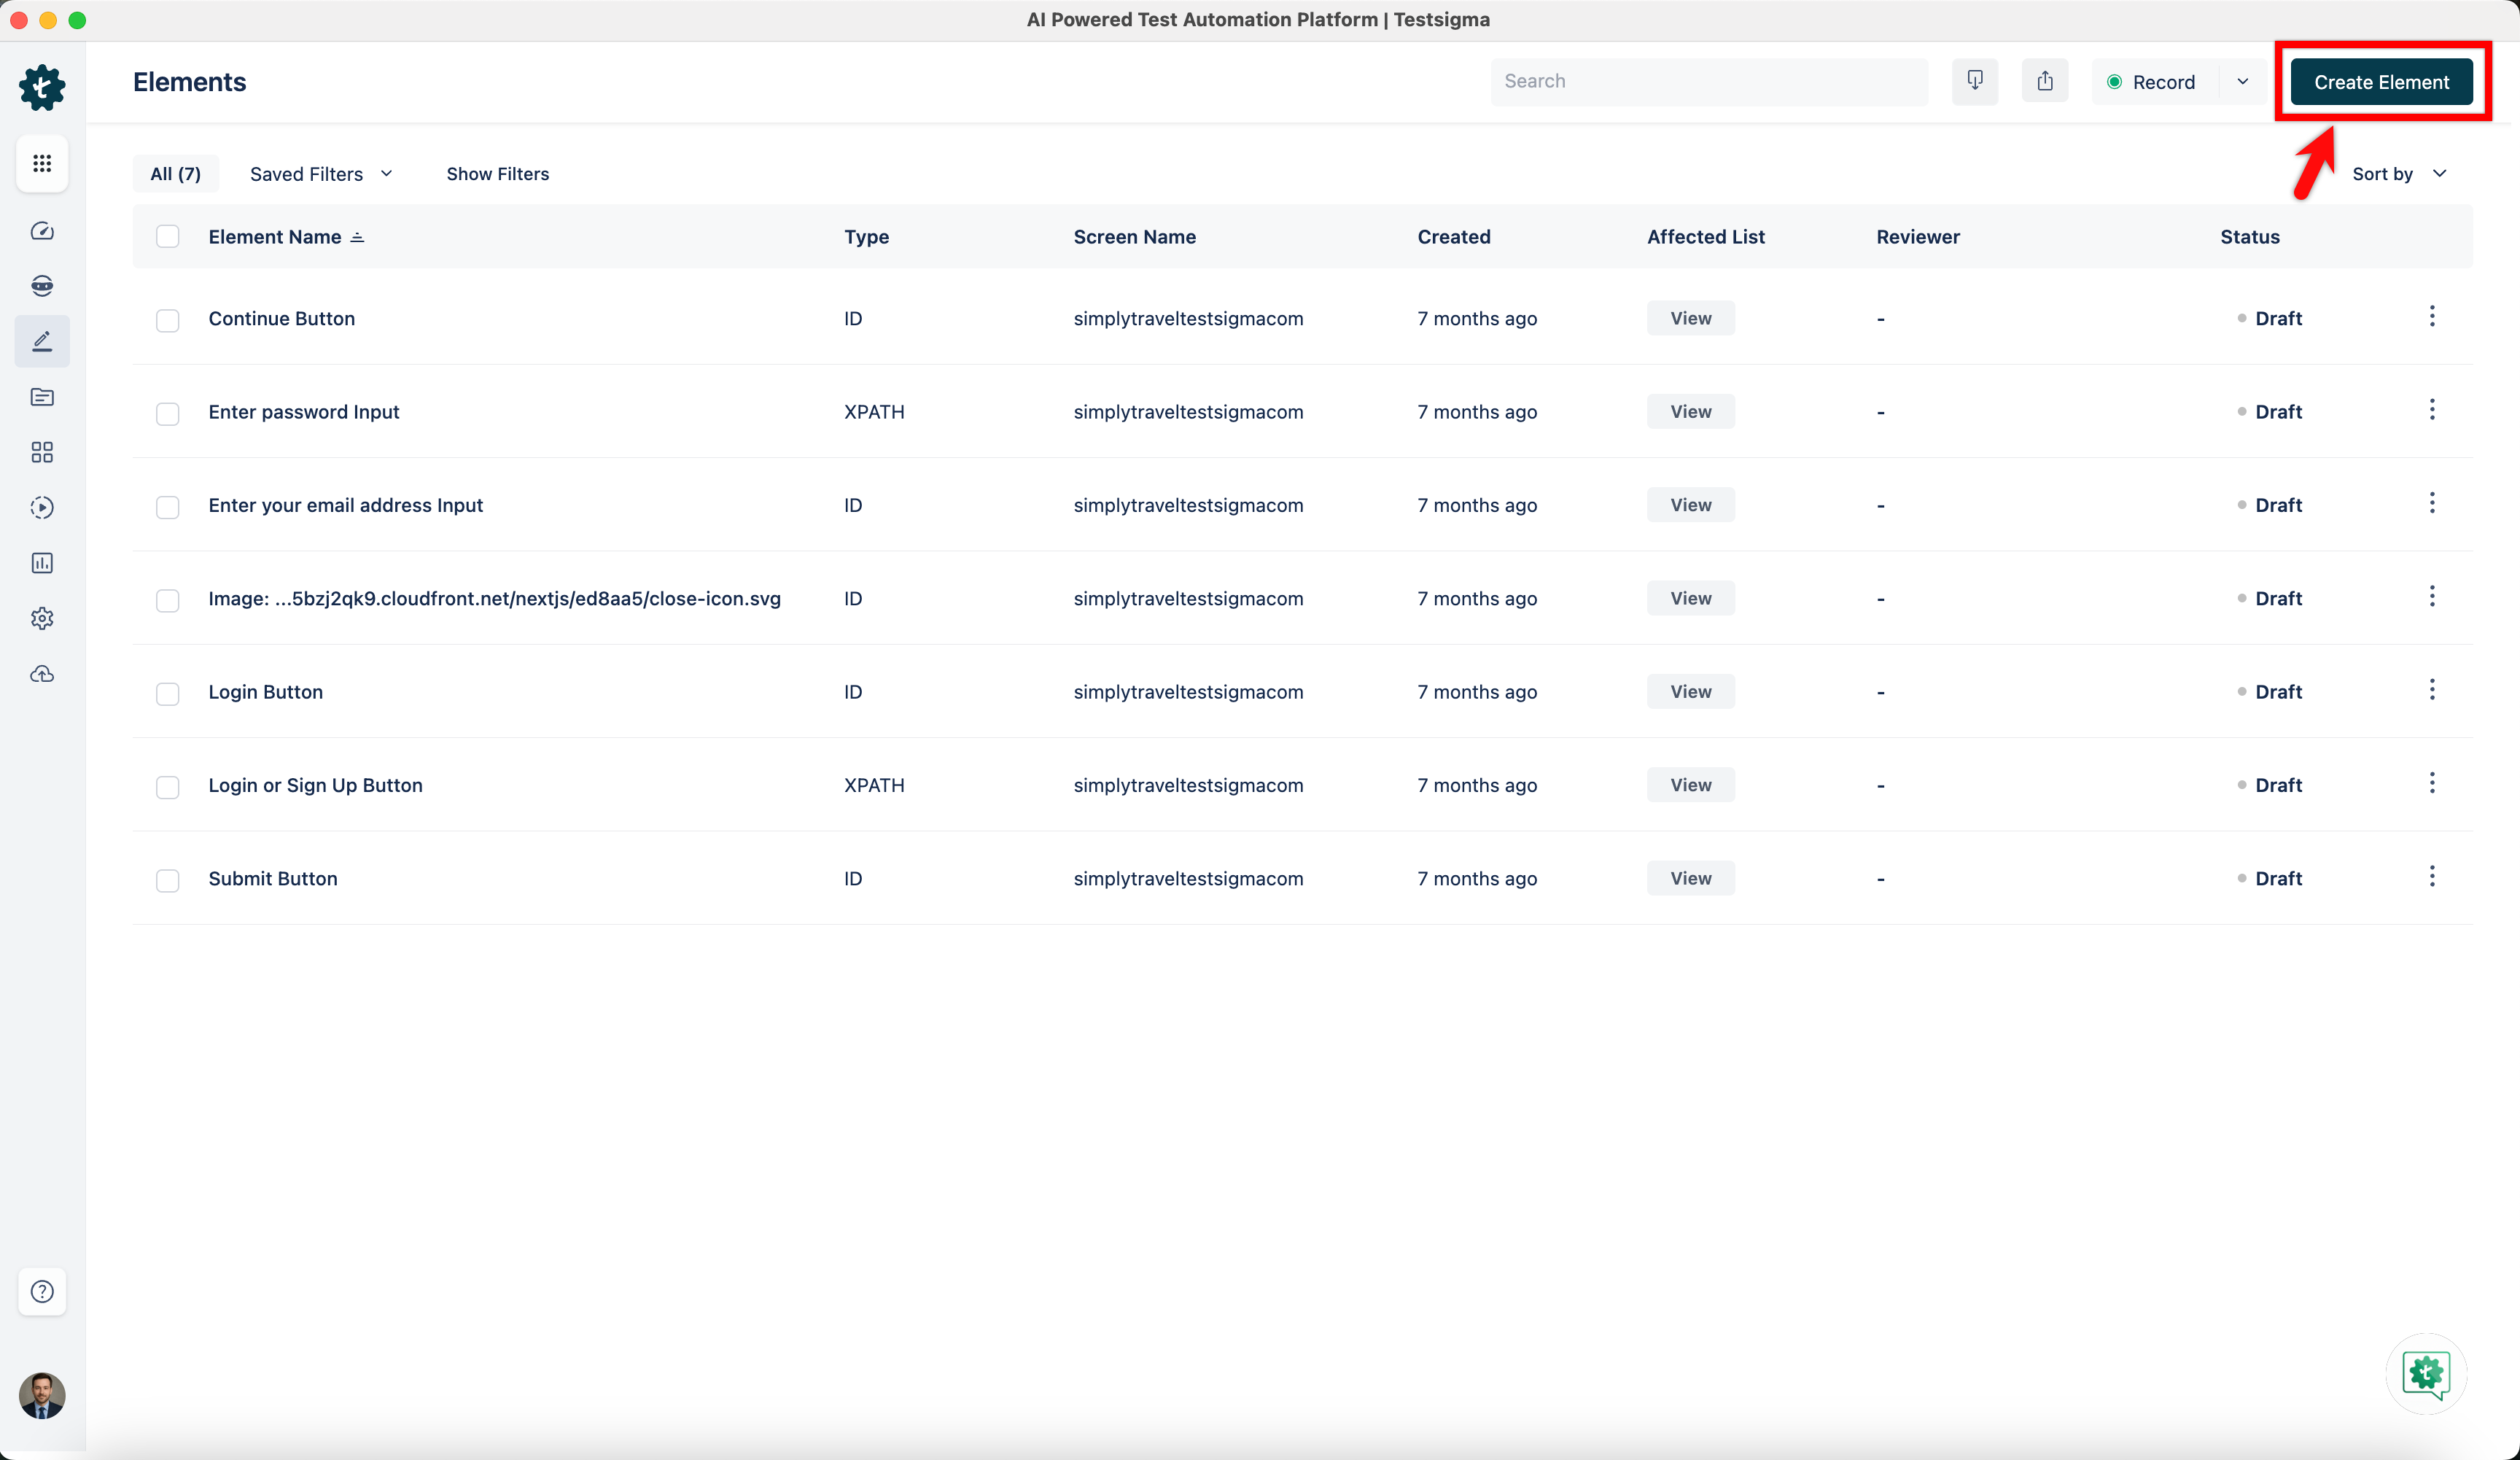
1. From the left navigation bar, navigate to **Create Tests > Elements**.
![Elements](https://s3.amazonaws.com/static-docs.testsigma.com/new_images/projects/elements/update_elements_mmw_1.png)


2. Click on **Create**.
![Create](https://s3.amazonaws.com/static-docs.testsigma.com/new_images/projects/applications/mwaeccocre.png)
2. Click **Create Element**.
Copy link
Copy Markdown
Contributor

Choose a reason for hiding this comment

The reason will be displayed to describe this comment to others. Learn more.

⚠️ Potential issue | 🟡 Minor

Normalize spacing in Step 2.

Line 43 has an extra space before **Create Element**; use a single space for consistency.

🤖 Prompt for AI Agents
Verify each finding against the current code and only fix it if needed.

In `@src/pages/docs/elements/mobile-web-application/create-manually.md` at line
43, Normalize the extra spacing in the step text: replace "Click  **Create
Element**." with a single-space version "Click **Create Element**." so the step
string (the line containing Click **Create Element**) uses consistent single
spacing before the bolded text.

![Create](https://s3.amazonaws.com/static-docs.testsigma.com/new_images/projects/elements/update_elements_mmw_2.png)


3. On **Create Element** Overlay, enter all the details:
![Overlay](https://s3.amazonaws.com/static-docs.testsigma.com/new_images/projects/applications/mwaecdetails.png)
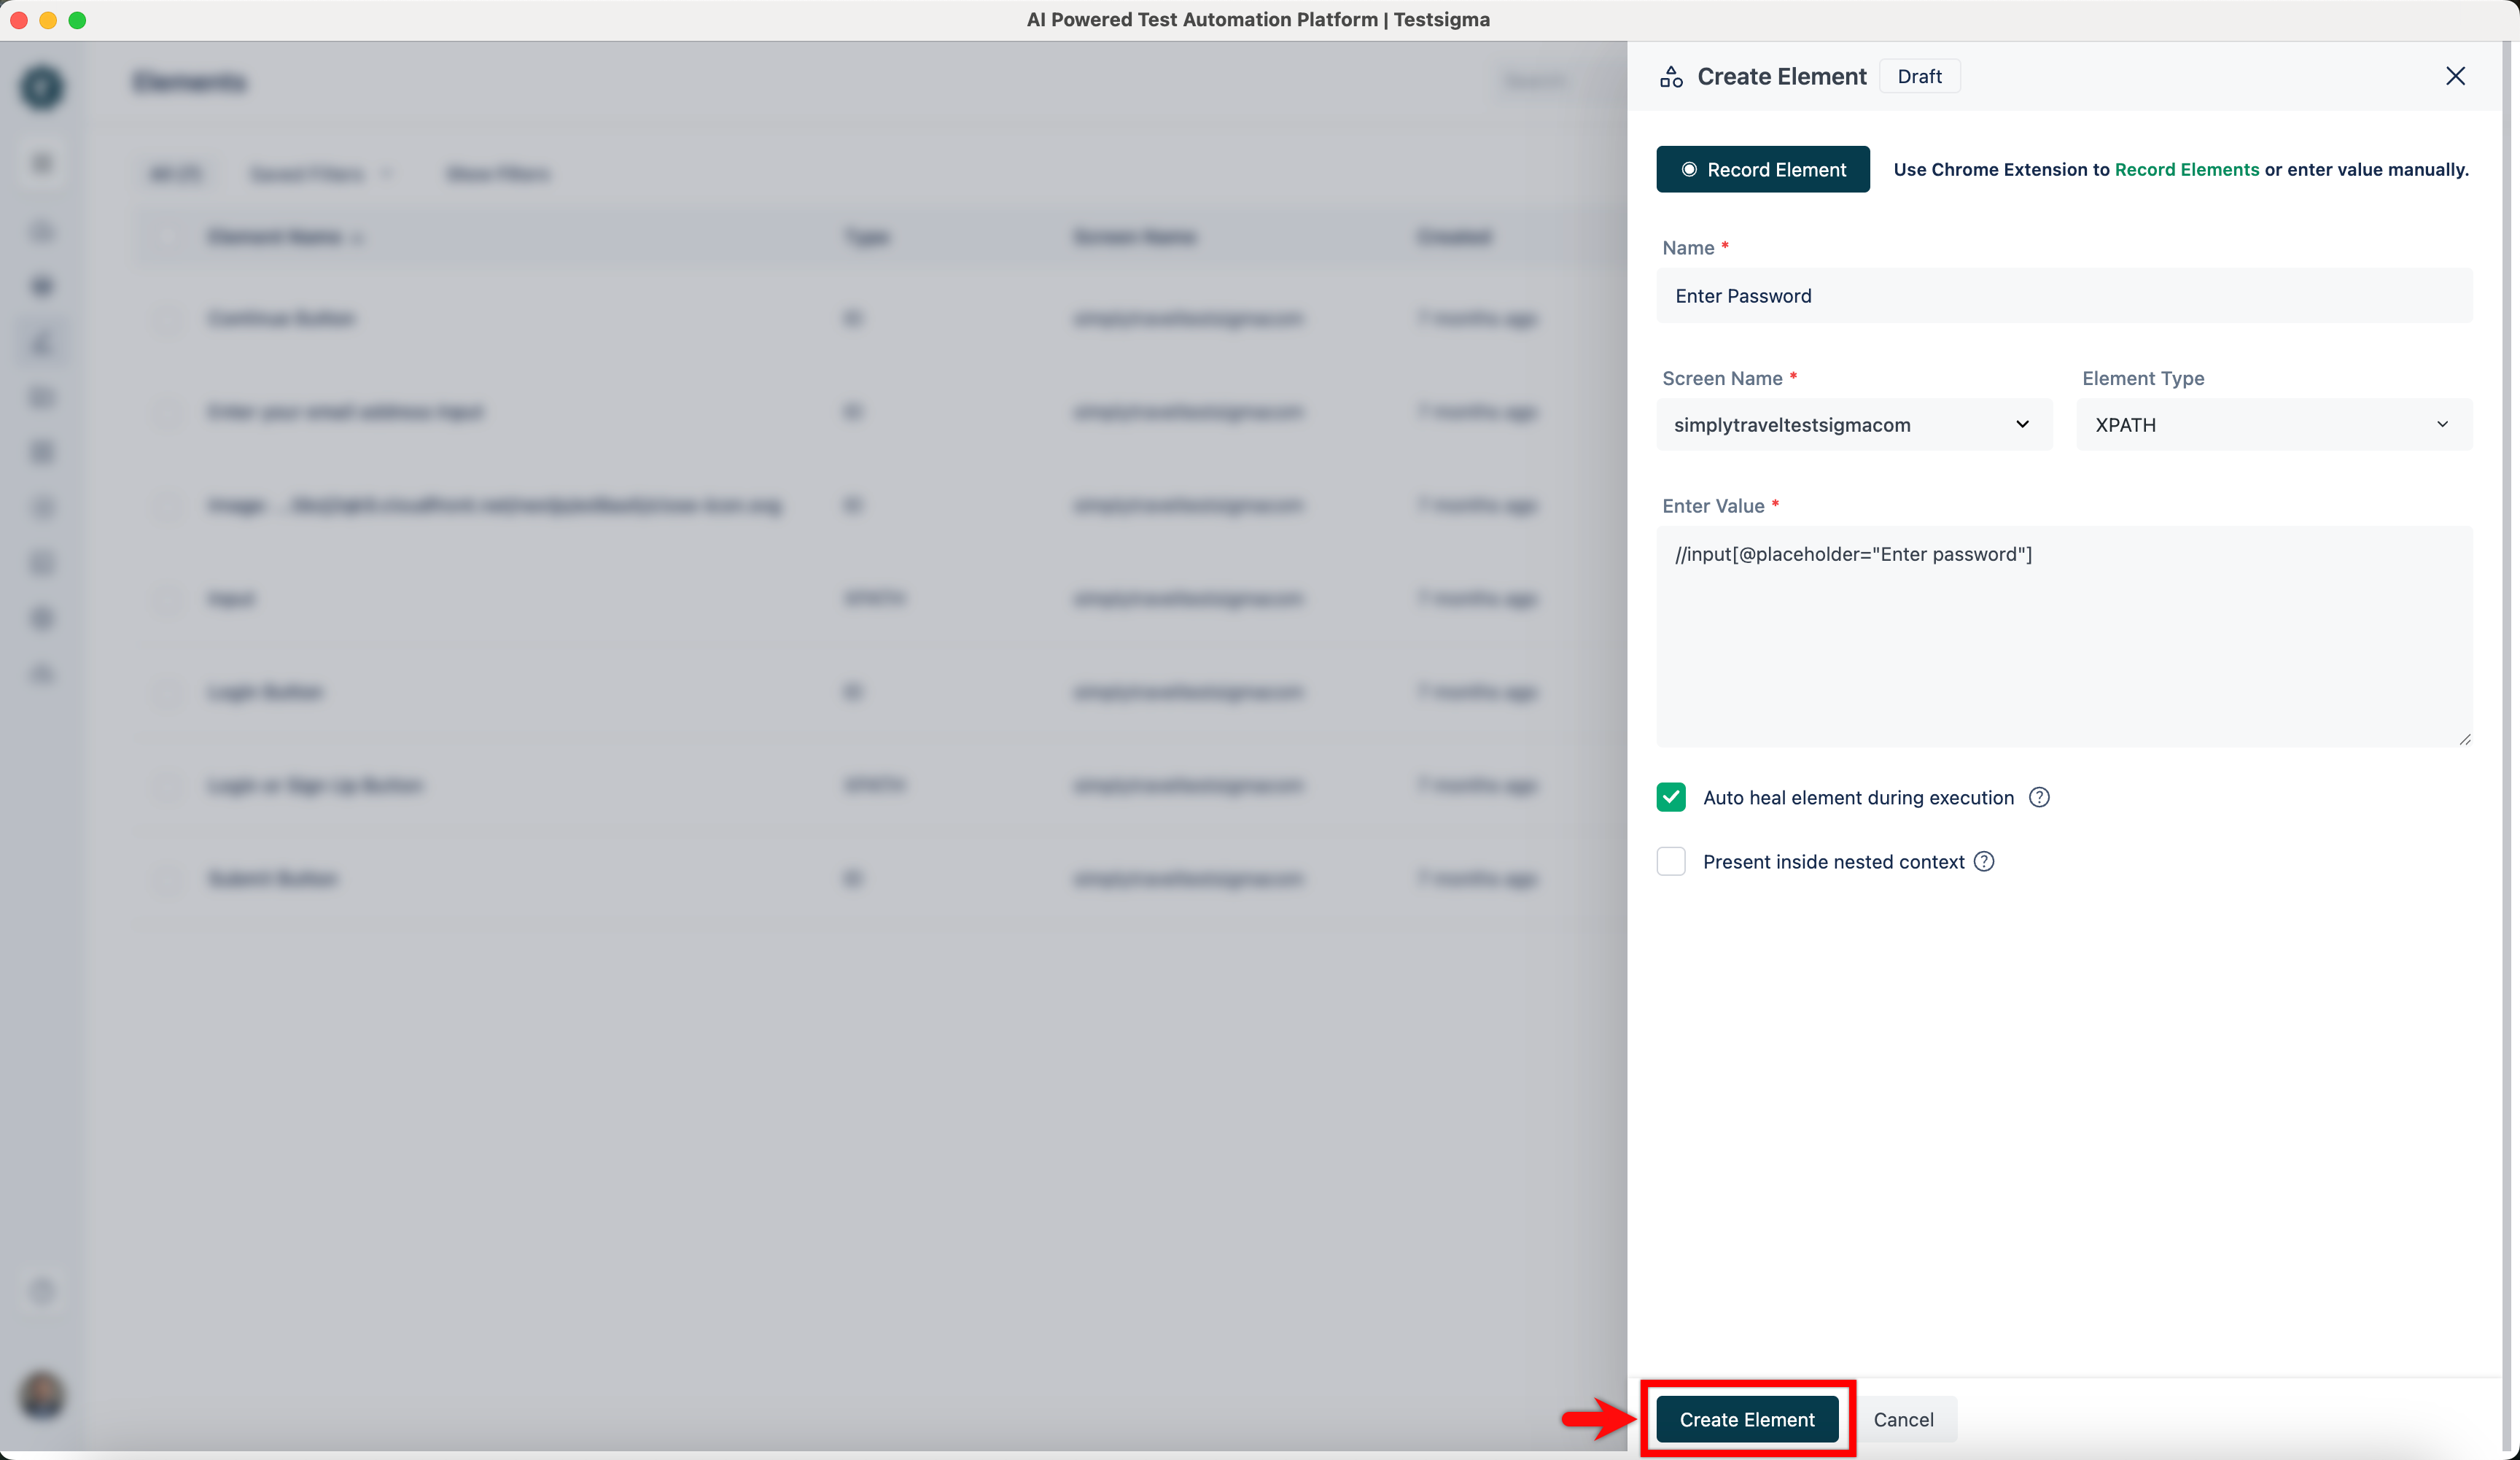
3. In the **Create Element** Overlay, enter all the details:
![Overlay](https://s3.amazonaws.com/static-docs.testsigma.com/new_images/projects/elements/update_elements_mmw_3.png)
- **Name:** Enter the name you want to give your element.
- **Screen Name:** Mention the screen that your element resides on.
- **Element Type:** There are 5 types of element types supported in Testsigma. This field is a drop-down list; you can select any of them: **XPATH**, **ID**, **Name**, **Class Name**, or **Accessibility ID**.
- **Enter Value:** Enter the value corresponding to the **Element Type** you selected.


4. Click on **Create Element**.
![Create Element](https://s3.amazonaws.com/static-docs.testsigma.com/new_images/projects/applications/mwacreateelm.png)
4. Click **Create Element**.
![Create Element](https://s3.amazonaws.com/static-docs.testsigma.com/new_images/projects/elements/update_elements_mmw_4.png)


5. The element will be saved in the elements list.


---
Original file line number Diff line number Diff line change
Expand Up @@ -40,7 +40,7 @@ Using the **Testsigma Recorder**, you can swiftly capture elements in mobile web
## **Steps to Record Elements for Mobile Web Apps**

1. From the left navigation bar, go to **Create Tests > Elements**, and click **Record**.
![Elements](https://s3.amazonaws.com/static-docs.testsigma.com/new_images/projects/applications/mwaelmnav.png)
![Elements](https://s3.amazonaws.com/static-docs.testsigma.com/new_images/projects/elements/update_elements_mw_1.png)

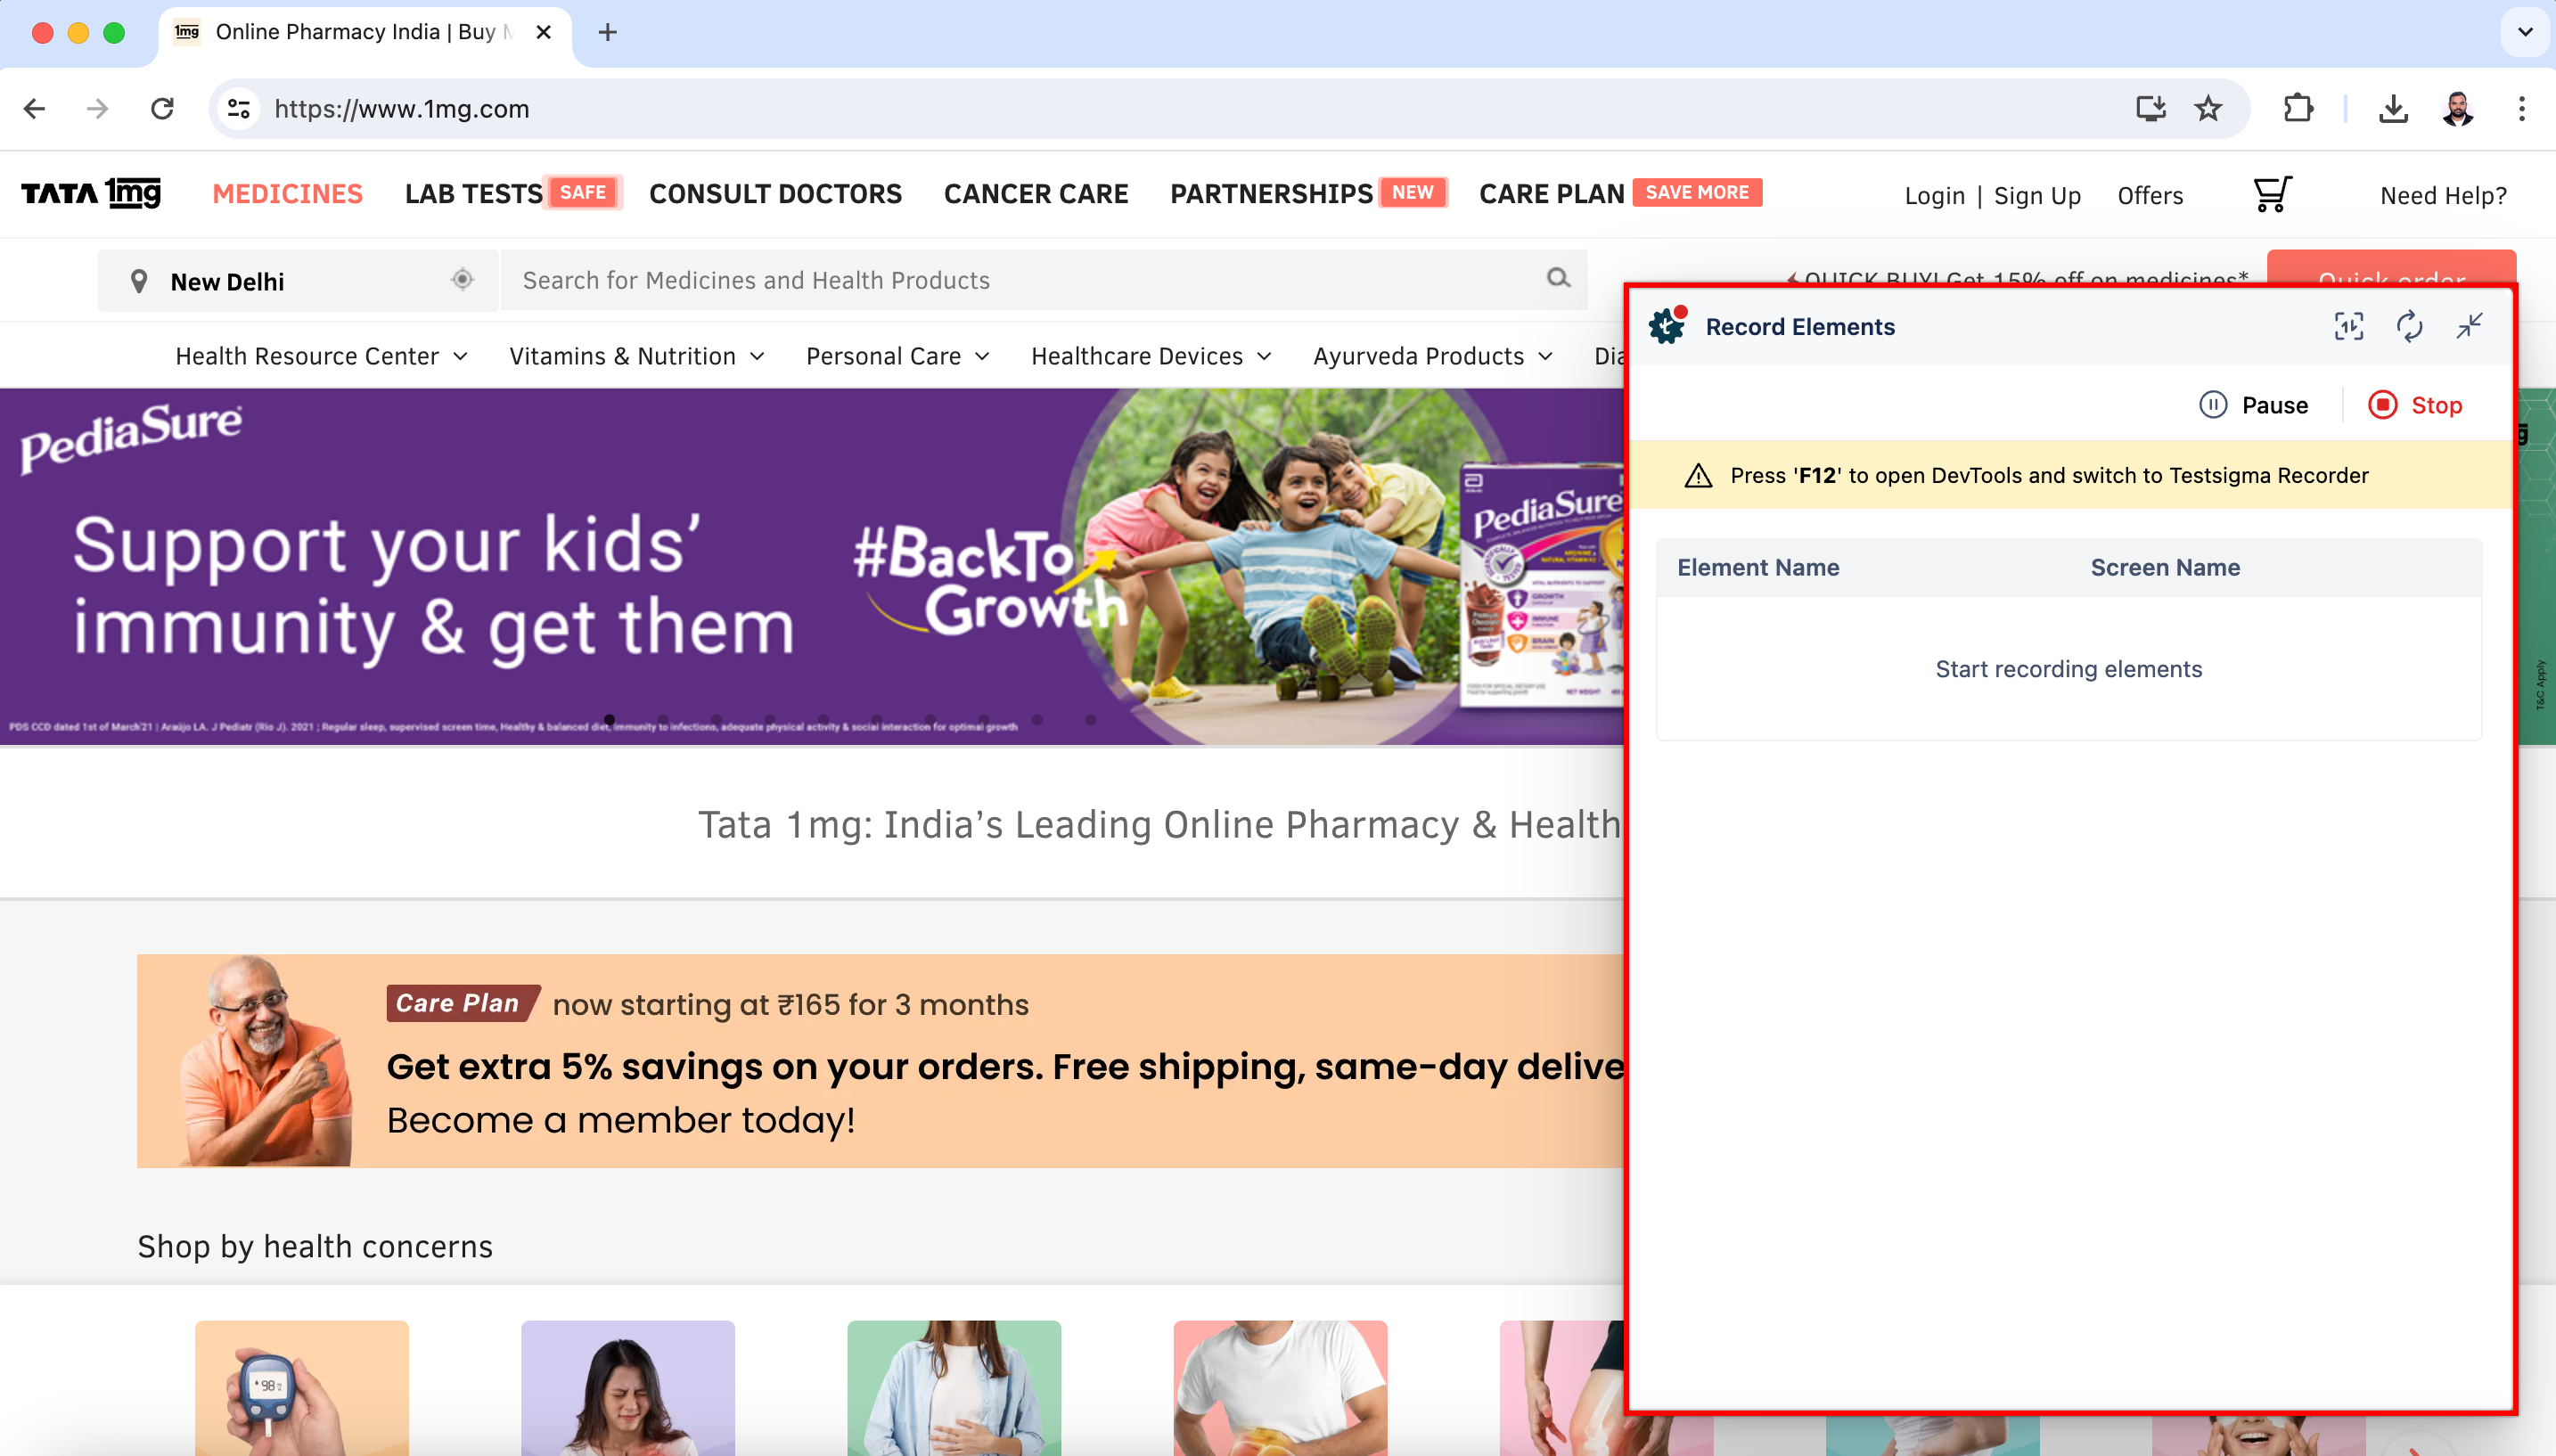
2. This will open a new window. Enter the URL from which you want to capture the elements. The **Testsigma Recorder** will appear and be ready to start recording. In this case, we are recording elements for the 1mg website.
![New Window](https://s3.amazonaws.com/static-docs.testsigma.com/new_images/projects/applications/mwaelmcdt.png)
Expand All @@ -65,7 +65,7 @@ Using the **Testsigma Recorder**, you can swiftly capture elements in mobile web
| Some devices might have unique characteristics that will affect element display and interaction, and adding a custom device required for your testing is necessary to identify and resolve these issues.


6. Once you have selected the dimension, capture elements by clicking on them directly.
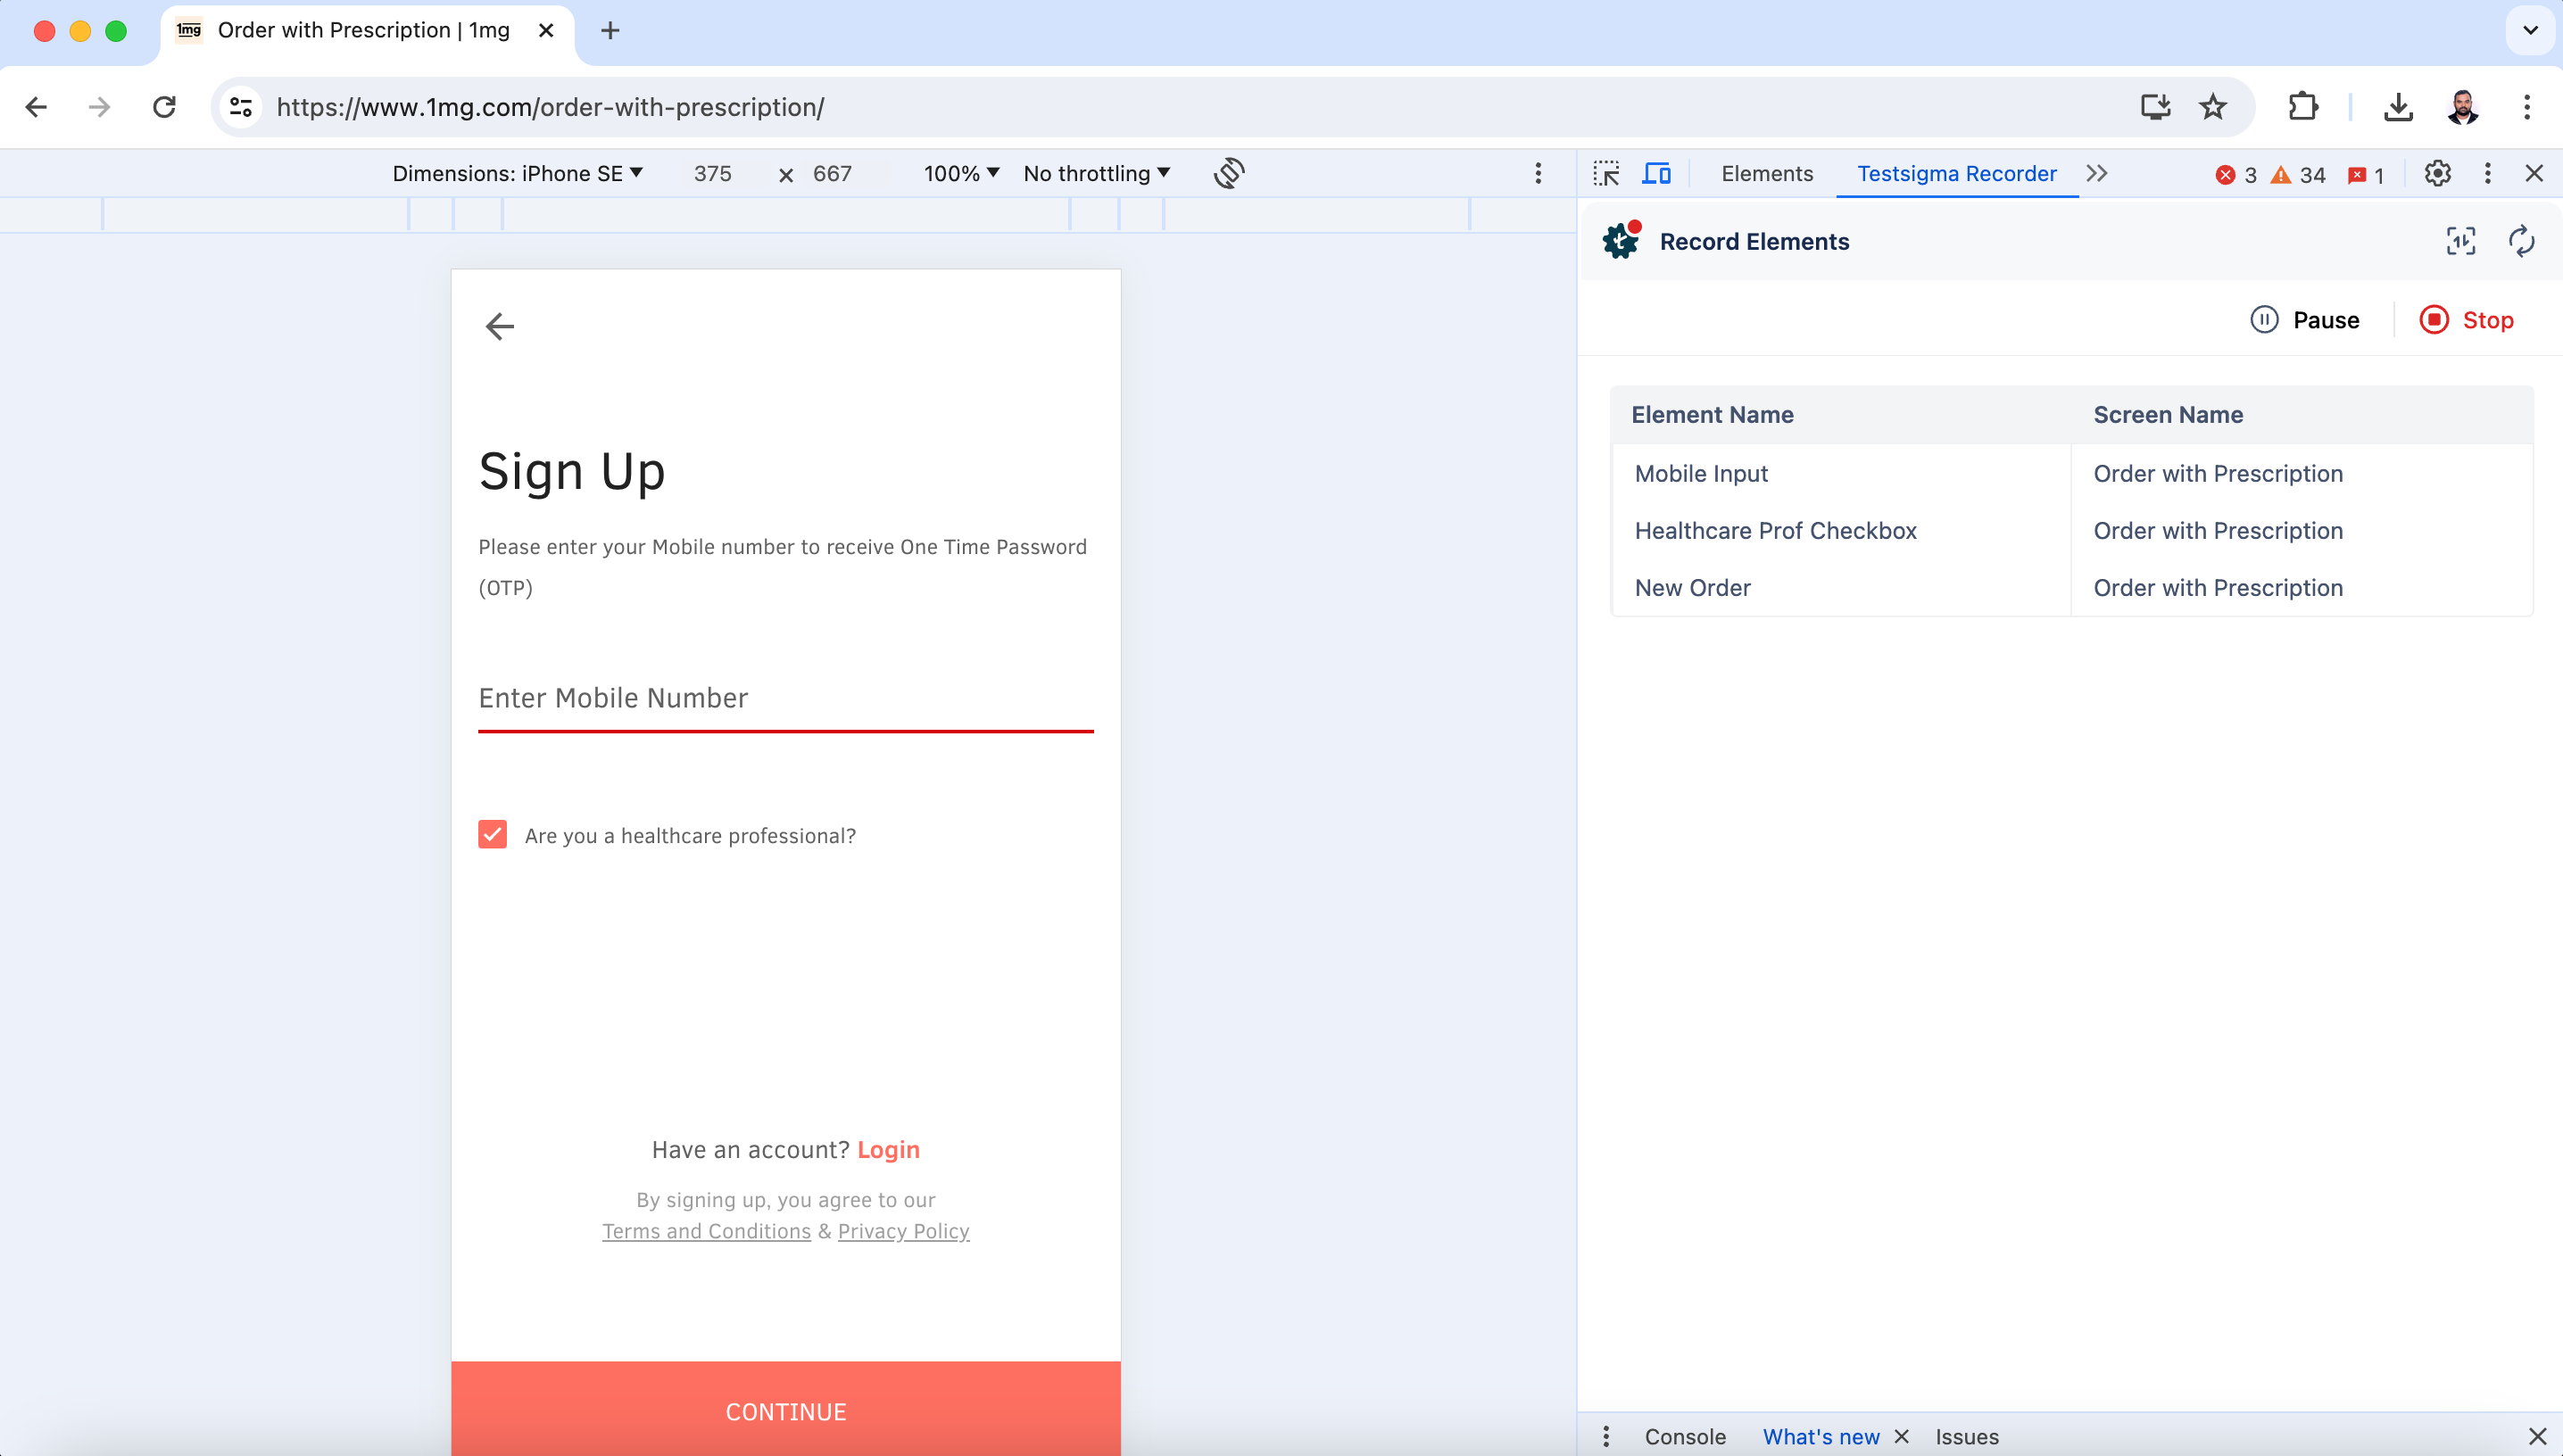
6. Once the dimension is selected, click directly on the elements to capture them, and click **Stop** when you are done capturing the required elements.
![Record Elements](https://s3.amazonaws.com/static-docs.testsigma.com/new_images/projects/applications/mwaelmrelms.png)

---
20 changes: 7 additions & 13 deletions src/pages/docs/reports/runs/filter-custom-reports.md
Original file line number Diff line number Diff line change
Expand Up @@ -35,32 +35,26 @@ Quickly view the run results of a test plan by applying filters | Learn how to a
## **Applying Filters on the Run Results Page**

1. From the left navigation bar, go to **Run Results** and click on the test plan for which you want to check the results.
![Test Suites](https://s3.amazonaws.com/static-docs.testsigma.com/new_images/projects/applications/Run_Results_Test_Suites.png)
![Test Suites](https://s3.amazonaws.com/static-docs.testsigma.com/new_images/projects/reports/update_filters_1.png)

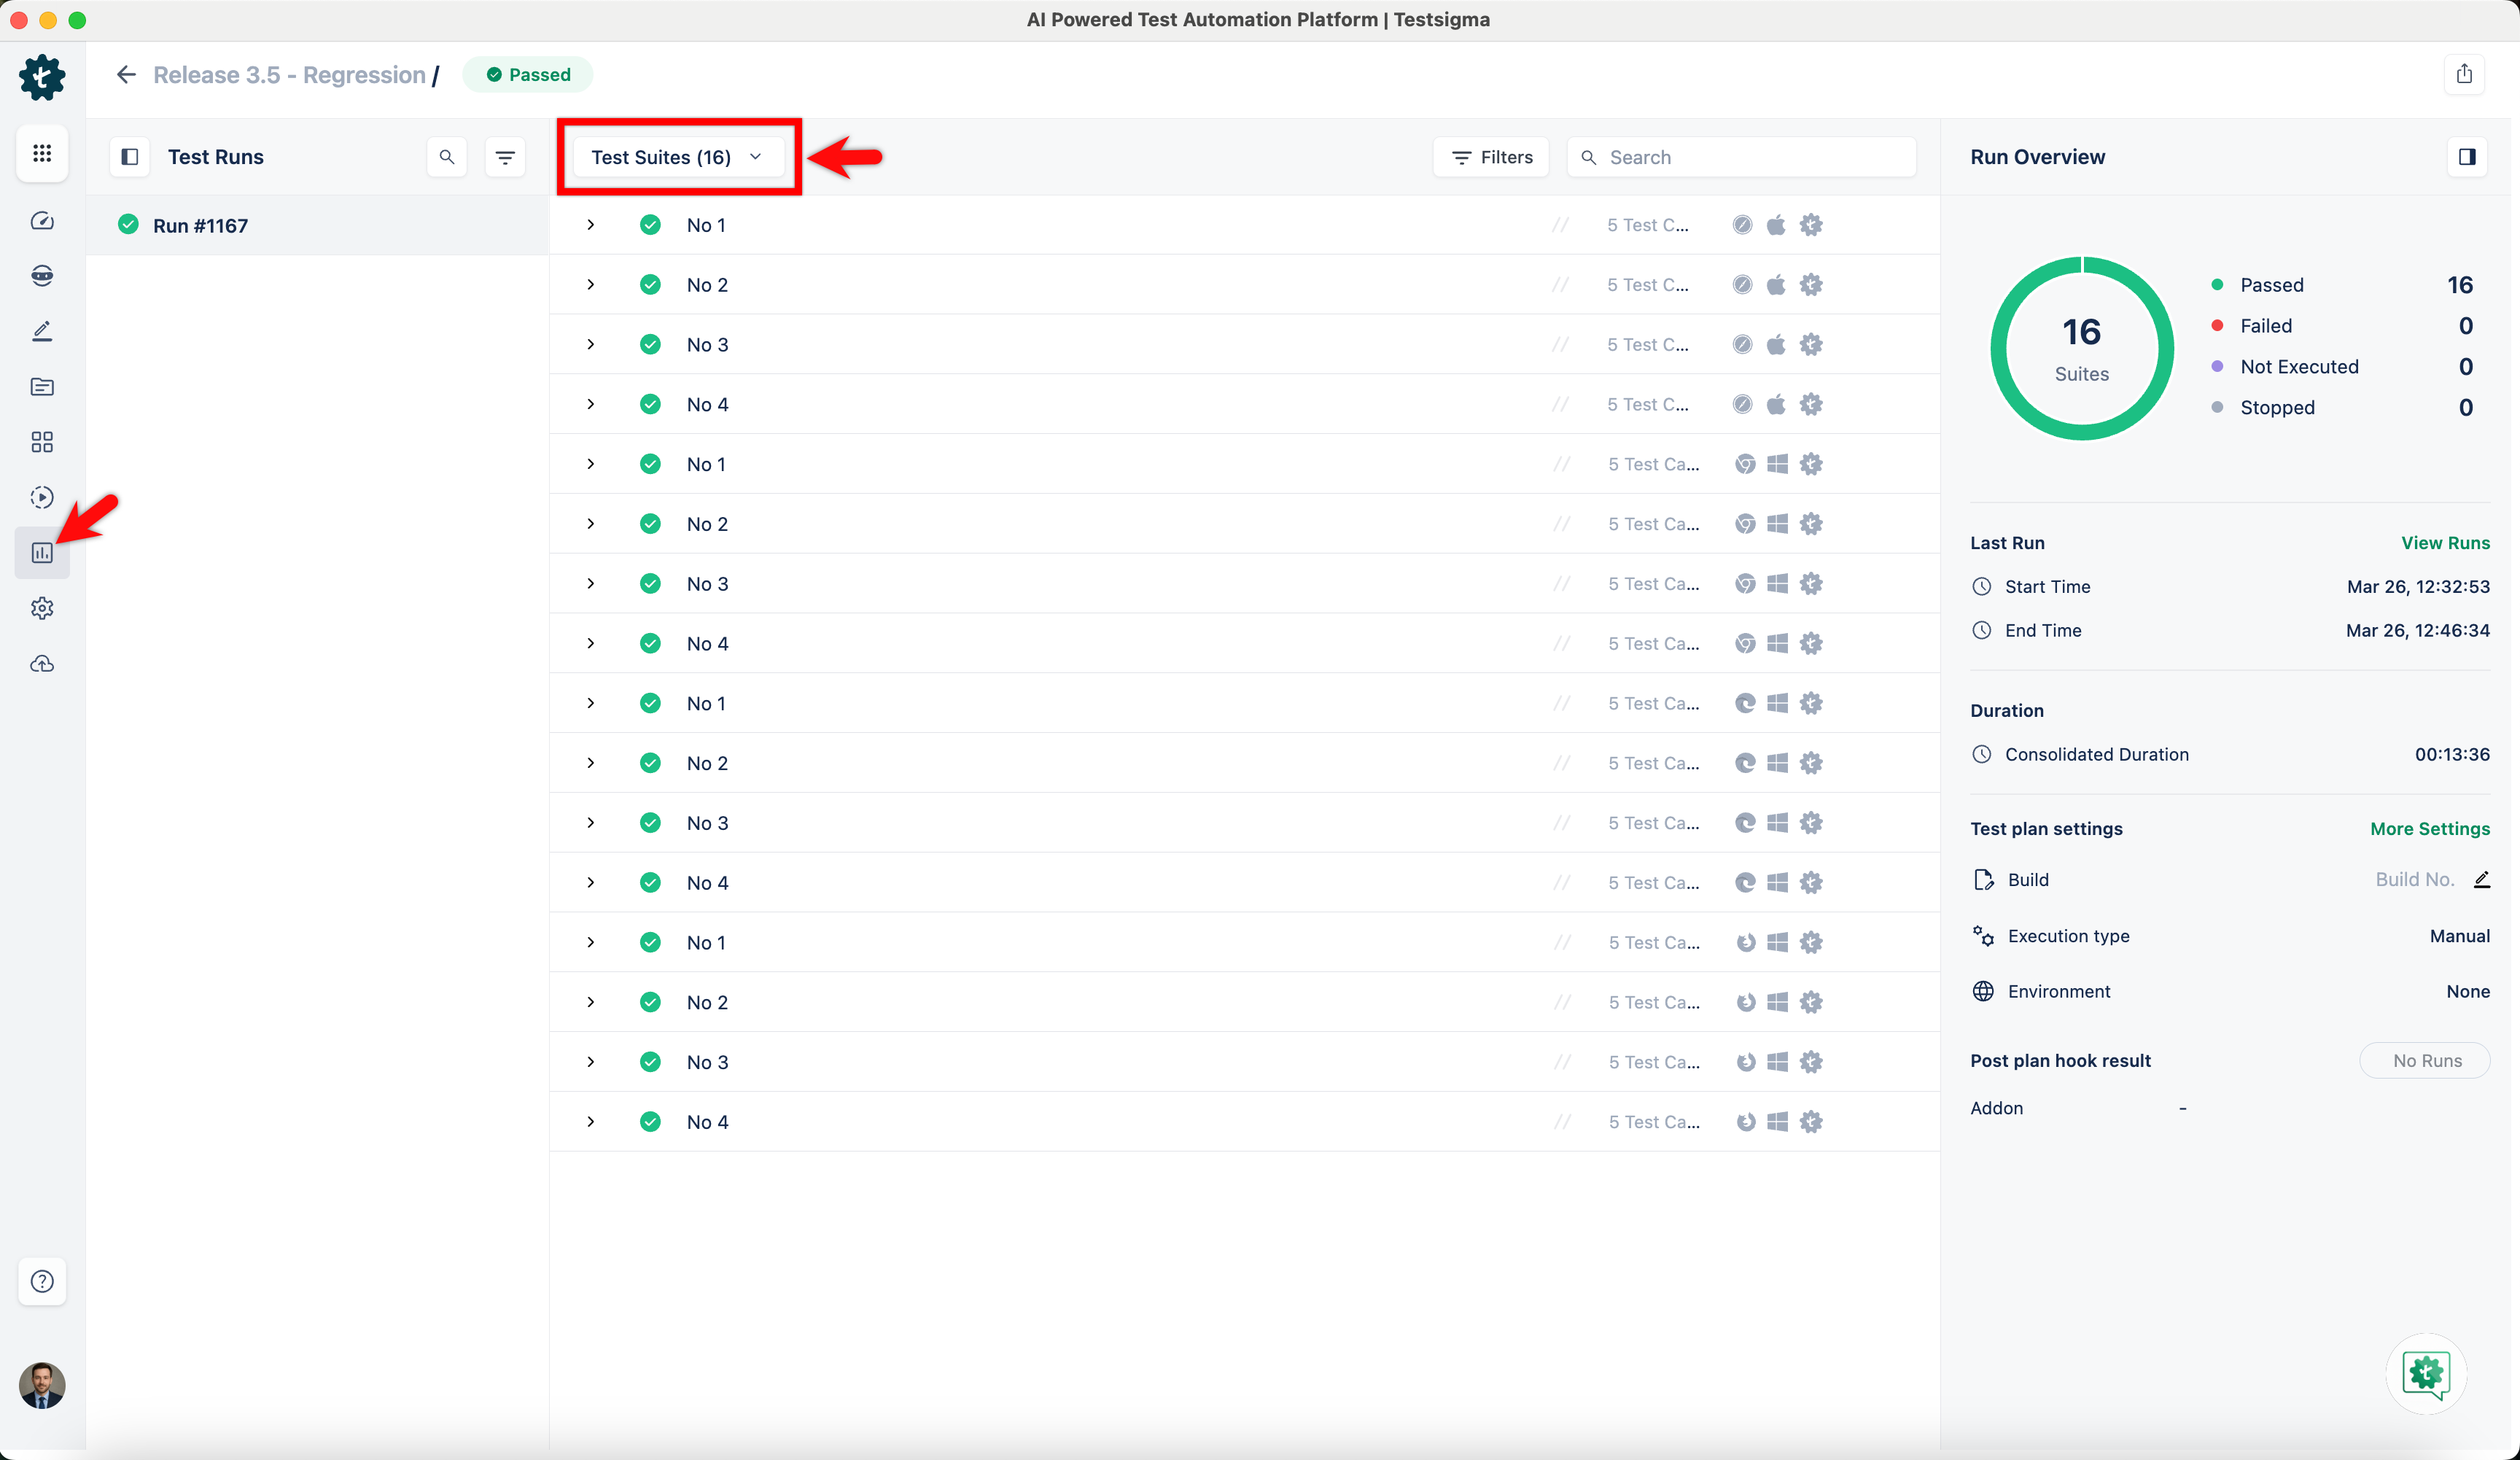
2. By default, you’ll see the results at test suite level.
![Results at Test Suite Level](https://s3.amazonaws.com/static-docs.testsigma.com/new_images/projects/applications/Run_Results_Default_Page.png)
![Results at Test Suite Level](https://s3.amazonaws.com/static-docs.testsigma.com/new_images/projects/reports/update_filters_2.png)

3. To apply filters to the **Test Runs** panel, click the **Filters** icon on the panel.
![Test Runs Filter](https://s3.amazonaws.com/static-docs.testsigma.com/new_images/projects/applications/Test_Runs_Filter.png)
![Test Runs Filter](https://s3.amazonaws.com/static-docs.testsigma.com/new_images/projects/reports/update_filters_3.png)

4. Add the desired filters and click **Apply**.
![Apply Filter to Test Runs](https://s3.amazonaws.com/static-docs.testsigma.com/new_images/projects/applications/Apply_Test_Runs_Filter.png)
![Apply Filter to Test Runs](https://s3.amazonaws.com/static-docs.testsigma.com/new_images/projects/reports/update_filters_4.png)

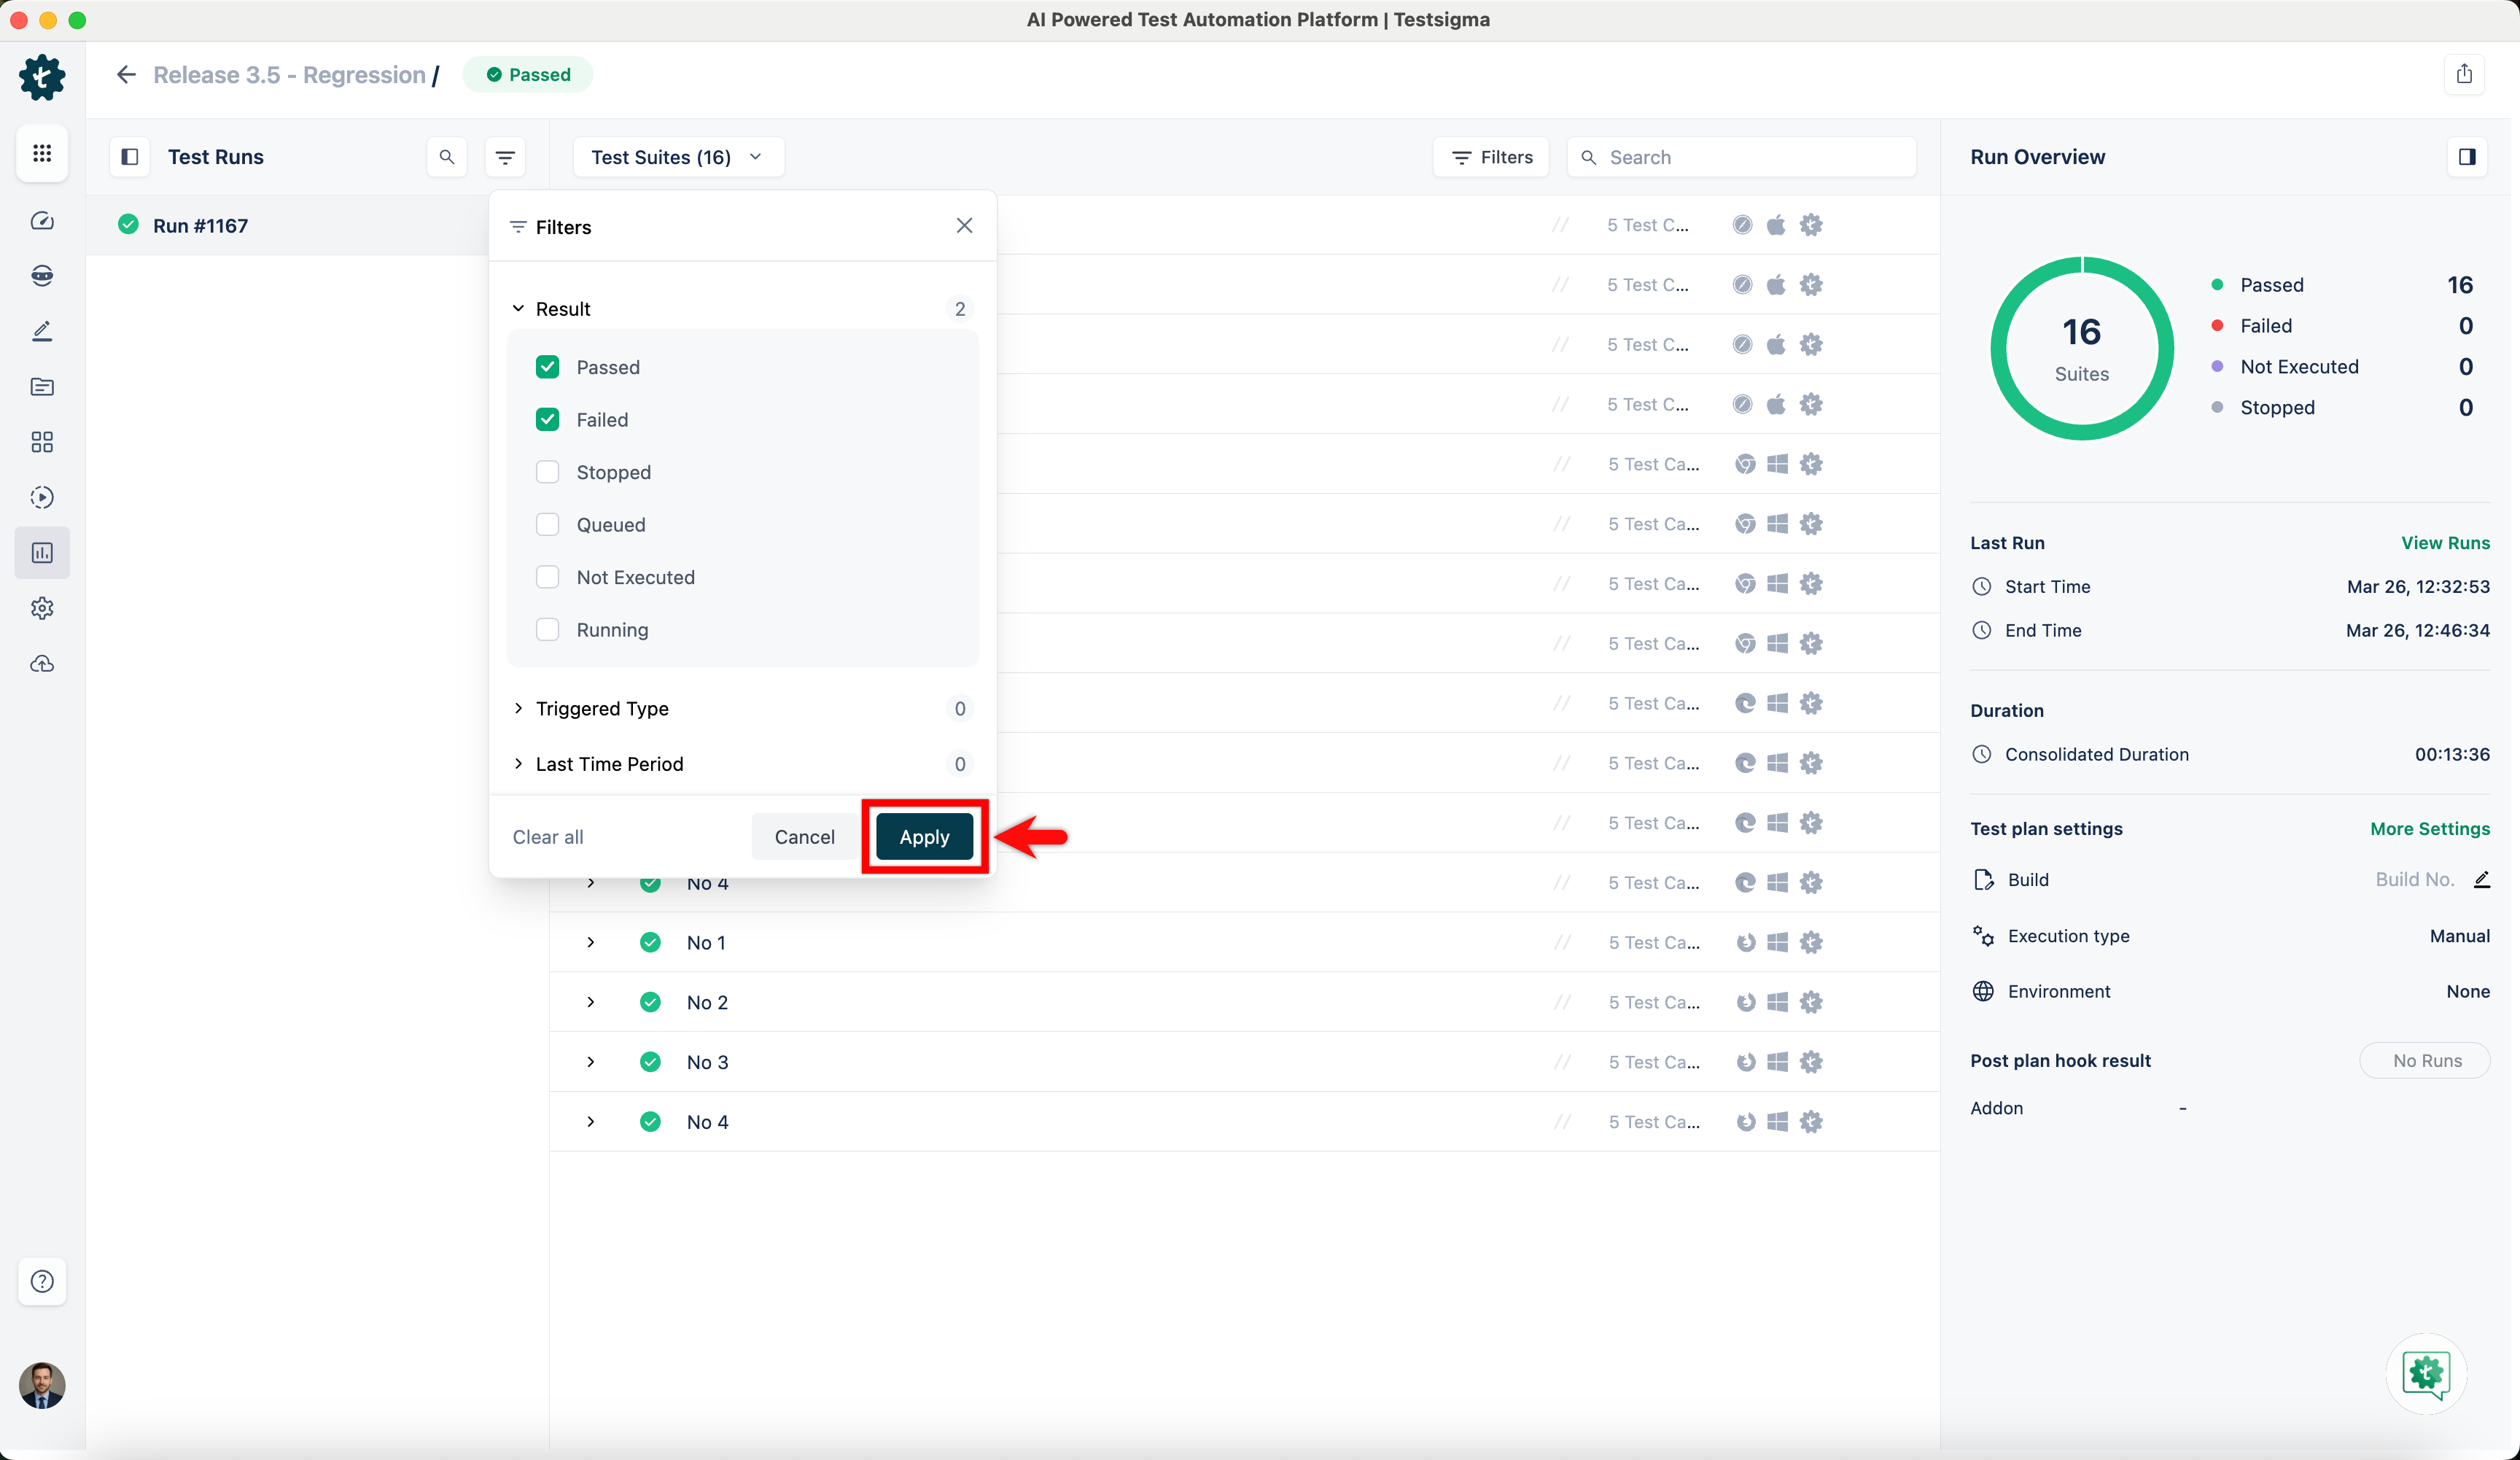
5. To apply filters to the tests, select **Test Cases, Suites, or Machines** from the dropdown menu, then click the **Filters** icon.
![Filter for Tests](https://s3.amazonaws.com/static-docs.testsigma.com/new_images/projects/applications/Tests_Filters_On_Run_Results.png)
![Filter for Tests](https://s3.amazonaws.com/static-docs.testsigma.com/new_images/projects/reports/update_filters_5.png)

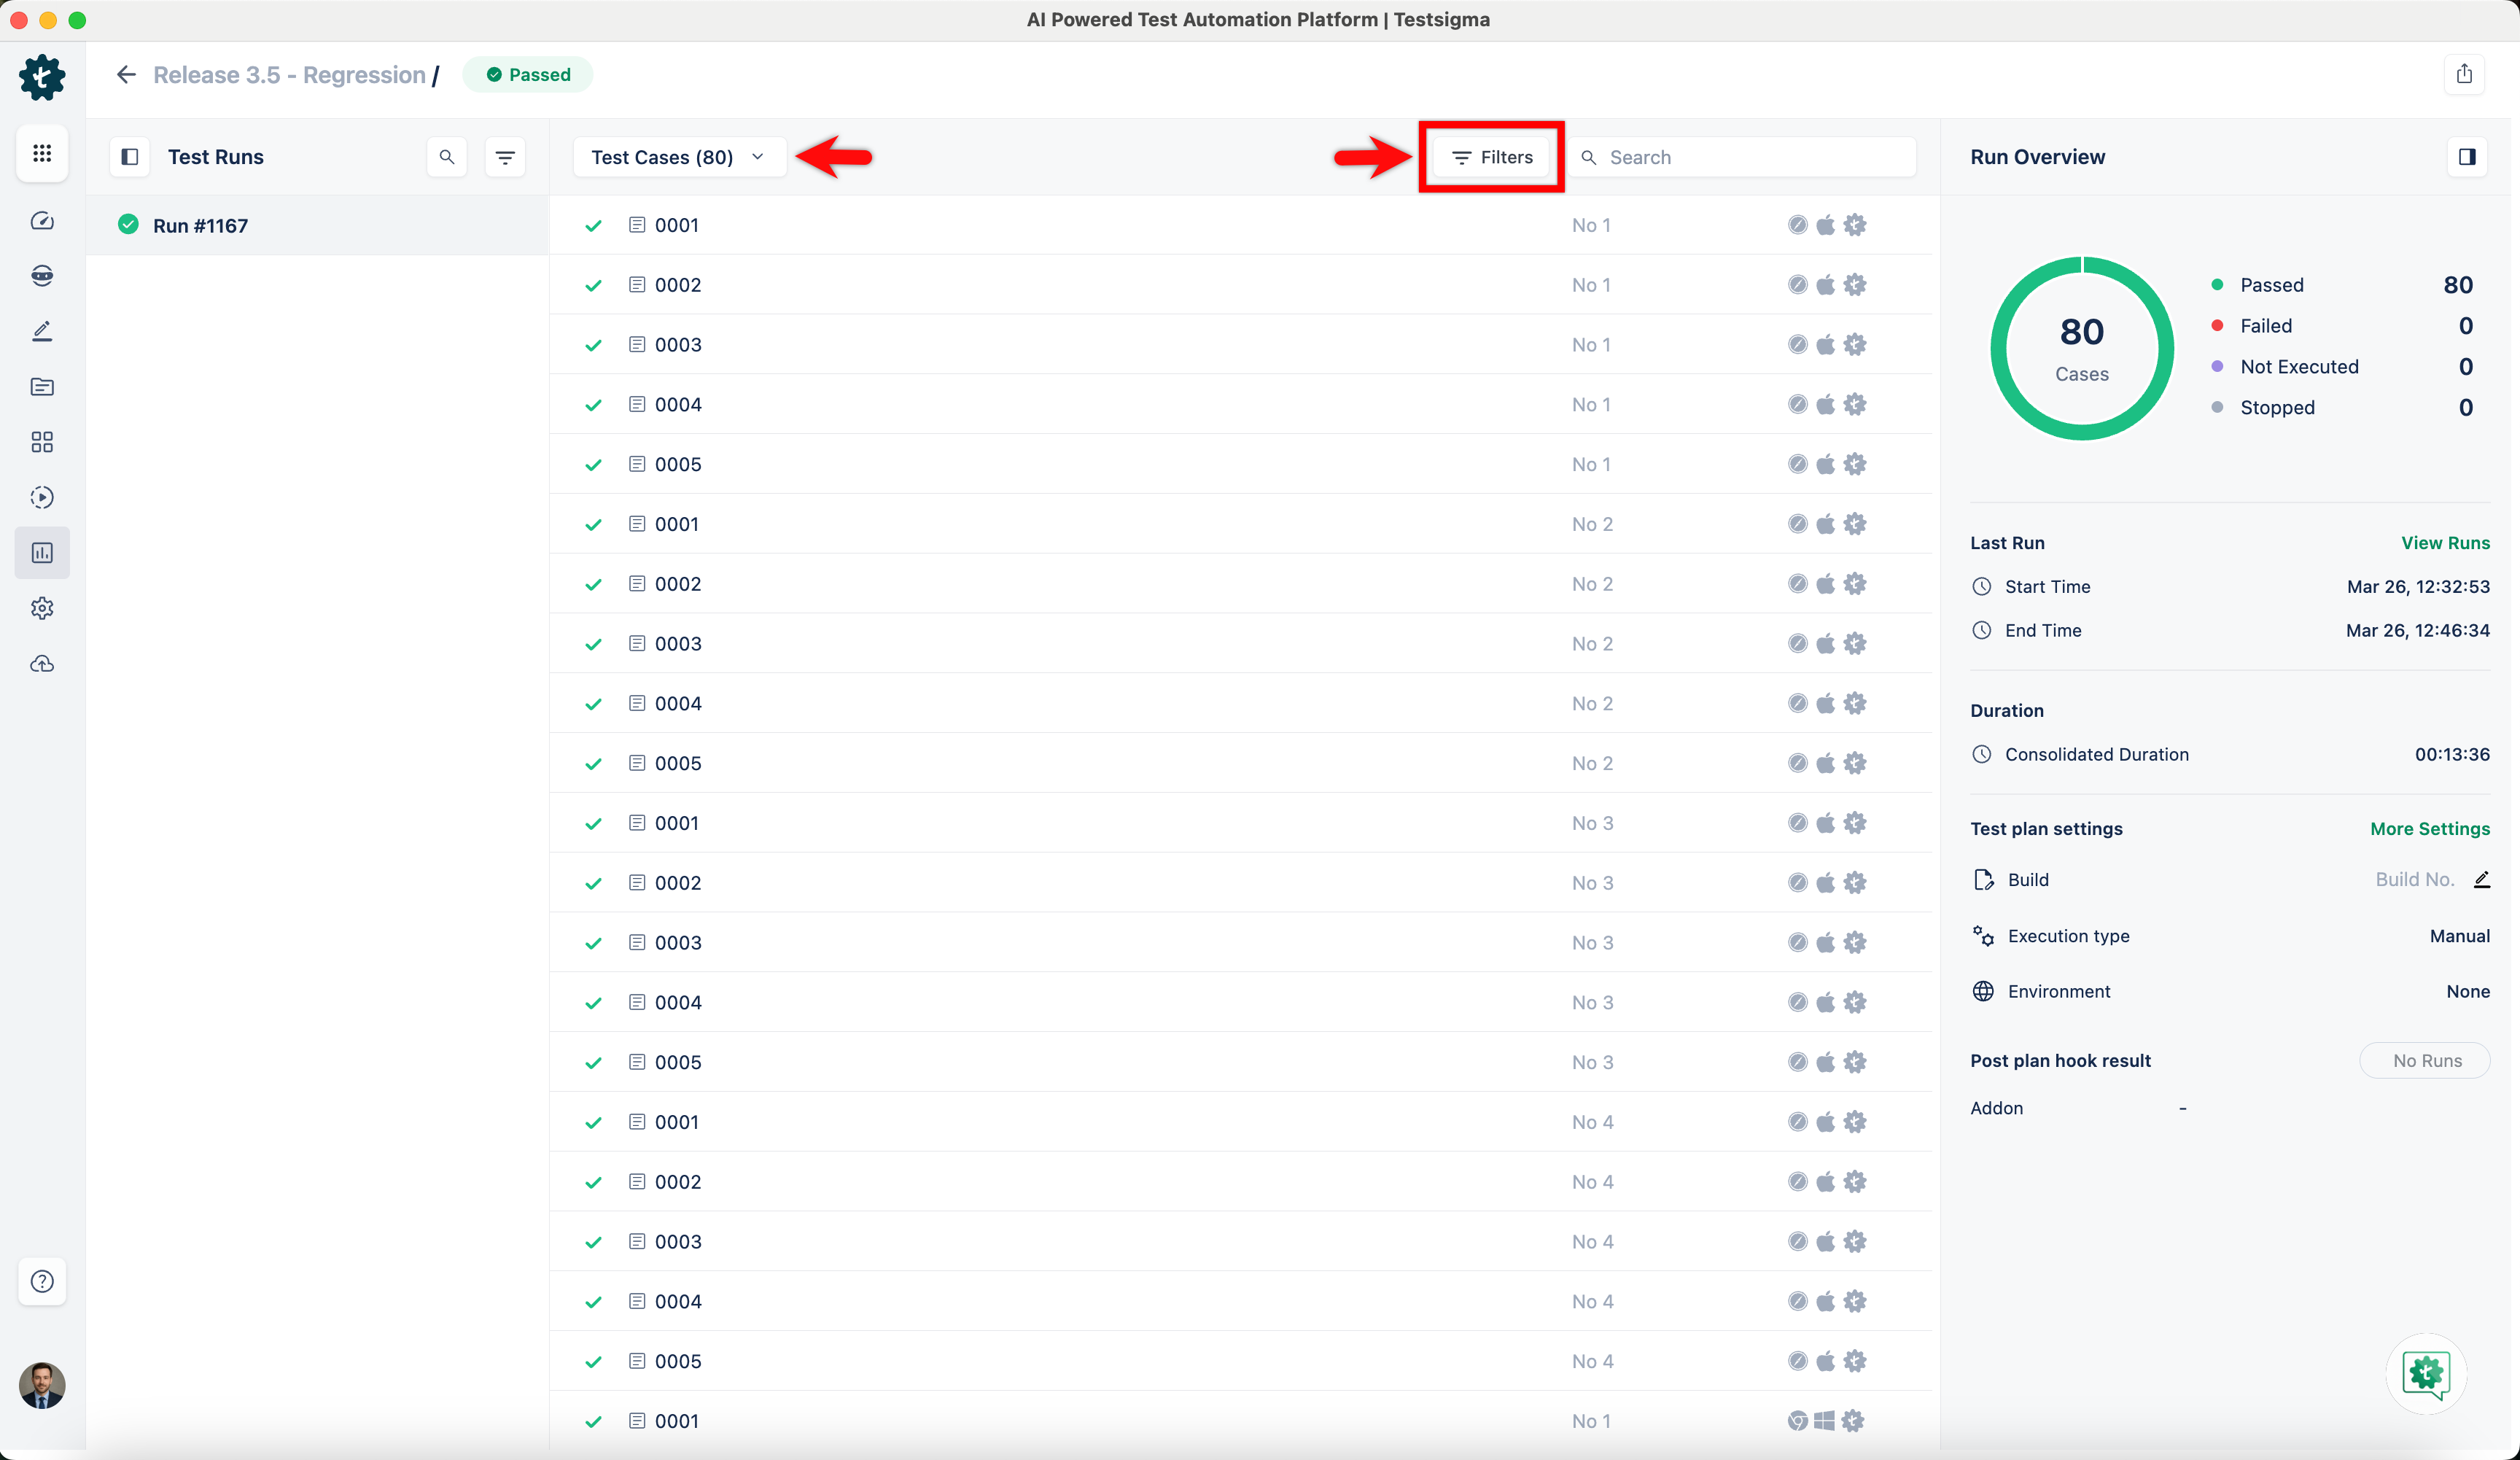
6. Add the desired filters and click **Apply**.
![Apply Filters to Tests](https://s3.amazonaws.com/static-docs.testsigma.com/new_images/projects/applications/Apply_Filters_To_Tests.png)
![Apply Filters to Tests](https://s3.amazonaws.com/static-docs.testsigma.com/new_images/projects/reports/update_filters_6.png)

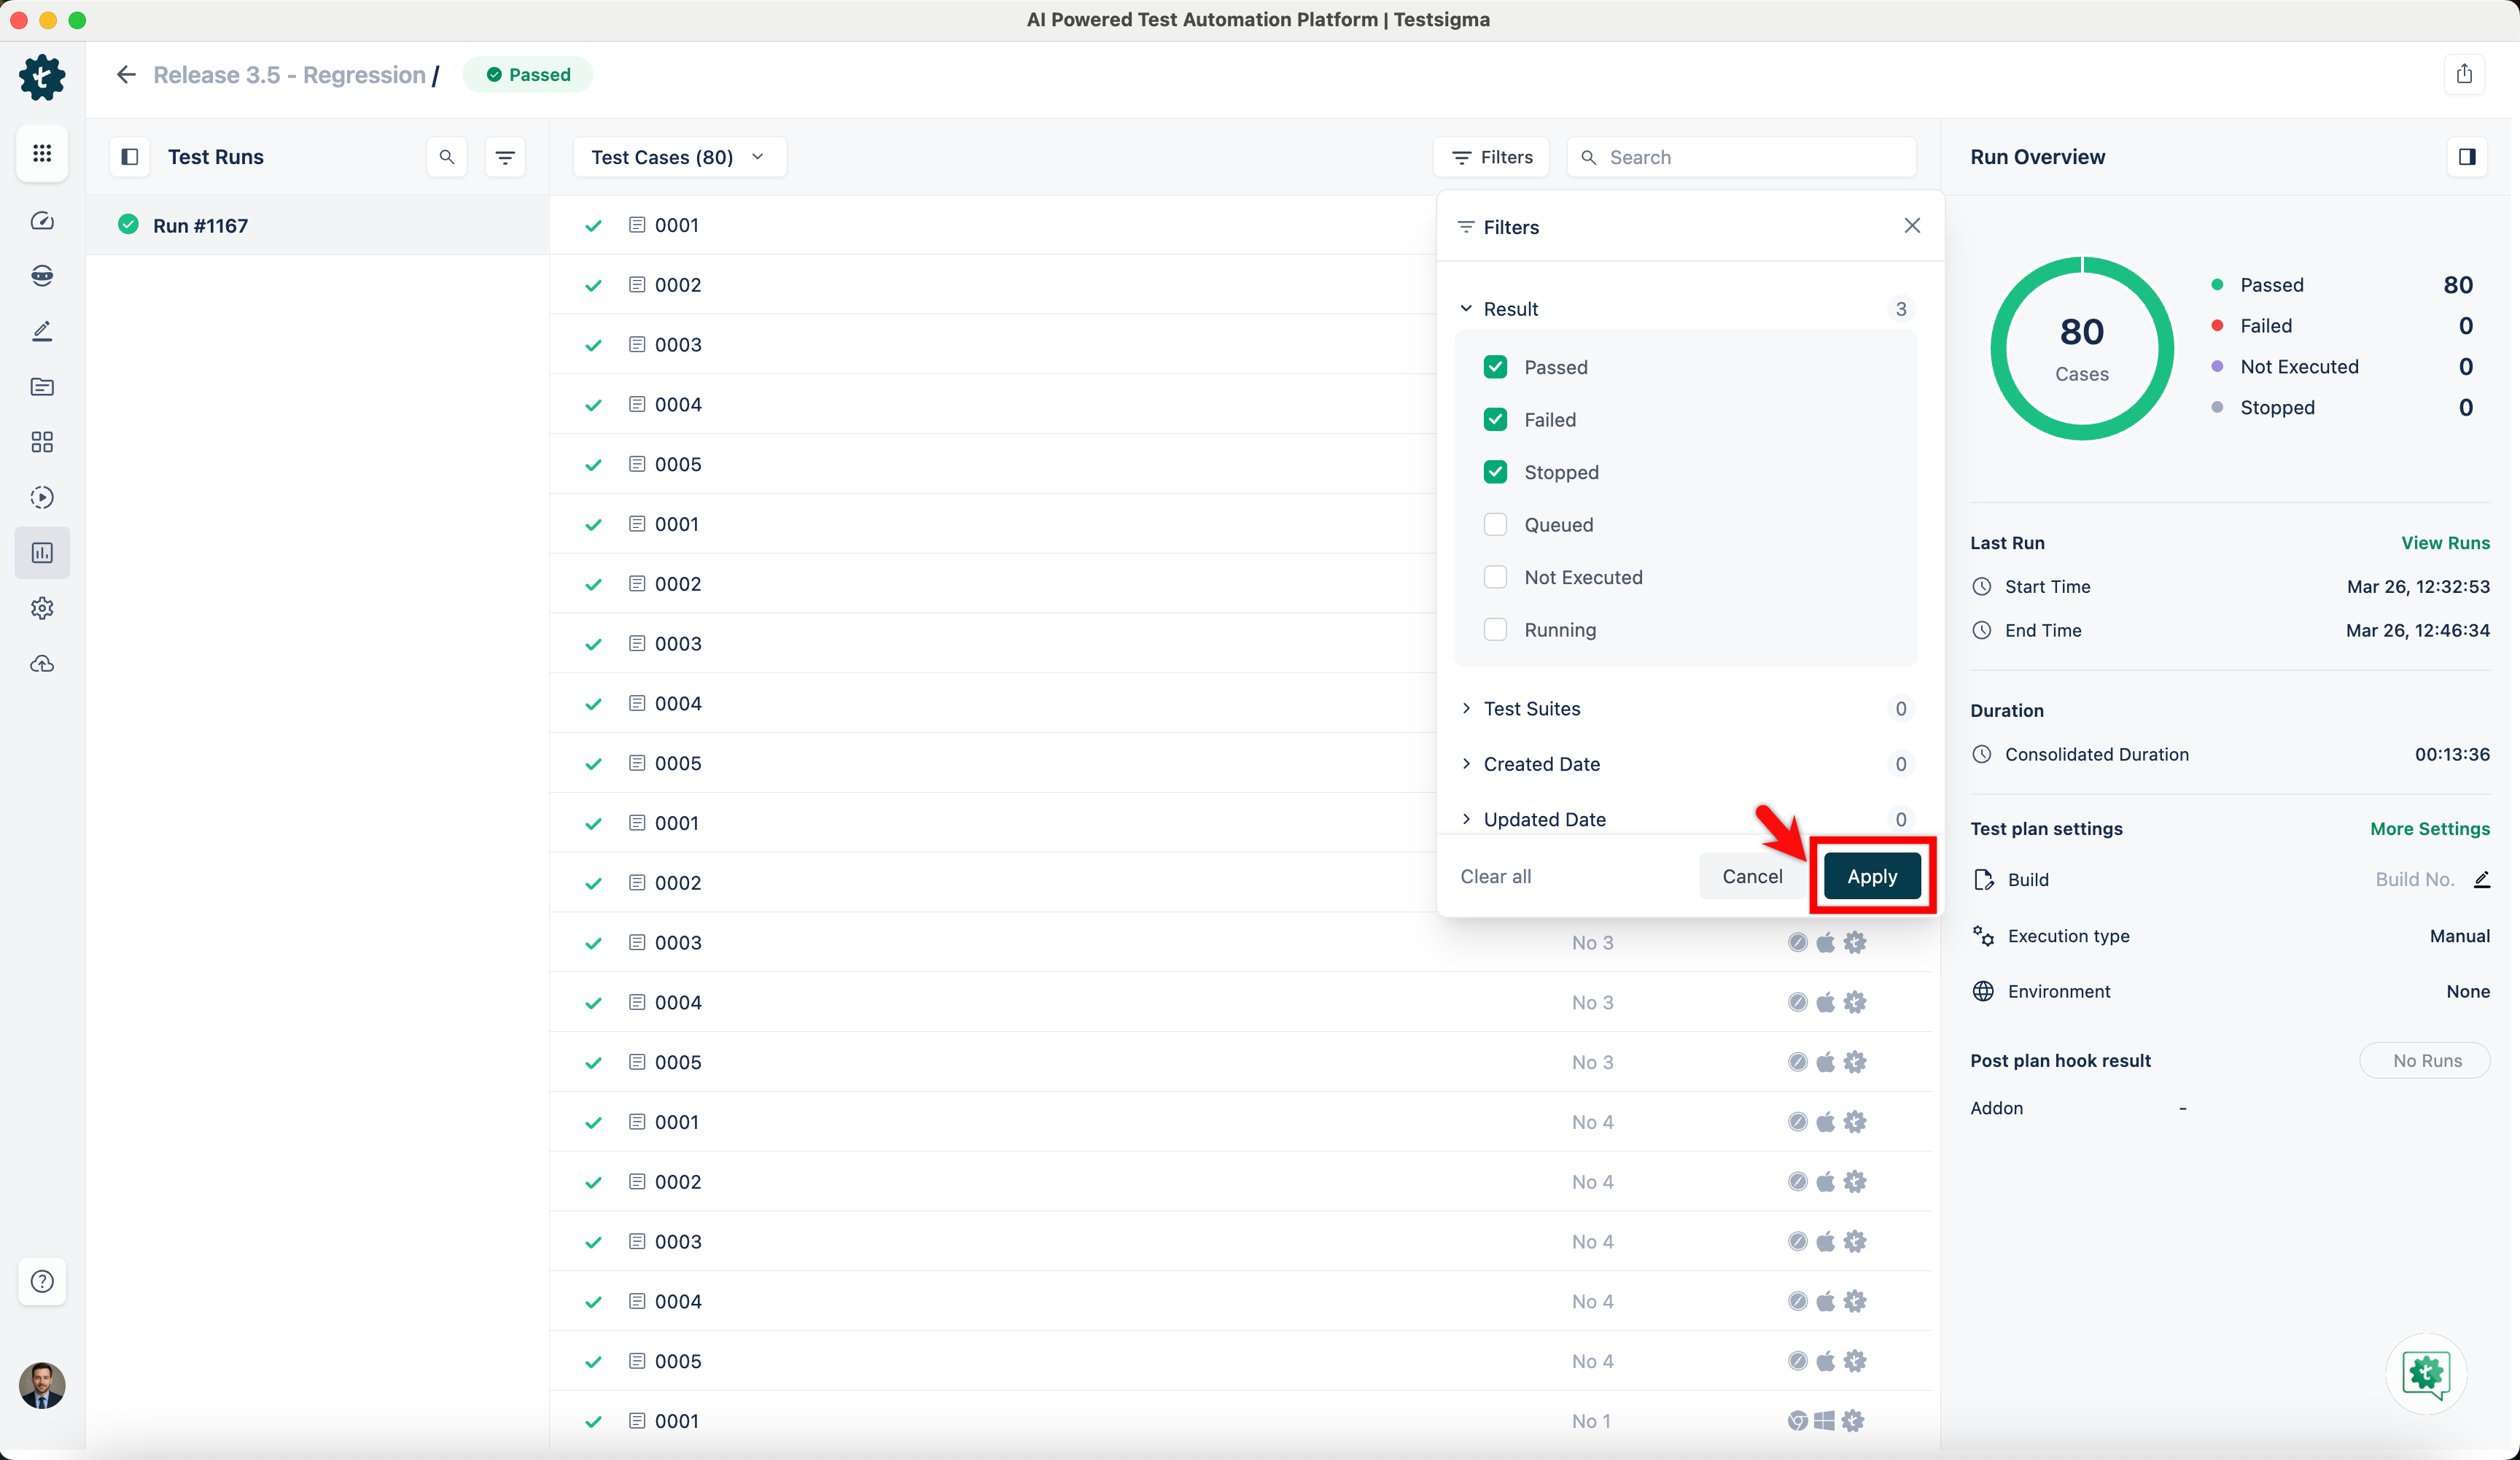
7. You can click a status in the chart within the **Run Overview** to apply additional filters on top of it.


Here's a quick GIF demonstrating how to apply filters on the run results Page.

![Applying Filters](https://s3.amazonaws.com/static-docs.testsigma.com/new_images/projects/applications/Filters_On_RunResults.gif)
![Run overview](https://s3.amazonaws.com/static-docs.testsigma.com/new_images/projects/reports/update_filters_7.png)

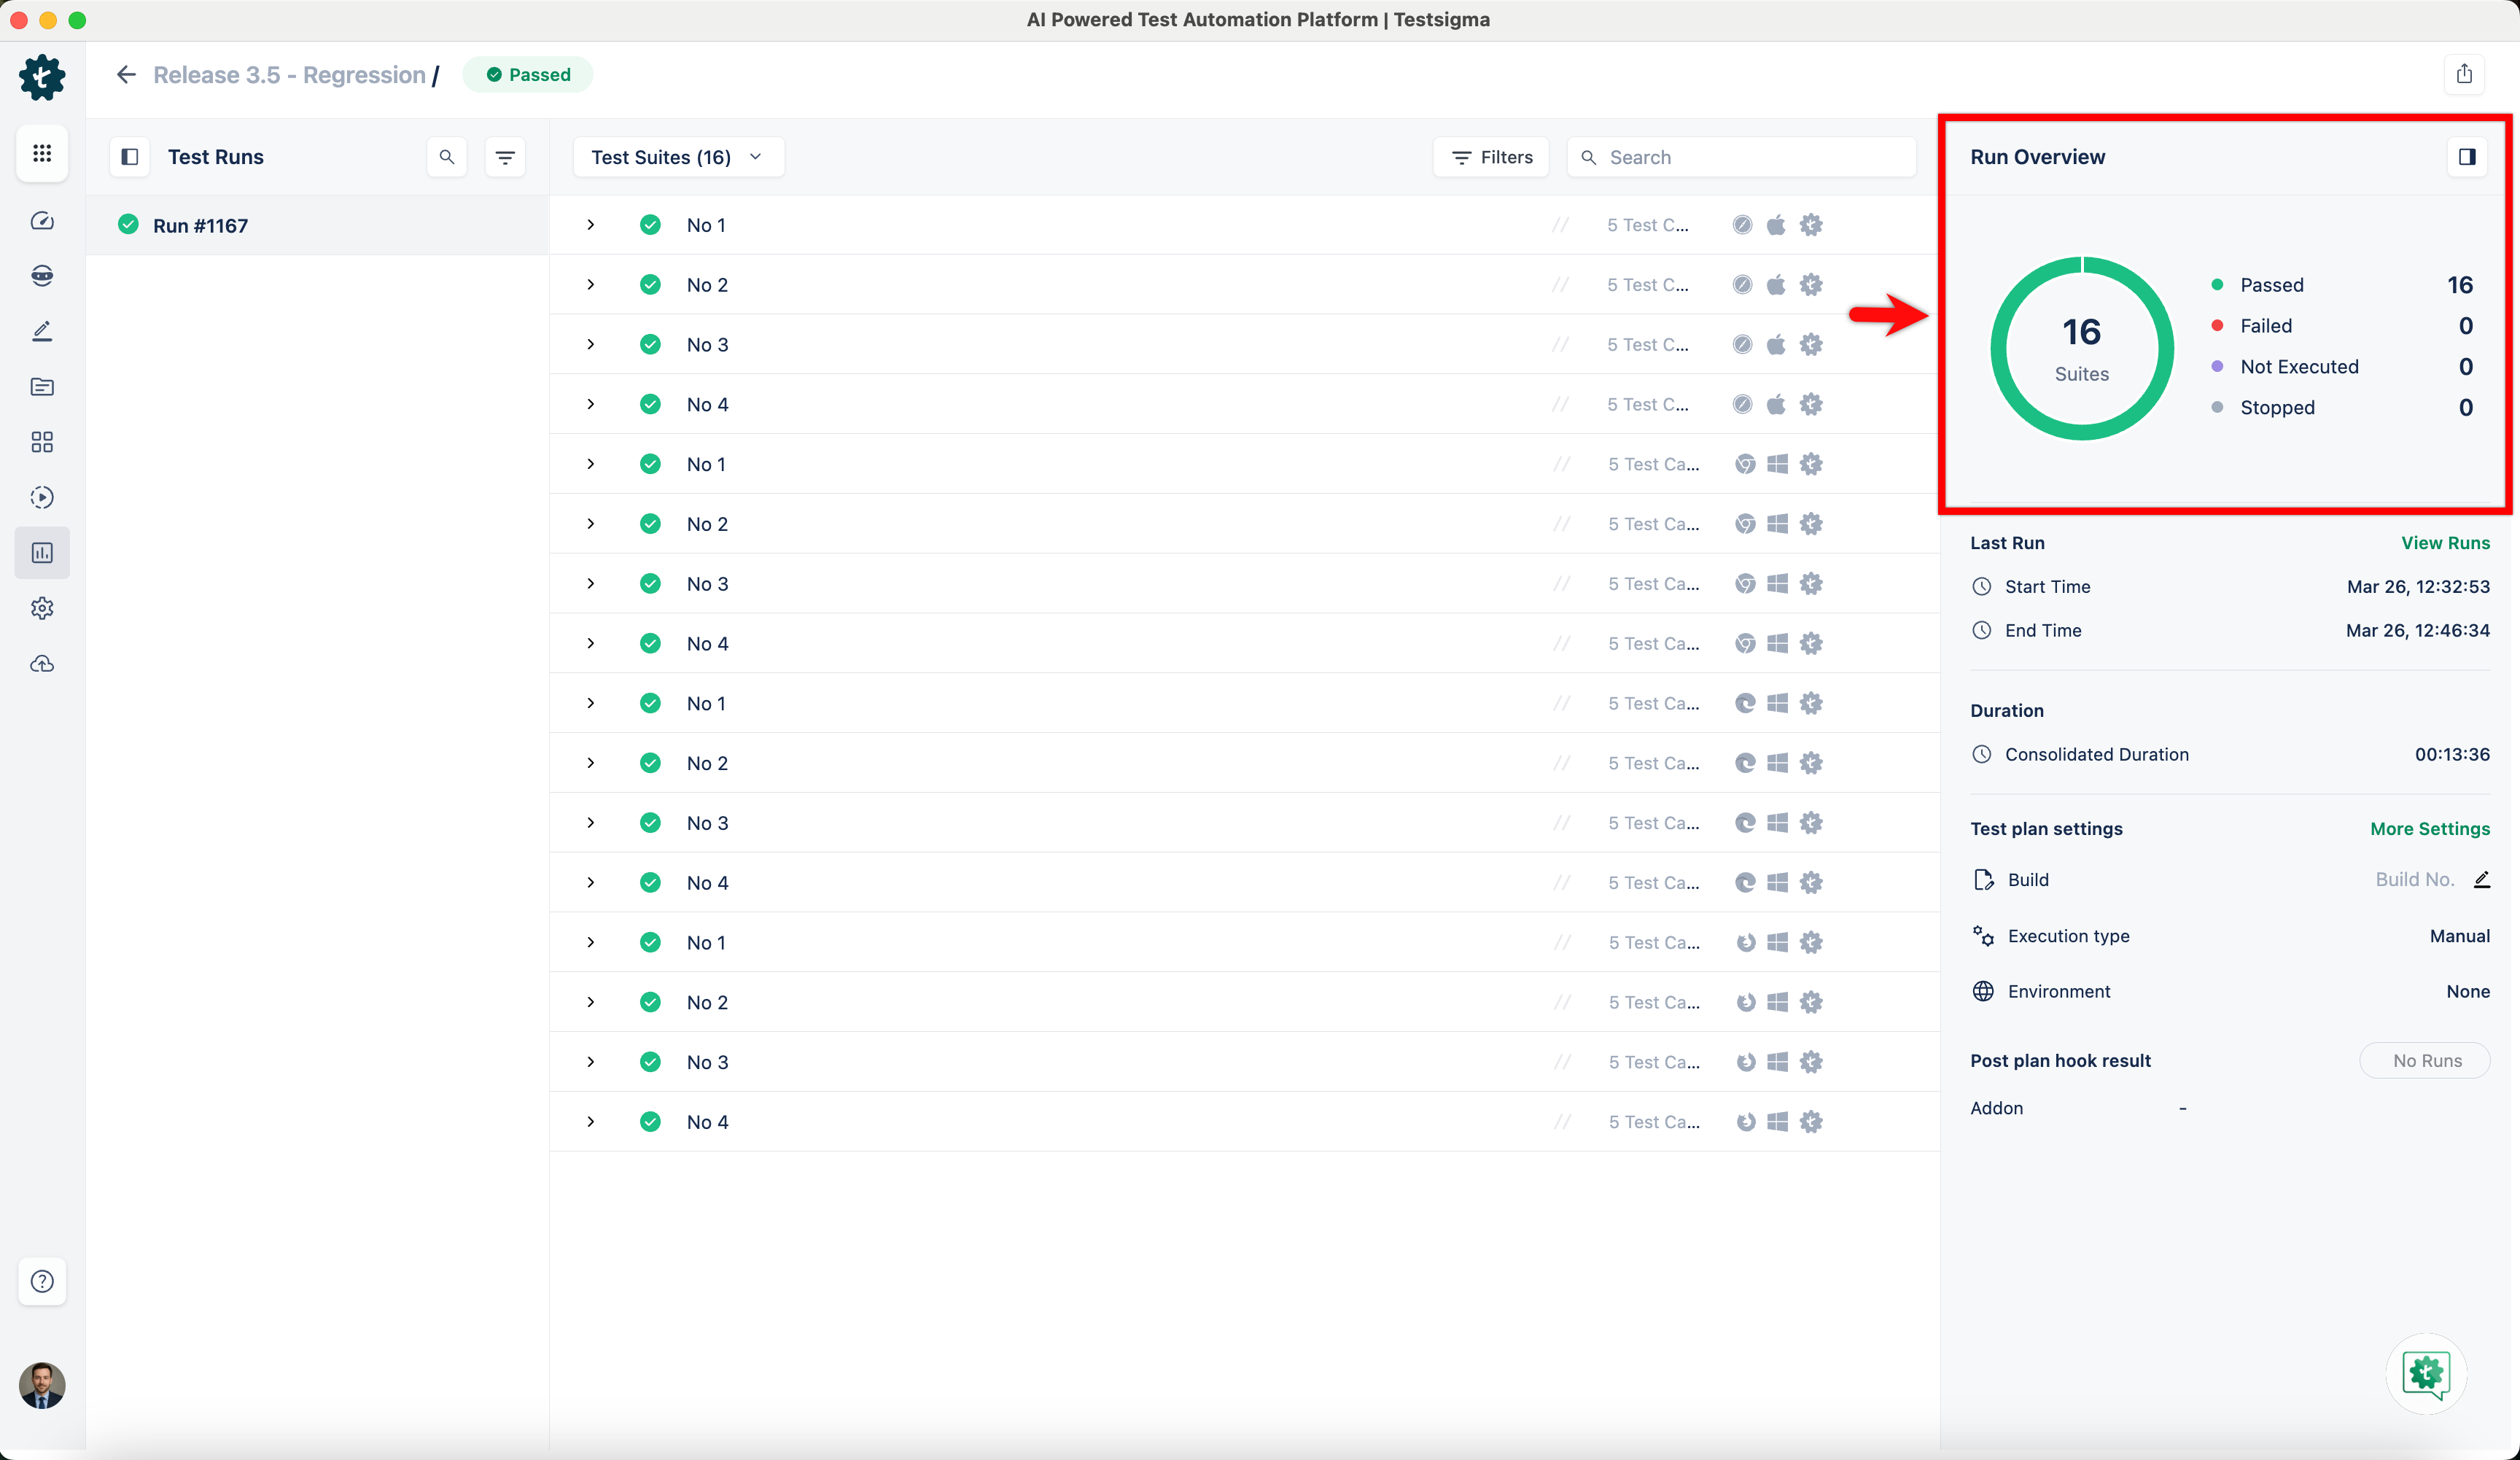
*For more information on viewing and downloading results of a test plan on test case, test suite or test machine levels, refer to the [documentation on test plan run results](https://testsigma.com/docs/reports/runs/drill-down-reports/).*


---
Loading
Loading