Installation Guide for a Single-Site WAN/LAN PC^2 system
This guide is going to thoroughly teach you how to install the PC^2 System on your PC. This guide assumes the computers are connected on the same network either through LAN or WAN. You should also have a valid administrator account. If performed on a JHS school computer, use the login "JHSCS010" with the password "password".
This guide will be split into multiple parts which can be found in the table of contents below.
- Download and Set-Up
- Server
- pc2v9.ini Configuration
- Administrator Panel 4.1. Logging In 4.2. Generating Accounts 4.3. Problems 4.4. Judges 4.5. Languages
- Starting the contest
- Judging Panel
- Contact Us
3.1. Finding your IP
Perform this task on all machines
Please ensure you have Java JDK/SDK 1.8+ downloaded. If not, please download from https://www.java.com/download/ie_manual.jsp
- Download the PC^2 software from https://pc2ccs.github.io/ . If you are asked for an admin account, use JHSCS010 with the password "password"
- Unzip the software into any directory, preferably outside of the downloads directory.
You will need to add two new values to the path environment value in order to run pc^2. Firstly, open your settings app and navigate to settings. Then click the additional option labeled "Advanced system settings".
From here, click on the "Environment Variables" dialogue, click on "Path" variable under "System Variables" and then click the "Edit" button.
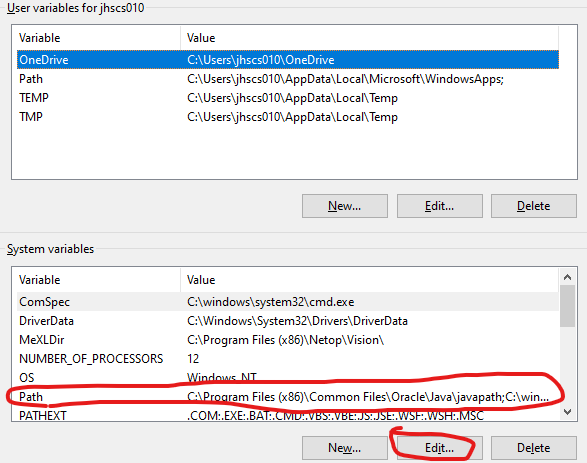
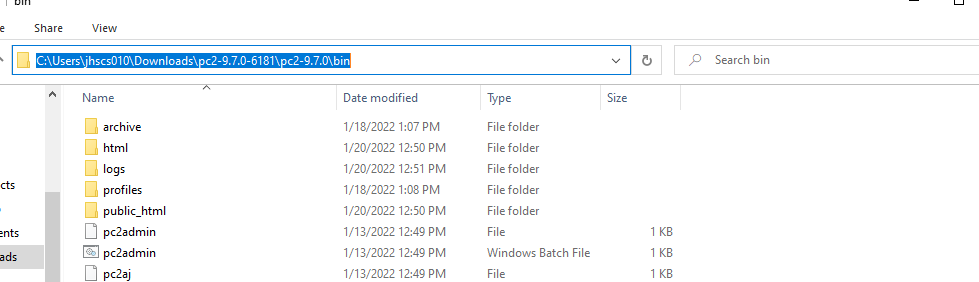
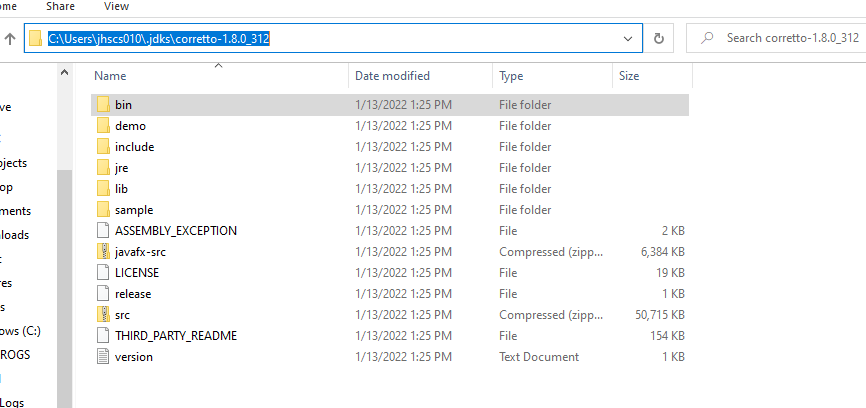
Once the new menu opens, you're going to create 2 new variables. One will be equal to the bin folder of your Java JDK, usually at "C:/Users/(username here)/.jdks/(jdk name)/bin/", and the other will be equal to your pc2's bin folder. To copy a path, simply navigate to the file or directory that you want to copy, click on the top bar, and copy the resulting text.
This task is to be performed on a server machine only
You'll need to move the "pc2v9.ini" file to the "bin" directory. Don't tamper with this file on this machine.
Inside of the bin folder, open "pc2server.bat". This is a Windows Batch file, and as such, will give you a security warning upon running. Click past this warning and run it anyways.
Once the GUI is open, login with the username and password "site1". You'll need to specify a contest password if this is your first time logging in. You'll need this password if you want to login to the server every again.
Once the Server GUI opens, you're done with this step. Leave the server open otherwise you won't be able to connect anything.
This step should be followed on ALL client machines.
Open the "pc2v9.ini" file in any text editor. It'll appear as a "Configuration Settings" file.
Once open, go to where it says "Site 1" and change localhost to whatever your server machine's IP is. If you don't know how to find this, go to Appendix 3.1 "Finding Your IP"
Your result should look something like this:

Once done, save the file and place it into the "bin" directory.
This is the biggest part of the Guide. The Administrator panel allows for almost full control of the Competition, its authority only one-upped by the server panel itself.
This will be split into many different parts regarding the Administrator Panel. Though the topics in this section aren't necessarily related to administration, they are, nevertheless, a part of the admin interface and thus will be covered.
Step 4.1 should be completed on one admin computer. Future admin-related steps can be included on any computers with an admin account. Generating accounts will be covered in part 4.2 "Generating Accounts"
Once your .ini has been placed into the bin folder, go into the bin folder and run "pc2admin". This will open a login screen similar to the one seen before. Login with the username "root" and password "administrator1". Once logged in, click on the admin account in the "Accounts" tab, click the "edit" button near the bottom of the screen, and change the password to something else, otherwise you risk compromising the admin account. Once done, save your changes and move onto the next step.
At the bottom of the accounts tab, there will be a generate button. This button allows any administrator to generate accounts very easily. The types of accounts that one can generate are "Team", which act as a normal participant in a tournament, "Admin", which act identical to the root administrator, "Judge", which allow for manual and automatic judgement of runs, and "Scoreboard", which allows the scores for each team to be displayed in a window. The amount of accounts that one will need will vary from competition to competition, but 1 of each type is good enough for testing.
Once the accounts are generated, feel free to edit their details as much as you want, but messing with the permissions is advised against.
Problems are, of course, the problems that the participants of the competition can answer. They can have automatic or manual grading, require STDIN input or file input, validate output, and more. For the full list of things that problems can do, it is best you read the API documentation, but we will give a summed up version here.
Problems can be created in the "Problems" tab of the administrator window. At the bottom of this tab, you'll see an "Add" button that allows for custom problems to be created.
Once the Add dialogue pops up, you'll see some fields. Here's what all of them do:
"Problem Name": The name of the problem that judges, admins, and contestants see. "Run Timeout Limit": The amount of seconds the program can run before being halted. "Short Name": A small string of characters that represents the problem internally.
-
Input Data Problem requires input data? - Whether or not the problem requires input data Team Reads From - Whether the problem will read input from a STDIN input stream (Such as System.in) or from a Data File
-
Answer Files Judges have provided answer file - Whether or not the judge object for the program will provide an answer file. An answer file is a simple .dat with the expected output of the program.
On the judging tab, you can set whether or not the problem is to be manually or automatically graded. In our case, turn on automatically.
Judges are both the automatic and manual form of grading problems. They're very simple to set up. Go to the judge tab of the administrator panel. You'll see a singular judge from when we generated accounts before. Edit this judge by clicking on it and selecting "edit". Make sure it can auto judge by ticking the checkbox next to "Auto judge".
Judges will judge the program based off of the answer file provided earlier when making the problem. The team member will compile the code and send it to the judges, who will check if their output matches the answer file. If so, they get a point.
The language that the competition allows its users to use. In our case, this will be Java. This will only work if you correctly configured the installation as instructed in step 1.
To start your contest, go to the "Times" panel on the admin window and look at the site that you're operating on. Simply click on it and press "Start", and the competition will start, allowing team members to see their problems and submit. If you want to edit a contest's length, click the "Edit" button and change accordingly.
This just needs to be run so auto-judging can begin, but here's a few things it can do. Assuming you followed the steps above, you'll already have generated at least one judge account. Log in with whatever username and password it has, default is judge1 judge1. Once this panel is opened, it will turn on autojudging, assuming you followed the steps above.
Runs View all submitted runs from the team members Bored play a game if you're bored
If you need any help working anything, here are some contacts:
Alrighty#8890
This Github page (Preferred)
3.1: Finding your IP:
Go to the control panel on your device. Click the greene text that reads "Network and Internet". Then click the green text that says "Network and Sharing Center". On the right side of the screen, there will be blue text that says your internet's name or ethernet. Click on it and then click the small text that says "Details". Near the top, you'll see something that says "IPv4 Address". This is what you want.