GalleryControls
In this post I’ll show you how to use the different galleries available with the Windows Ribbon Framework.
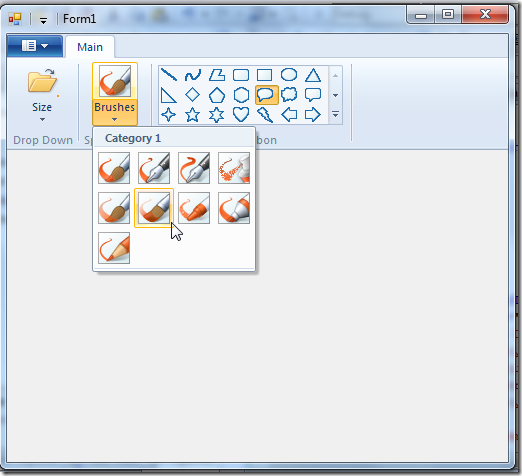
The result of this post is a new sample named “09-Galleries”. It looks like this:

Item Galleries vs. Command Galleries The galleries that we will soon review comes in two flavors: item galleries and command galleries. In this section will see what’s the difference between these two.
Item Galleries
-
Gallery items are “simple” items, just text and image, similar to items in a ComboBox.
-
Items have an index and there is a concept of "Selected Item”.
-
Item galleries support preview. This means you get a “preview” notification (event) when you move over an item and also a “cancel preview” notification when you cancel the selection.
-
A single item in an item gallery has the following properties: Label, Image and Category Id.
!Note:
A ComboBox ribbon control is also an item gallery.
Command Galleries
-
Gallery items are actually commands.
-
The Commands are not indexed and thus doesn’t have the concept of “Selected Item”.
-
Command galleries doesn’t support preview.
-
A single item in a command gallery has the following properties: Command Id, Command Type and Category Id.
!Note:
Both gallery types have the concept of categories, see ComboBox post for more details.
Gallery Types Now we will review the 3 gallery types we have; each one can be an item gallery or command gallery. Note that according to MSDN a ComboBox is also considered to be a gallery which is always an item gallery. Since we already review the ComboBox in a previous post, I won’t mention it here.
-
DropDownGallery Just a button that a click on it displays a list of items. The button itself has no action. In the first image above, the leftmost control is a DropDownGallery.
-
SplitButtonGallery Two buttons, one that is used as a default action and another one that opens a list of items. In the second image above, the middle control is a SplitButtonGallery.
!Note: We already saw in a previous post that the main difference between a DropDownButton and a SplitButton is that a SplitButton has a default item.
- InRibbonGallery The items are displayed inside the ribbon; no button is needed. In the images above, the rightmost control is an InRibbonGallery.
Command Space One additional feature you should know about, in the sake of completeness, is that all 3 galleries have a command space. This is a section on the bottom of the control that contains statically defined commands. In the first image above, the DropDownGallery has a button defined in its command space.
Using Galleries In the next sections I’ll show you how to define galleries in ribbon markup and use the new helper classes for easily operate on them. Note that since galleries have many options. I will demonstrate only a representative subset.
Using DropDownGallery – Ribbon Markup
Here I’ll show you how to use the DropDownGallery as an item gallery with a command space.
Commands section:
<Application.Commands>
  <Command Name='cmdTabMain' Id='1000' LabelTitle='Main' />
  <Command Name='cmdGroupDropDownGallery' Id='1001' LabelTitle='Drop Down' />
  <Command Name='cmdDropDownGallery' Id='1002' LabelTitle='Size' >
    <Command.LargeImages>
      <Image>Res/Open32.bmp</Image>
    </Command.LargeImages>
    <Command.SmallImages>
      <Image>Res/Open16.bmp</Image>
    </Command.SmallImages>
  </Command>
  <Command Name='cmdCommandSpace' Id='1003' LabelTitle='Command Space' >
    <Command.LargeImages>
      <Image>Res/Save32.bmp</Image>
    </Command.LargeImages>
    <Command.SmallImages>
      <Image>Res/Save16.bmp</Image>
    </Command.SmallImages>
  </Command>
  …
</Application.Commands>
Views section:
<Application.Views>
  <Ribbon>
    <Ribbon.Tabs>
      <Tab CommandName='cmdTabMain'>
        <Group CommandName='cmdGroupDropDownGallery' SizeDefinition='OneButton'>
          <DropDownGallery CommandName='cmdDropDownGallery'
                           TextPosition='Hide'
                           Type='Items'>
            <DropDownGallery.MenuLayout>
              <FlowMenuLayout Columns='1' Rows='5' Gripper='None' />
            </DropDownGallery.MenuLayout>
            <DropDownGallery.MenuGroups>
              <MenuGroup>
                <Button CommandName='cmdCommandSpace' />
              </MenuGroup>
            </DropDownGallery.MenuGroups>
          </DropDownGallery>
        </Group>
        …
      </Tab>
    </Ribbon.Tabs>
  </Ribbon>
</Application.Views>
In the view part you define the use of a DropDownGallery along with its layout (how many columns and rows you want) and command space. What makes this gallery an item gallery is setting the Type attribute to ‘Items’. More details about DropDownGallery attributes can be found on MSDN.
Using DropDownGallery – Code Behind
Create an instance of RibbonDropDownGallery helper class and register some of its events:
partial class RibbonItems
{
    private RibbonButton[] _buttons;
    private Form1 _form;

    public void Init(Form1 form)
    {
        _form = form;
        DropDownGallery.ItemsSourceReady += new EventHandler<EventArgs>(_dropDownGallery_ItemsSourceReady);

        DropDownGallery.SelectedIndexChanged += new EventHandler<GalleryItemEventArgs>(_dropDownGallery_ExecuteEvent);
        DropDownGallery.Preview += new EventHandler<GalleryItemEventArgs>(_dropDownGallery_OnPreview);
        DropDownGallery.CancelPreview += new EventHandler<GalleryItemEventArgs>(_dropDownGallery_OnCancelPreview);
    }

    void _dropDownGallery_OnCancelPreview(object sender, GalleryItemEventArgs e)
    {
        SelectedItem<GalleryItemPropertySet> item = e.SelectedItem;
        Debug.WriteLine("DropDownGallery::OnCancelPreview");
    }

    void _dropDownGallery_OnPreview(object sender, GalleryItemEventArgs e)
    {
        SelectedItem<GalleryItemPropertySet> item = e.SelectedItem;
        Debug.WriteLine("DropDownGallery::OnPreview");
    }

    void _dropDownGallery_ExecuteEvent(object sender, GalleryItemEventArgs e)
    {
        SelectedItem<GalleryItemPropertySet> item = e.SelectedItem;
        Debug.WriteLine("DropDownGallery::Selected = " + item.SelectedItemIndex);
        Debug.WriteLine("DropDownGallery::ExecuteEvent");
    }
}
Add items to the DropDownGallery:
void _dropDownGallery_ItemsSourceReady(object sender, EventArgs e)
{
    // set label
    DropDownGallery.Label = "Size";

    // set _dropDownGallery items
    UICollection<GalleryItemPropertySet> itemsSource = DropDownGallery.GalleryItemItemsSource;
    itemsSource.Clear();
    foreach (Image image in _form.ImageListLines.Images)
    {
        itemsSource.Add(new GalleryItemPropertySet()
        {
            ItemImage = new UIImage(Ribbon, (Bitmap)image)
        });
    }
}
Note that I’m using here a standard ImageList control to supply the bitmaps for the DropDownGallery. GalleryItemPropertySet is a helper class that represents a single item in an item gallery.
Using SplitButtonGallery – Ribbon Markup
Here I’ll show you how to use the SplitButtonGallery as a command gallery.
Commands section:
<Command Name='cmdGroupSplitButtonGallery' Id='1004' LabelTitle='Split Button' />
<Command Name='cmdSplitButtonGallery' Id='1005' LabelTitle='Brushes' >
  <Command.LargeImages>
    <Image>Res/Brush1.bmp</Image>
  </Command.LargeImages>
</Command>
Views section:
…
<Group CommandName="cmdGroupSplitButtonGallery" SizeDefinition="OneButton">
  <SplitButtonGallery CommandName="cmdSplitButtonGallery"
                      TextPosition="Hide" Type="Commands" HasLargeItems="true">
    <SplitButtonGallery.MenuLayout>
      <FlowMenuLayout Columns="4" Rows="3" Gripper="None"/>
    </SplitButtonGallery.MenuLayout>
  </SplitButtonGallery>
</Group>
…
In the view part you define the use of a SplitButtonGallery along with its layout (how many columns and rows you want), and optionally, a command space. What makes this gallery a command gallery is setting the Type attribute to ‘Commands’. More details about SplitButtonGallery attributes can be found on MSDN.
Using SplitButtonGallery – Code Behind
Create an instance of RibbonLib.Controls.SplitButtonGallery helper class.
partial class RibbonItems
{
     private RibbonButton[] _buttons;
     private Form1 _form;

     public void Init(Form1 form)
     {
         _form = form;
         SplitButtonGallery.CategoriesReady += new EventHandler<EventArgs>(_splitButtonGallery_CategoriesReady);
         SplitButtonGallery.ItemsSourceReady += new EventHandler<EventArgs>(_splitButtonGallery_ItemsSourceReady);
     }
}
Add items to the SplitButtonGallery:
void _splitButtonGallery_CategoriesReady(object sender, EventArgs e)
{
    // set _splitButtonGallery categories
    UICollection<CategoriesPropertySet> categories = SplitButtonGallery.GalleryCategories;
    categories.Clear();
    categories.Add(new CategoriesPropertySet() { Label = "Category 1", CategoryId = 1 });
}

void _splitButtonGallery_ItemsSourceReady(object sender, EventArgs e)
{
    // set label
    SplitButtonGallery.Label = "Brushes";

    // prepare helper classes for commands
    _buttons = new RibbonButton[_form.ImageListBrushes.Images.Count];
    uint i;
    for (i = 0; i < _buttons.Length; ++i)
    {
        _buttons[i] = new RibbonButton(Ribbon, 2000 + i)
        {
            Label = "Label " + i.ToString(),
            LargeImage = new UIImage(Ribbon, (Bitmap)_form.ImageListBrushes.Images[(int)i])
        };
    }

    // set _splitButtonGallery items
    UICollection<GalleryCommandPropertySet> itemsSource = SplitButtonGallery.GalleryCommandItemsSource;
    itemsSource.Clear();
    i = 0;
    foreach (Image image in _form.ImageListBrushes.Images)
    {
        itemsSource.Add(new GalleryCommandPropertySet()
        {
            CommandId = 2000 + i++,
            CommandType = CommandType.Action,
            CategoryId = 1
        });
    }
}
GalleryCommandPropertySet is a helper class that represents a single item in a command gallery.
Important: If you don’t add the default item to the items list of a SplitButtonGallery, the items will appear twice! This is probably a bug.
Using InRibbonGallery – Ribbon Markup Here I’ll show you how to use the InRibbonGallery as an item gallery. Commands section:
<Command Name='cmdGroupInRibbonGallery' Id='1006' LabelTitle='In Ribbon' />
<Command Name='cmdInRibbonGallery' Id='1007' />
Views section:
…
<Group CommandName="cmdGroupInRibbonGallery" SizeDefinition="OneInRibbonGallery">
  <InRibbonGallery CommandName="cmdInRibbonGallery" Type="Items"
                   MaxRows="3" MaxColumns="7">
  </InRibbonGallery>
</Group>
…
In the view part you define the use of an InRibbonGallery along with its layout. Note that InRibbonGallery has more control on how to layout its items. More details about InRibbonGallery attributes can be found on MSDN.
Using InRibbonGallery – Code Behind Similar to DropDownGallery code. This post is long enough.