Releases: b451c/ReaperHaptic
Releases · b451c/ReaperHaptic
ReaperHaptic v1.1.3
ReaperHaptic v1.1.3
Haptic feedback for Logitech MX Master 4 mouse, triggered by REAPER DAW events.
What's New
- Toggle state support - toolbar icon now properly shows active/inactive state
- Toolbar icons - Normal and Active states in 100%, 150%, 200% scales
- Script registers as toggle action using
SetToggleCommandState
Installation
- Download
ReaperHaptic.lplug4and double-click to install - Download
reaper_haptic_monitor.luato~/Library/Application Support/REAPER/Scripts/ - Copy
toolbar_icons/to~/Library/Application Support/REAPER/Data/toolbar_icons/ - In REAPER: Actions > Load ReaScript > select the script
- Install mavriq-lua-sockets for REAPER
Requirements
- macOS 14+
- Logitech MX Master 4
- Logi Options+
- REAPER 7.0+
Full Changelog
https://github.com/b451c/ReaperHaptic/blob/main/CHANGELOG.md
ReaperHaptic v1.1.2
ReaperHaptic v1.1.2
Haptic feedback for Logitech MX Master 4 mouse, triggered by REAPER DAW events.
What's New in v1.1.2
Bug Fixes:
- Fixed dock position not being remembered after REAPER restart
- Window now opens in the exact docker location where it was last placed
What's New in v1.1.1
- Removed console output on script startup (cleaner experience)
- Console messages now only appear for errors or in debug mode
Features (since v1.1.0)
- Configuration GUI with toggle switches for all haptic events
- LED indicator that flashes green on haptic feedback
- Collapse mode - minimize to LED-only view
- Dock support - dock to any REAPER Docker position
- Background mode - close window, script keeps running
- Persistent settings - all preferences saved automatically
Installation
- Download
ReaperHaptic.lplug4and double-click to install - Download
reaper_haptic_monitor.luato~/Library/Application Support/REAPER/Scripts/ - In REAPER: Actions > Load ReaScript > select the script
- Install mavriq-lua-sockets for REAPER
Requirements
- macOS 14+
- Logitech MX Master 4
- Logi Options+
- REAPER 7.0+
Full Changelog
https://github.com/b451c/ReaperHaptic/blob/main/CHANGELOG.md
ReaperHaptic v1.1.0
ReaperHaptic v1.1.0 - Configuration GUI
Haptic feedback for Logitech MX Master 4 mouse, triggered by REAPER DAW events.
What's New
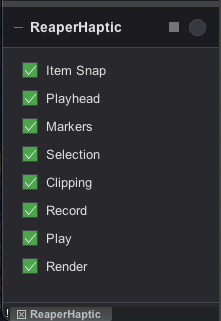
Configuration GUI - Native REAPER gfx-based configuration panel:
- Toggle switches for all 8 haptic event types
- LED indicator that flashes green on haptic feedback
- Collapse/expand mode (click +/- button) for minimal footprint
- Dock support (press
Dor click dock button) for REAPER Docker - Settings persistence via REAPER ExtState
- Background operation - script continues when window is closed
Installation
- Download
ReaperHaptic.lplug4and double-click to install - Download
reaper_haptic_monitor.luato~/Library/Application Support/REAPER/Scripts/ - In REAPER: Actions > Load ReaScript > select the script
- Install mavriq-lua-sockets for REAPER
Requirements
- macOS 14+
- Logitech MX Master 4
- Logi Options+
- REAPER 7.0+
Full Changelog
https://github.com/b451c/ReaperHaptic/blob/main/CHANGELOG.md
ReaperHaptic v1.0.0
ReaperHaptic v1.0.0
Haptic feedback for Logitech MX Master 4 mouse, triggered by REAPER DAW events.
Features
- Item snap detection (items, markers, selection, playhead)
- Clipping detection on master track
- Transport events (record/play start/stop)
- Marker crossing during playback
- Render complete notification
Installation
- Download
ReaperHaptic.lplug4and double-click to install - Download
reaper_haptic_monitor.luato~/Library/Application Support/REAPER/Scripts/ - In REAPER: Actions > Load ReaScript > select the script
- Install mavriq-lua-sockets for REAPER
Requirements
- macOS 14+
- Logitech MX Master 4
- Logi Options+
- REAPER 7.0+