![]()
Advanced diagnostics, battery health monitoring, and system visibility for FEMS in Home Assistant


REST + Modbus integration • Battery health • Diagnostics dashboard
FEMS Diagnostics ist eine inoffizielle Home Assistant Integration für die Diagnose und Überwachung von FEMS-basierten Energiesystemen.
- REST + Modbus Integration
- Batterie-Zustandsüberwachung
- Diagnose von Fehlern und Warnungen
- Spezielles Diagnose-Dashboard
- HACS installieren
- Repository hinzufügen: https://github.com/alpenfun/fems-diagnostics
- Integration installieren und Home Assistant neu starten
👉 Die vollständige Dokumentation befindet sich im englischen Hauptteil dieses README.
FEMS Diagnostics is an unofficial Home Assistant integration focused on diagnostics, health monitoring, and technical visibility for FEMS-based energy systems.
It combines:
- 🌐 REST API data for status and diagnostics
- 🔌 Modbus data for technical real-time values
- 📊 a dedicated diagnostic dashboard for fast anomaly detection
⚠️ Unofficial project
This project is not affiliated with, endorsed by, or supported by FENECON GmbH.
All product names, trademarks, and brand names belong to their respective owners.
- 📡 Parallel REST + Modbus integration
- 🔋 Battery health and operating data
- ⚡ Charger / inverter values
- 🚨 Error, warning, and alarm diagnostics
- 📈 Energy counters and phase values
- 🧠 Derived system state: OK / Warning / Error
- 🔧 Configurable battery module count
- 🧩 Dashboard optimized for diagnosis, not just monitoring
This integration is intentionally positioned as a diagnostic and health tool.
Focus areas:
- Zellgesundheit / cell health
- Spannungsabweichungen / voltage spread (ΔU / ΔV)
- Fehler- und Warnbilder / error and warning patterns
- Kommunikationsstatus / communication state
The goal is to help detect battery issues early instead of only showing general energy flows.
A ready-to-use example dashboard YAML is included in this repository:
docs/dashboard.yaml
It is based on the current diagnostic layout and uses the entity names provided by the integration.
The included example dashboard reflects the current recommended standard layout for diagnostics-focused daily use.
Per-cell voltages are intentionally not shown in the example dashboard.
Why:
- too many entities for a compact diagnosis view
- slower visual interpretation
- module voltage spread plus min/max values are usually the better first indicator
The cell entities are still created by the integration and remain available for advanced users.
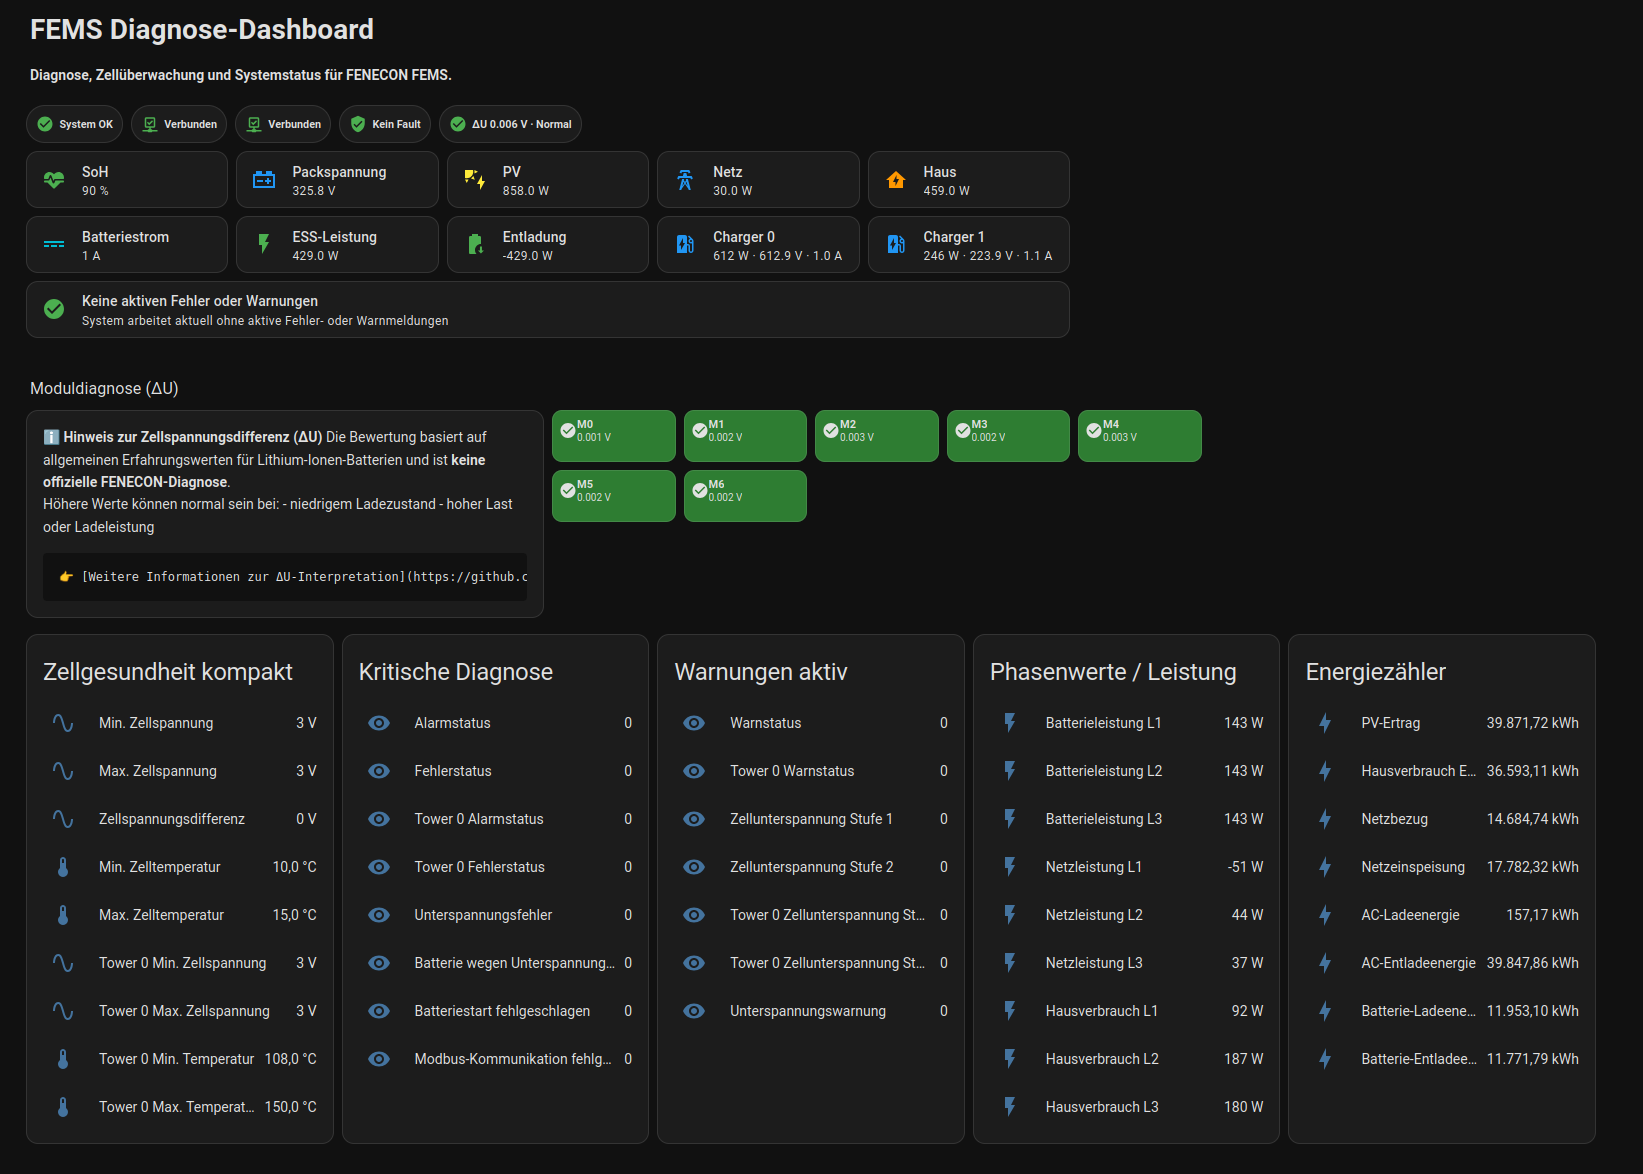
The cell voltage spread (ΔU / ΔV) is one of the key indicators used by this integration to assess battery health.
However, it is important to understand the following:
❗ Not an official manufacturer metric
The thresholds used in this integration:
Spread Interpretation < 0.02 V uncritical 0.02 – 0.05 V observe
0.05 V critical
are engineering heuristics based on general lithium-ion battery behavior.
👉 They are NOT official thresholds from FENECON or any other manufacturer.
⚡ Strongly dependent on operating conditions
The spread between cell voltages is not constant and varies depending on system conditions.
Higher spread values can be completely normal during:
low state of charge (SOC) charging phases high load / discharge currents transient system behavior
In particular:
A higher ΔU at low SOC does not necessarily indicate a battery defect.
🧠 Context-aware evaluation in this integration
To avoid false interpretations, this integration evaluates ΔU with context:
low SOC → separate status (low_soc) high current → separate status (under_load) missing context → not_evaluable
This helps prevent false "critical" indications under normal operating conditions.
📊 Recommendation for users Do not evaluate ΔU based on a single measurement Observe trends over time Compare behavior at similar SOC levels Use manufacturer tools for final diagnosis if needed 🚫 Important disclaimer
This integration is intended as a diagnostic aid.
It does not replace manufacturer diagnostics or official support.
If you suspect a real issue with your system, always consult the official FENECON service.
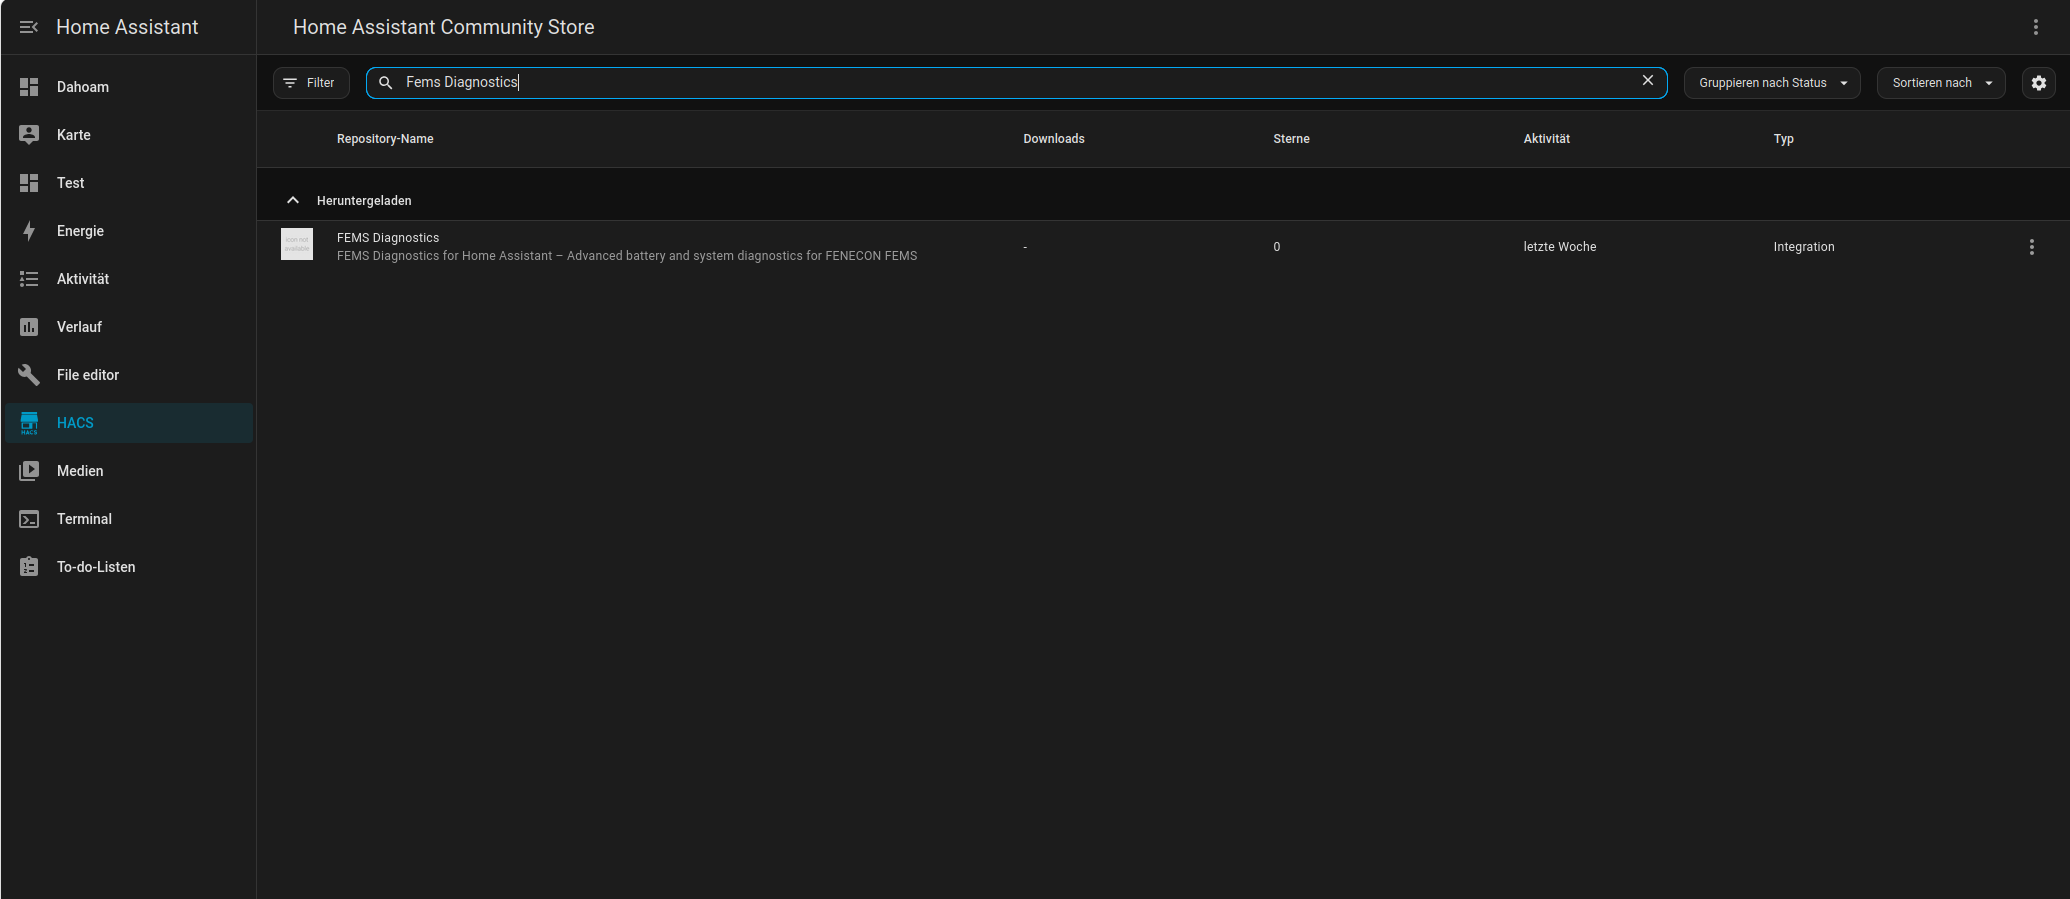
This integration and the example dashboard rely on HACS.
👉 HACS is required to install:
- this integration
- custom dashboard cards
Install HACS here: 👉 https://hacs.xyz/
👉 Without HACS, the integration and dashboard cannot be installed.
For the provided example dashboard you also need:
- 🍄 Mushroom Cards
- 🔘 button-card by @RomRider
These can be installed directly via HACS.
The integration itself can run without the dashboard, but the provided example dashboard depends on those custom dashboard cards.
See the official HACS documentation.
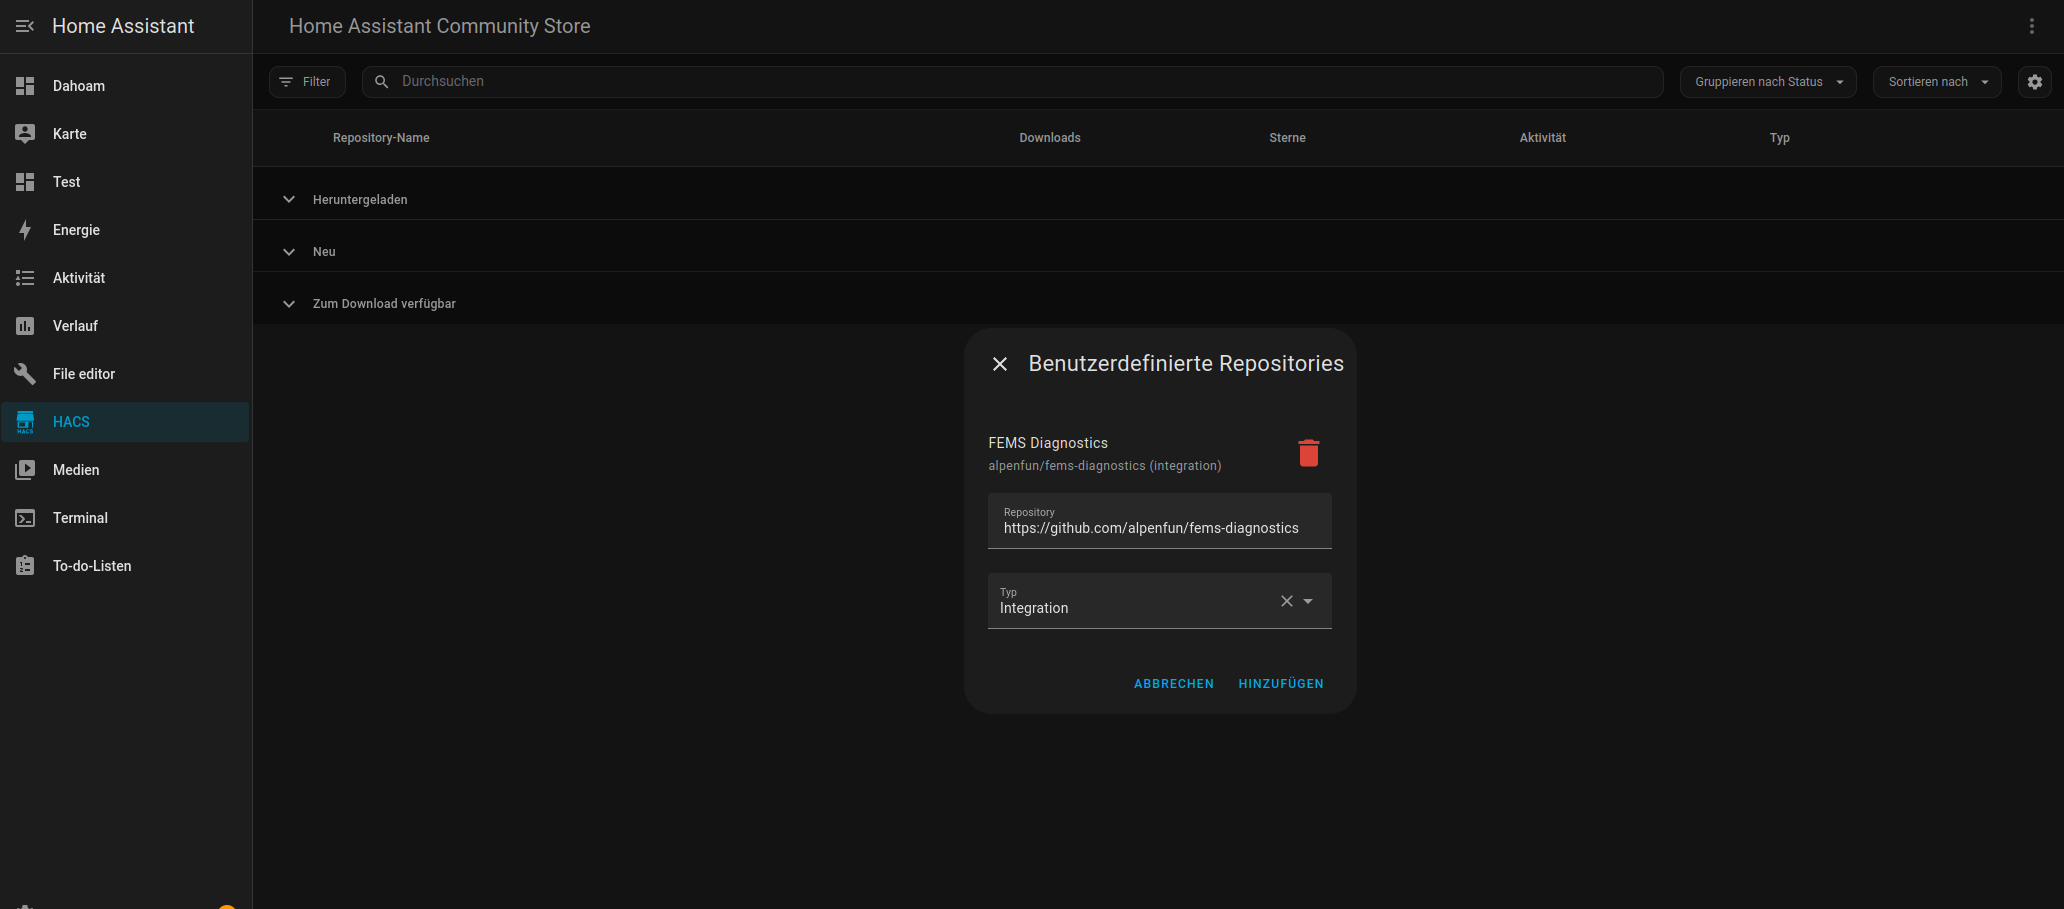
Use this repository URL:
https://github.com/alpenfun/fems-diagnostics
Type:
Integration

Required setup values:
- REST host
- REST port
- Modbus host
- Modbus port
- Modbus slave
- Battery module count
- Username
- Password
The configuration flow currently exposes these setup parameters directly in Home Assistant, including separate REST and Modbus endpoints and the configurable battery module count.
The integration creates six logical devices:
- 🔋 Battery
- ⚡ Charger 0
- ⚡ Charger 1
- 🧠 Diagnostics
- 📊 Energy management
- 🔬 Cells
During setup, the battery module count can be configured from 1 to 10.
This setting controls how many module spread and cell sensors are created.
⚠️ The current default value is a technical placeholder and must be adjusted to match the real system.
If the configured module count does not match the real system, diagnostic values may become misleading.
The integration provides a small set of runtime options to balance update speed, diagnostic depth, and entity count.
Controls how often the main sensor data is updated.
- Lower value = faster updates
- Higher value = lower system load
Recommended default: 30 seconds
Use a lower value only if you need faster updates in daily operation.
Controls how often health and diagnostic values are refreshed.
- Lower value = faster diagnostic updates
- Higher value = lower system load
Recommended default: 60 seconds
In most setups, diagnostics do not need to update as often as general power and status values.
Defines how many battery modules are installed in your system.
Important: This value must match your real physical battery configuration.
⚠️ This setting has a direct impact on sensor creation and diagnostic accuracy.
If the value is incorrect:
- expected sensors may be missing
- additional sensors may appear that do not exist
- diagnostic values may become misleading
Default value: 7 (placeholder only)
The default does not represent a recommended system size.
Typical real-world examples:
- 3 modules → small system (~6–7 kWh)
- 5 modules → common residential setup (~10 kWh)
- 7+ modules → larger systems
Always configure this value according to your actual installation.
Enables creation of individual cell voltage entities.
- Enabled = maximum detail
- Disabled = fewer entities and lower overhead
Recommended default: True
Disable this option if you want to reduce the number of entities or keep the setup simpler.
To use the included example dashboard:
- Open the dashboard editor in Home Assistant
- Switch to YAML mode if needed
- Copy the content of:
docs/dashboard.yaml
- Paste it into your dashboard / view configuration
The provided dashboard view is currently named FEMS Diagnostics and includes status badges, KPI cards, module spread cards, compact health information, critical diagnostics, warnings, phase values, and energy counters.
For a step-by-step setup and customization guide, see:
👉 Dashboard Setup and Customization Guide
📘 Detailed sensor explanations:
👉 Sensors and Diagnostics Guide
The integration provides, among other things:
- SoC
- SoH
- current
- DC voltage
- pack voltage
- capacity
- cycle count
- power
- voltage
- current
- fault status
- warning status
- alarm status
- communication state
- module spread per battery module
- per-cell voltage entities
- system OK
- system warning
- system error
- REST communication
- Modbus communication
Your current binary sensor implementation derives these overall health states from REST and Modbus availability plus fault, warning, and alarm signals.
The total entity count grows with the configured number of battery modules.
Important:
- more modules = more entities
- per-cell voltages are the largest contributor
- the first refresh can take noticeably longer than later updates
- REST is usually slower than Modbus
Recommended structure:
custom_components/fems/
docs/images/
docs/dashboard/
README.md
hacs.json
manifest.json
This README assumes the following documentation files exist:
docs/images/dashboard.pngdocs/images/hacs_installation.pngdocs/images/hacs_search.pngdocs/images/config_flow.pngdocs/dashboard.yaml
If something is not working as expected, check the following first:
- verify REST host and port
- verify Modbus host, port, and slave ID
- check credentials
- initial startup can take longer due to REST requests
- large systems (many modules) create many entities
- verify battery module count
- check if your system matches the configured setup
- check Home Assistant logs
- verify network connectivity to the FEMS system
Most issues are caused by configuration mismatches or connectivity problems.
If you encounter issues with the integration, please follow these steps before opening an issue:
Look for entries related to:
custom_components.fems
Common indicators:
- connection issues (REST / Modbus)
- authentication problems
- timeout warnings
This integration provides a built-in diagnostics function.
You can download diagnostics data via:
Home Assistant → Settings → Devices & Services → FEMS → Download diagnostics
The diagnostics include:
- sanitized configuration (no passwords)
- update status and timing
- REST and Modbus data snapshots
👉 This information is extremely helpful for debugging.
Before reporting a bug, please ensure:
- REST endpoint is reachable
- Modbus connection is working
- credentials are correct
- battery module count matches your system
If the problem persists, please open an issue on GitHub.
Include:
- a clear description of the problem
- steps to reproduce
- relevant log excerpts
- diagnostics file (if possible)
👉 Please use the provided issue templates.
Most issues are related to:
- incorrect endpoints or ports
- Modbus connectivity
- mismatched module configuration
Checking these first usually resolves the problem quickly.
Feedback, issues, and pull requests are welcome.
This project is licensed under the MIT License.
(Deutsch: Dieses Projekt steht unter der MIT-Lizenz – eine sehr freie Open-Source-Lizenz.)