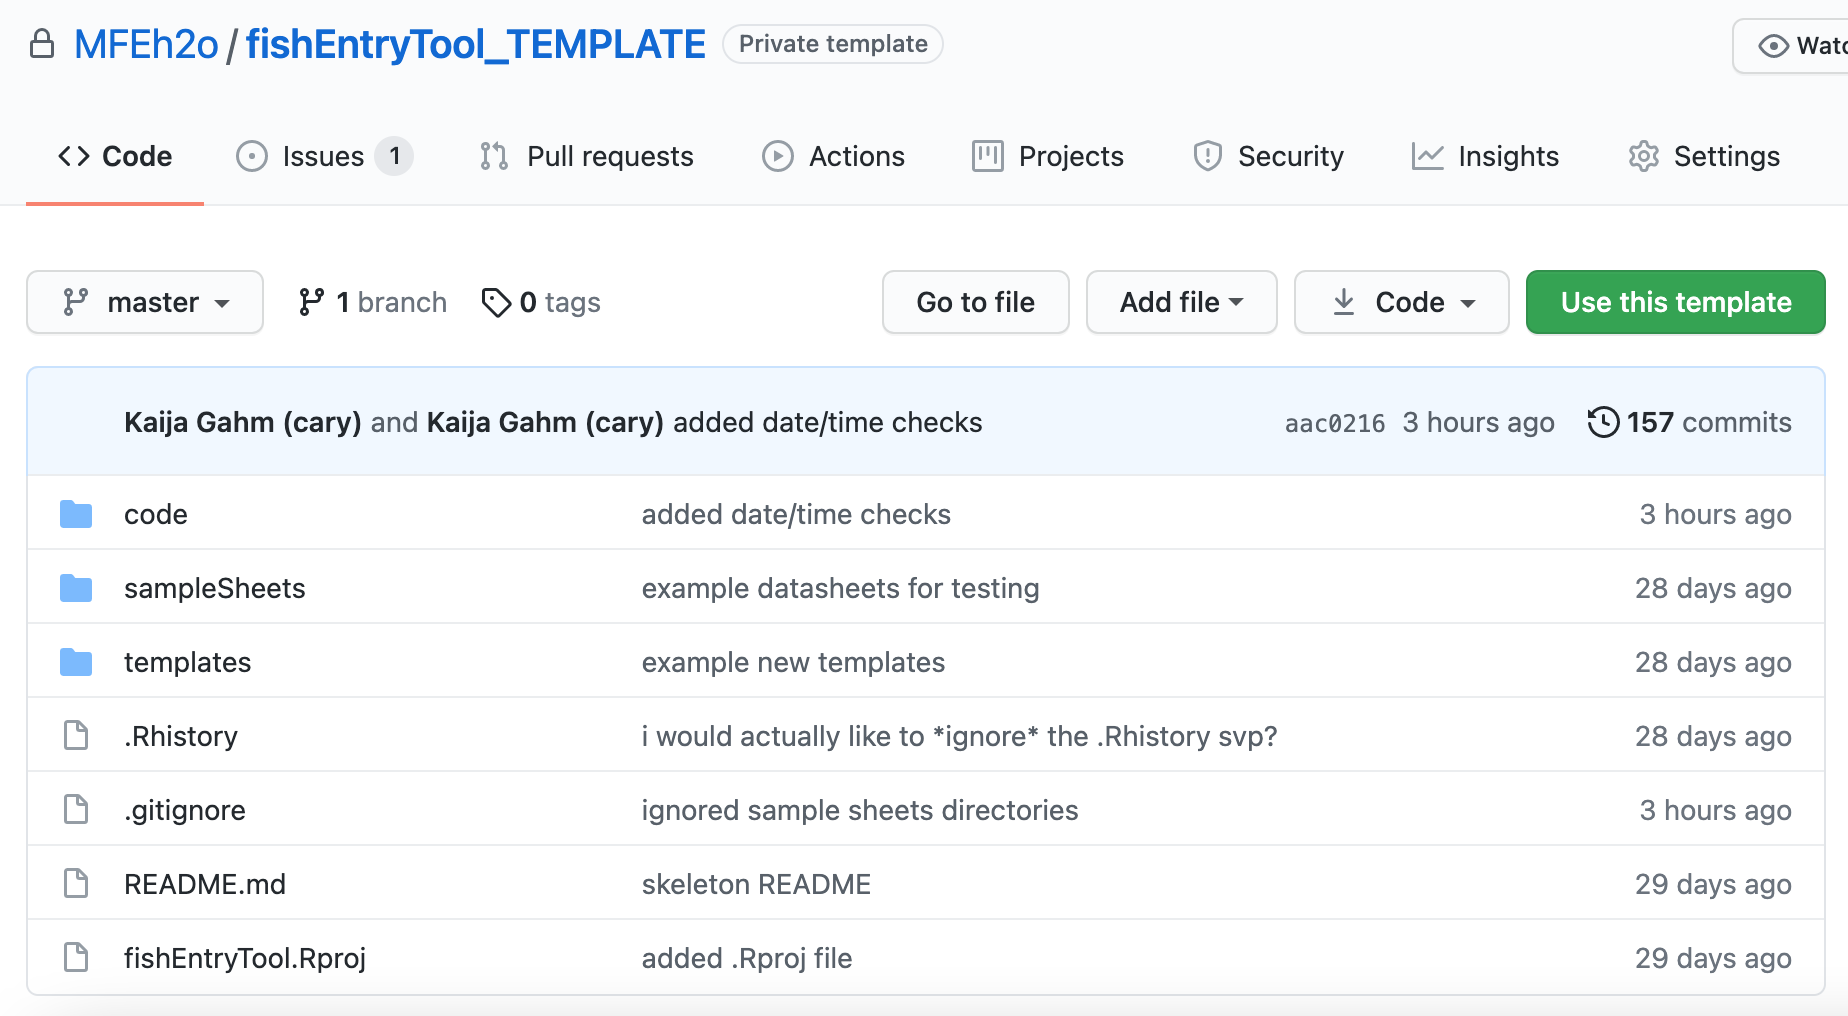
This is a template repository, created by Kaija Gahm on 18 June 2021. It's designed to be duplicated for each year's data entry. Don't use this repo itself to enter and store data––make a copy first!
Not sure how to do that? Follow the instructions below.
Basically, we're going to be following the instructions here, so feel free to refer to that resource instead/in addition to this README.
-
Go to the main page of this repository. If you're reading this README, you're very likely already on the main page. You should see a list of files at the top with their most recent commits.
-
Click the big green Use this template button.
- In the dropdown menu, select the GitHub account that you would like to have as the owner of this repository. You can leave that as MFEh2o.

-
In the field next to the owner, set a name for the new repository. I recommend fishEntryTool_2021 (or whichever year you're entering data for).
-
By default, the repository will be private (i.e. viewable only by members of the MFEh2o "organization" on GitHub).
-
Don't bother selecting "Include all branches"--you don't need that.
-
Don't bother selecting any Marketplace apps--that's not relevant here.
-
Click Create repository from template.
Great, now you've created a new GitHub repository. The next step is to download the files onto whichever computer you're going to be using to enter the data.
-
Make sure you have R and RStudio installed on the computer. If you don't, you can install them here and here.
-
Make sure you have git installed. If you don't, you can follow the instructions here to install it.
-
If you haven't already on the computer you're using, introduce yourself to Git by setting your username and email (should be the same as the username/email associated with your GitHub account). The easiest way to do this is through RStudio.
# install.packages("usethis") # install the usethis package--makes it easy to do complicated and finnicky things in R
library(usethis)
use_git_config(user.name = "Jane Doe", user.email = "jane@example.org") # enter your user name and email here.
-
Connect RStudio to GitHub, by following this tutorial. The rest of the sections on that website will be helpful if you run into any trouble.
-
Okay, it's finally time to download your new template repository. In RStudio, go to File > New Project. In the window that pops up, choose "Version Control" and then "Git".
Now you should see something like this:

For the repository URL, navigate to the main page of the repository that you've just cloned from this template and copy the URL from the address bar. For example, it might look something like https://github.com/MFEh2o/fishEntryTool_2021.
When you paste in that URL, the project directory name should auto-populate. If it doesn't, just call it something logical like "fishEntryTool_2021".
Then, you have the option of deciding where to put the new project you're about to create. This is going to be a new folder on your computer, so put it wherever makes sense (Desktop, etc).
Click "Create Project". Your project will get created, and a new session of RStudio will initialize, with the home directory set to the new folder you've just created.
-
Add the database file. This should be the most recent version of the database, before adding any data from the current season. Download it from the MFE Box. Note: for clarity and reproducibility, please download the version that includes a date in the file name. So, 'MFEdb_20210423.db', not 'MFEdb.db'. Put that into the main, top-level 'fishEntryTool_2021' (or whatever you ended up calling it) folder.
-
Add your sample sheets. You can/should use one of the template sampleSheets to guide your data entry. The templates can be found in the templates/ folder; there's one for minnow traps and one for other kinds of fishing. Make sure to change the file name to include your lakeID and date.
Sometimes, you'll need to include columns that aren't shown in the template. The FISH_INFO table has a huge number of columns. As long as you're adding a column that already exists in FISH_INFO, everything should be fine. We just don't put all the (mostly blank, project-specific) columns into the template files, for simplicity.
Your sample sheets must have file names in either of the following formats:
- For angling (AN), electrofishing (BE), and fyke nets (FN): file name must end with 'YYYY-MM-DD_hhmm.csv'. For example, 'LongLake2020_angling_2020-06-03_1126.csv'. Anything can come before the date and time, but do not include the string 'minnowtrap'.
- For minnow traps (MT): file name must contain the string 'minnowtrap'.
The entry tool expects the following information in the header:
- For non-minnowtrap files:
- projectID (Integer value, see the PROJECTS table. Must not be one of the retired projectID's defined in supportingFuns.R)
- lakeID (See LAKES table)
- siteName (See SITES table. Be careful with capitalization. The entry tool will correct the most common capitalization errors--e.g. 'wholeShoreline' and 'deepHole' instead of 'WholeShoreline' and 'DeepHole', but I have not built in robust corrections. If you try to enter an unrecognized site, it will be caught at the end.)
- dateTimeSet (Expects format 'M or MM/D or DD/YY or YYYY' for the date, and 'h or hh:mm' for the time. For example, '9/3/21 7:30', '09/3/21 07:30', '09/03/2021 07:30', etc. would all be valid formats. I'm not going to write out all the possible combinations, but you get the idea. Regex is '"^[0-9]{1,2}\/[0-9]{1,2}\/[0-9]{2,4}\s[0-9]{1,2}:[0-9]{2}$"')
- dateTimeSample (same format as dateTimeSet, see previous)
- crew (One or more sets of names or initials, any combination of capital or lowercase letters, separated by commas and spaces. For example, 'chris, stuart, randi', or 'CTS, SEJ, RN', or 'chris, SEJ, Randi')
- gear (A value that has previously been used in the database. AN, FN, BE, or MT)
- distanceShocked (A numeric value between 0 and 25, or NA for non-electrofishing)
- effort (A numeric value between 0 and 24)
- effortUnits (A value that has previously been used in the database, such as 'angler_hours', 'hours', 'trap_hours', etc.)
- comments (No specific format requirements)
- useCPUE ('yes', 'no', or NA)
- dataRecorder (No specific format requirements)
- dataEnteredBy (No specific format requirements)
- metadataID (A metadata value previously used in the database, or a new one if you force it. Caution here! It's really easy to misspell metadataID's: punctuation, capitalization, getting the date wrong... double-check your metadataID's! And if the entry tool throws an error and gives you the opportunity to force a new metadataID, please please please double-check that you actually intended to enter a new metadataID and didn't just make a typo. )
- useSampleMarkRecap ('yes', 'no', or NA) sampleGroup (A value previously in the database, such as 'EL2016_markrecap_fall' or 'angling' or '2020_JonesLake_Experiment')
- For minnowtrap files:
Same requirements, but omit siteName--each
trapNumberwill combine with thelakeIDto make its ownsiteName. Just leave distanceShocked as NA.
The paper data sheet has four columns for recording fish tags: tagApply, tagApplyType, tagRecapture, and tagRecaptureType. But as of 2021, the database stores tag information in a different format: pitApply, pitRecapture, floyApply, and floyRecapture. To make the fish entry tool work more smoothly, and to facilitate entering data for fish with multiple tags, we are making you do the work of translating the first format into the second when you enter the data from the paper data sheets into a digital sample sheet (sorry!).
So, as you might have guessed, any rows where tagApplyType was 'pit' should have their tagApply values entered into the new pitApply column in the template. Same with floy tags. If there were any additional tags recorded on the data sheet (usually in the comments or in the margin), make sure to record those too, wherever they go. For example, if there's a comment along the lines of 'old WI DNR floy tag number XXXX', you would enter the number into floyRecapture. Each fish can, theoretically, have four tag numbers entered on a single line (two pit and two floy), although that will pretty much never happen.
If you forget to enter the tags in the new format, the entry tool will throw an error and warn you that you need to change your column formats. I know that's a pain, and I'm sorry for the extra effort. But this is a good step in helping us catch errors before they happen and standardize the workflow for getting data into the database. Fish tags have been a particularly tricky part of the database in the past because there are so many ways for errors to be introduced.
If you know that there was a tag but you couldn't read the number, enter 'unknown', for any of the tag columns.
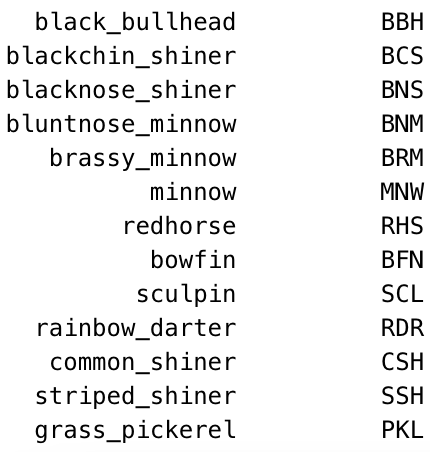
The entry tool expects fish species to be recorded as abbreviations, not as full fish names. Use the standard field abbreviations. The tool will accept any abbreviations that show up in the abbreviation column of the OTU database table. In addition to the standard abbreviations you're used to, I (KG) have added a couple more as of June 2021, to fill in gaps for species that didn't previously have an abbreviation assigned. They are:
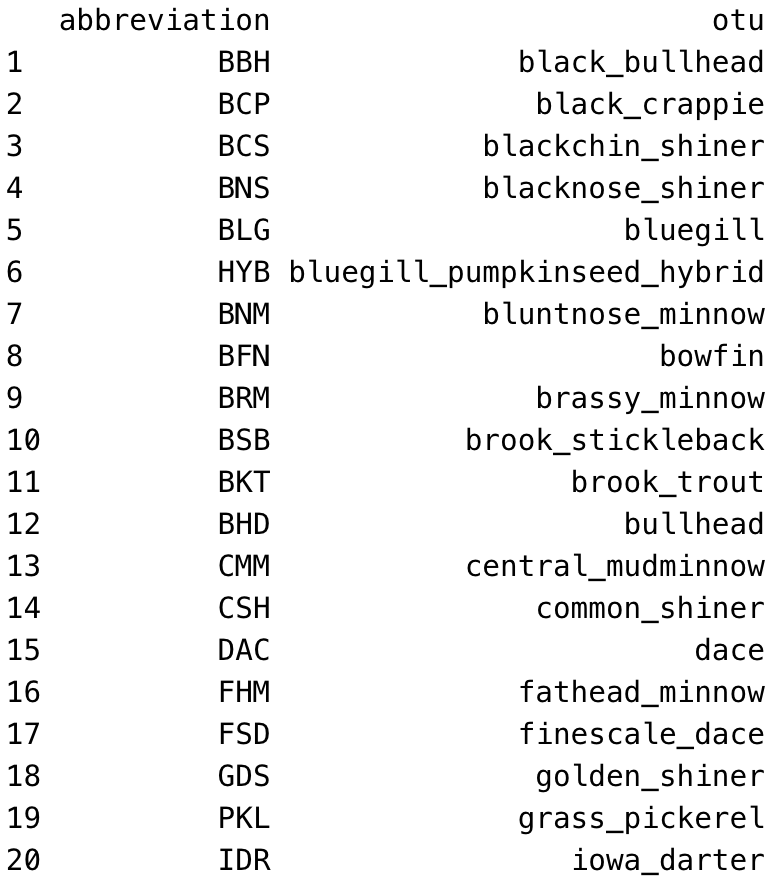
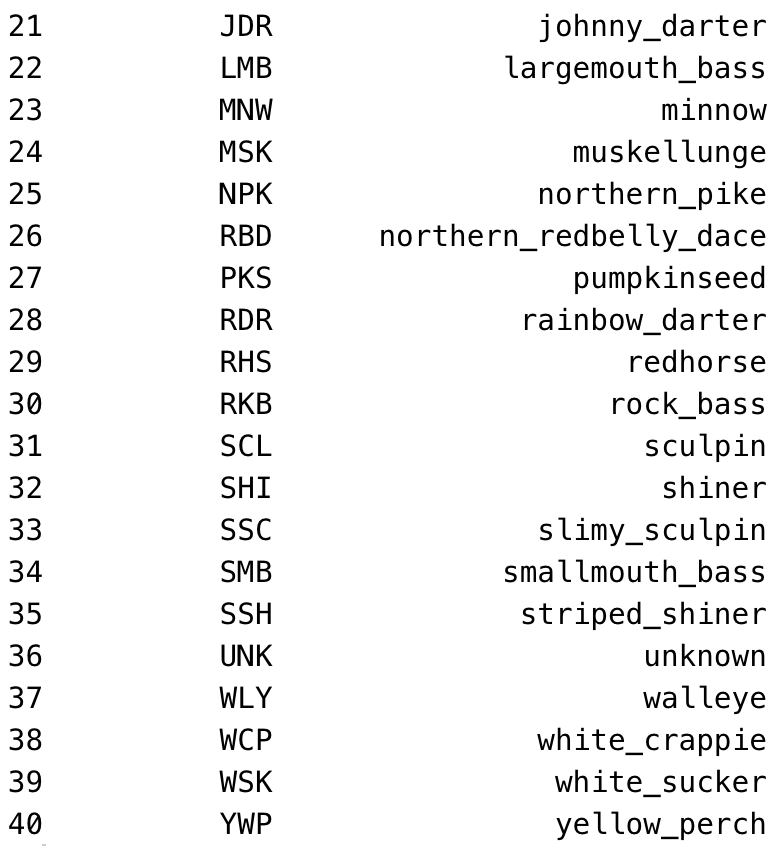
And here's a full list of the OTU fish abbreviations, in alphabetical order by common name/otu:
- There are several files in the 'code/' directory. The only one you should need to work with directly is 'updateFish.R'. Open up that file. Fill in the name of the database at the top, on the line that looks like this:
db <- "CHANGE THIS" # name of the database file you're using. Try to use one with a specific date to make the workflow clear. For example, "MFEdb_20200530.db"
So, to be clear, when you're done that line should look like this (with the name of the database version you're using).
db <- "MFEdb_20200530.db" # name of the database file you're using. Try to use one with a specific date to make the workflow clear. For example, "MFEdb_20200530.db"
-
Run the script! Pay attention to warnings and errors that come up in the console.
-
If you get errors related to e.g. trying to add a new lake or site that isn't already in the database, make sure to double-check the error messages. They will flag which data is problematic and which data sheet(s) it came from. You should take a look and figure out whether there's missing information you need to fill in, or whether the information is actually correct and you just need to 'force' it past the tool's flags. If you need to force, here's how:
First, check the error message to determine which force_* argument to use. Then, in the console (not in the script), press the up arrow key to retrieve the last command you ran, which should be the updateLimno() function. Add the relevant force_* parameter to the function call in the console, setting its value to TRUE or T. For example, if the error you got was about trying to add a new siteID, you'd do this:
# Run the tool ------------------------------------------------------------
updateLimno(dbdir = dbdir,
            db = db,
            sampleSheetsDir = sampleSheetsDir,
            logFilesDir = logFilesDir,
            funcdir = funcdir,
            labelsDir = labelsDir,
            force_siteID = T)
IMPORTANT: Make sure you're doing all of this in the console, not actually modifying the 'updatingLogs.R' script! If you modify the script and the commit and push those changes to GitHub, the force_* arguments you added for one day's data sheets will be saved for the next day, and you might end up missing real errors by accidentally forcing them through.
Finally, each time you use a force_* argument in the console, you need to fill out a new line in the force log. This is a manual log to keep track of what information has been forced while entering data sheets, so that the database manager can go through and make any corrections needed at the end of the field season. You'll want to include the data sheet that caused an error, the force_ argument* that you used, and a brief comment about why you forced the data. Was it a legitimate new lake/site/etc? Was the data actually wrong and needs to be fixed later? Was information missing that shouldn't have been? Just describe a little bit.
The file paths in updateFish.R are defined using the here() package for simplicity. All file paths are relative to the project root directory, aka the top-level folder where the '.Rproj' file lives. Instead of writing file paths with slashes, we write them separated by commas. For example, instead of "code/checks.R", we write here("code", "checks.R"). Behind the scenes, that evaluates to a full file path that's specific to whatever computer you're on and where you've stored your project. For more information on the here package, see this article.
Important: before following these instructions, make sure that you have copied the template repository as instructed above. It would really not be ideal if you started committing/pushing data and code specific to one year to the template repository on GitHub.
Assuming that you're working in an RStudio project that you've copied from the template (should be called something like "fishEntryTool_2021"), then you can proceed.
In your RStudio window, you should see a "Git" tab, in the same pane as "Environment", "History", and "Connections" (by default, it's at the top right out of the four panes, but if you've modified your pane layout, it might be somewhere else). Click on that Git tab. You should now see a small window with some button options at the top: a blue downward-pointing arrow ("Pull"), a green upward-pointing arrow ("Push"), a gear icon, a refresh button, the name "master" or "main" (shows the current branch you're on), etc.
Below those button options, you should see three columns: Staged, Status, and Path. If you have added, removed, or modified files since setting up this repo, you will see some files listed there. In the 'Staged' column, there will be a checkbox; in the 'Status' column, there will be a small colored square with a letter in it (A for added, or yellow question marks if you've added the file but it has never been committed before, D for deleted, R for renamed, M for modified).
So, to be more specific, let's imagine that you've run the limno entry tool on a couple of sample sheets. You probably made the following changes:
- You put the sample sheets into 'sampleSheets/', as instructed above.
- You added the most recent database version into the root directory, as instructed above.
- You modified the 'CHANGE THIS' line in updateFish.R to point to the named database file
- Maybe you made some other changes to the
updateFish()function call in updateFish.R, such as setting a few of theforceparameters toTRUEto deal with adding e.g. new sites. (You may have made other changes too, but I'm going to start with the above for example).
If you did that, here's the corresponding information you should see in the Git pane:
- Each of the sample sheets should show up with yellow question marks that turn to A's when you click the checkbox.
- The database file should not show up at all in the panel, because we have a line in our .gitignore file that says to ignore files ending in '.db'. That's because the database file is too large to push and pull to GitHub--that's why it wasn't included in the template repository originally. If you DO see the database .db file showing up in the git panel, that's not good. You might need to open the .gitignore file and add
*.dbsomewhere in it to make sure the database file gets ignored. - updateFish.R will show up in the git pane with a blue M next to it because you modified at least one line.
- Same as 3.
- Once you run the fish entry tool, the in-season database files will also get created in inSeason/, and each of those will also show up in the git window with an M or question marks/an A depending on whether they were modified or added.
Having these files show up in the Git pane means that Git is aware of your changes. The next step for saving your changes to GitHub is to "stage" the files. The concept of staging is a little confusing; you can read more about it here. But basically, staging a file just means that you're getting ready to commit it to GitHub.
So, you can go ahead and check the checkboxes for all those files (just make sure NOT to check the box on your database file if for some reason it's still showing up!)
Now that the boxes are checked, click the "Commit" button. A new window will pop up that shows your staged files again, along with an overview of your changes (insertions in green, deletions in red) at the bottom (you can see the changes for each file by clicking on its name in the top left panel). At the top right, you need to enter a "Commit mesasage"--a brief note about what change(s) you made. This is mandatory. Try to keep it under 50 characters (the maximum that will display on GitHub) and keep it short and sweet.
Something like '2021 setup and processing first 3 sample sheets' could work as a good first commit message. Ideally, keep it under 50 characters, but that's not critical.
Then click the "Commit" button to save your changes to the Git version control system.
Finally, you can "Push" your changes to GitHub by clicking the green "Push" arrow. This will cause the changes to actually show up if you go look at the repository on GitHub, which means they can be seen by others with access to the repo and accessed from other computers.
It might seem a little redundant to commit and then immediately push. Typically, you can make a bunch of commits before pushing, but that's more relevant when you're actively developing a piece of software. When you use the entry tool, you're more likely to run it each time with minimal changes, generating new output files and modifying log files each time, so it makes sense to push each time you commit. But it's not critical--if you forget to push, you can just commit the next day's datasheets and then push then. No worries.
When you push your changes, you may run into this message:
Error: repository not found
This is weird and confusing! Assuming you followed the setup instructions above for cloning the repository from the template, there's no reason the repository shouldn't exist.
What this typically means, actually, is that the user whose email is associated with the git version running on your computer doesn't have permission to access the repository. (This page, for instance, notes that this error can indicate an access problem, as well as the possibility that the repo doesn't exist).
To fix this, you need to go to the repository page on GitHub and grant Admin access to the user whose computer you're working on. For example, when I (KG) encountered this error using the UNDERC lab computer (working with CM), I realized that the lab computer was logged in as 'joneslabnd', so I had to grant Stuart (joneslabND) Admin access. Then the push worked correctly.
To grant admin access, go to repository main page on GitHub (if you're reading this README on GitHub, you're probably already there). In the top right, click Settings (gear icon), and then choose 'Manage access' from the menu on the left. On this page, you should be able to add Stuart (or yourself, or whoever's computer it is) as an Admin on the repository. Refresh the GitHub page and then go back to RStudio and try pushing again--now it should work.
In general, you should aim to commit and push your changes after each time that you run the tool, i.e. every day or every other day or however often you enter your new data sheets.
I wrote this whole example assuming that you'll make your first commit after both setting up the entry tool and running the script for the first time. That's a fine way to do it, but if you prefer, you can also make one commit after just the setup part (after adding the database file and sample sheets but before running the tool) and another one after running the tool for the first time. Or, you can make one commit per file modified, if you'd like to leave a different commit message for each file.
I hope that's a helpful introduction. If you want more information about committing, pushing, and pulling (which I didn't explicitly cover because you usually won't have to do it for this tool), you can check out Happy Git with R, the RStudio tutorial on version control, and this tutorial on committing/pushing/pulling.
Contact Kaija (gahmk@caryinstitute.org) with questions for troubleshooting help. If you're reading this while Kaija still works at Cary, definitely contact her! This is literally her job. If you're reading this after Kaija has left to go to grad school, try the above resources first, or talk to Chris, Stuart, or Randi.
I've said above that you should not modify this template repository for regular seasonal data entry.
This template repository can and should be modified if you want to make changes to the entry tool itself. For example, if something about the tool is broken and needs to be fixed, you should clone the repository to your computer by creating a new R Project with version control and copy/pasting https://github.com/MFEh2o/fishEntryTool_TEMPLATE into the URL slot. Then you should make the code changes and commit/push them to modify the template. (Or you can fork the repo and work with pull requests--If you're modifying the template, I'm going to assume you know your way around GitHub).
Another case where you'd want to modify the template is if you need to change or expand the allowed parameters and ranges that are built into the tool. For example, maybe you decide that one of the error messages should be possible to get around with a new force_* parameter. In that case, you'd clone the repo and make the change to checks.R, and then commit that. Then, future years will copy the updated template and use those updated parameters.
Of course, you could make changes like this directly to the year-specific repo you created from the template, but keep in mind that those changes won't be permanent--you'd have to keep track of them and re-do them in the following year. Don't do that to yourself. Trust me.