
Scegli la lingua / Choose your language:
🇮🇹 ITALIANO (Clicca per espandere)

La soluzione professionale per automatizzare aspiratori e ventilatori in Home Assistant.
Controllo intelligente, logica robusta e ventilazione davvero affidabile.
Perché ASPIRATORE MASTER
ASPIRATORE MASTER è un package avanzato per Home Assistant progettato per la gestione intelligente di aspiratori e ventilatori (Switch / Fan), ideale per bagni ciechi, lavanderie, locali tecnici e ambienti dove il ricambio d’aria deve essere automatico, coerente con le condizioni reali e affidabile nel tempo.
Non è una semplice automazione on/off, ma una logica evoluta che supervisiona sensori, attuatori e timer per garantire un funzionamento stabile, continuo e ottimizzato.
Cosa lo rende diverso
| Funzione | Vantaggio |
|---|---|
| Selezione dinamica delle entità | Configurazione semplice direttamente da interfaccia |
| Controllo evoluto dell’umidità | Attivazione solo dopo permanenza sopra soglia |
| Gestione presenza | Ventilazione più intelligente durante e dopo l’utilizzo |
| Timer avanzati | Controllo preciso di permanenza, durata e riattivazione |
| Sincronizzazione stato reale/logico | Maggiore affidabilità anche in caso di spegnimenti indesiderati |
| Architettura fail-safe | Gestione robusta di anomalie, stati invalidi e incoerenze |
Vantaggi principali
- Configurazione intuitiva tramite selettori dedicati
- Compatibile con attuatori
SwitcheFan - Pensato per l’uso reale, non per semplici automazioni base
- Riduce falsi avvii, incoerenze e comportamenti instabili
- Trasforma un aspiratore tradizionale in un sistema di ventilazione intelligente
- Ideale con relè smart, ad esempio Shelly
Scenario tipico
Un classico caso d’uso è il bagno cieco con:
- aspiratore tradizionale
- sensore di umidità
- sensore presenza
- relè smart
Risultato: una ventilazione completamente automatica, più intelligente, più affidabile e più professionale rispetto a una logica standard.
Requisiti
- Home Assistant
- 1 attuatore (
SwitchoppureFan) - 1 sensore umidità
- 1 sensore presenza
**Add-on consigliato:** `File Editor`
Installazione
Verificare che nel file configuration.yaml, presente nella cartella config del server Home Assistant, sia riportata la seguente configurazione:
homeassistant:
  packages: !include_dir_named packages/
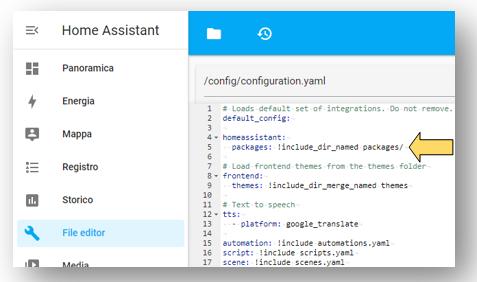
Se la configurazione non è presente, inserirla, salvare il file configuration.yaml e riavviare Home Assistant seguendo il percorso: Impostazioni → Strumenti per sviluppatori → Riavvia → Riavvia Home Assistant.
Verificare la presenza della cartella packages all’interno della directory config del server Home Assistant.
Se la cartella non è presente, creare il seguente percorso:
\192.168.1.xxx\config\packages\aspiratore\master
L’operazione può essere eseguita, ad esempio, tramite l’add-on File Editor.
All’interno del percorso \192.168.1.xxx\config\packages\aspiratore\master, copiare i seguenti file scaricabili dal repository GitHub tramite: Code → Download ZIP.

- aspiratore_master.yaml
- aspiratore_master_automazione_gestione_totale_sistema.txt
- aspiratore_master_automazione_verifica_spia_umidita.txt
- aspiratore_master_automazione_verifica_spia_rilevamento.txt
- aspiratore_master_scheda_manuale_interfaccia.txt
In Home Assistant seguire il percorso:
Impostazioni → Automazioni e scene → Crea automazione → Crea una nuova automazione
Successivamente:
- cliccare in alto a destra sui tre puntini;
- selezionare Modifica in YAML;
- eliminare il contenuto presente;
- incollare il contenuto del file aspiratore_master_automazione_gestione_totale_sistema.txt;
- salvare l’automazione.
Una volta salvata, tornare alla schermata Automazioni e scene.
Ripetere la medesima procedura descritta al punto precedente per i seguenti file:
- aspiratore_master_automazione_verifica_spia_umidita.txt
- aspiratore_master_automazione_verifica_spia_rilevamento.txt
In Home Assistant seguire il percorso:
Panoramica → Modifica dashboard (icona matita) → Aggiungi scheda → Manuale
Successivamente:
- selezionare tutto il codice già presente;
- eliminarlo;
- incollare il contenuto del file aspiratore_master_scheda_manuale_interfaccia.txt;
- salvare la scheda.
Al termine dell’installazione:
- verificare che il package sia stato correttamente caricato;
- verificare la presenza delle automazioni importate;
- verificare la corretta visualizzazione della scheda in dashboard;
Configurazione
La configurazione avviene direttamente da interfaccia tramite:
Selezione AttuatoreSelezione Sensore UmiditàSelezione Sensore Rilevamento
Questo consente di cambiare dispositivi senza modificare manualmente lo YAML a ogni variazione.
Esonero di responsabilità
In nessun caso l’Ing. Danilo Robotti potrà essere ritenuto responsabile per danni diretti, indiretti o conseguenti derivanti dall’uso del presente software.
Se il progetto ti è stato utile e desideri supportarne lo sviluppo , scansiona il QR code qui sotto

🇺🇸 ENGLISH (Click to expand)
The professional solution to automate exhaust fans and ventilators in Home Assistant.
Smart control, robust logic, and truly reliable ventilation.
Why ASPIRATORE MASTER
ASPIRATORE MASTER is an advanced Home Assistant package designed for the smart management of exhaust fans and ventilators (Switch / Fan). It is ideal for windowless bathrooms, laundries, technical rooms, and environments where air exchange must be automatic, consistent with real conditions, and reliable over time.
It is not just a simple on/off automation, but an evolved logic that supervises sensors, actuators, and timers to ensure stable, continuous, and optimized operation.
What makes it different
| Function | Advantage |
|---|---|
| Dynamic entity selection | Simple configuration directly from the interface |
| Advanced humidity control | Activation only after remaining above threshold |
| Presence management | Smarter ventilation during and after use |
| Advanced timers | Precise control of dwell time, duration, and reactivation |
| Real/logical state synchronization | Greater reliability even in case of unintended shutdowns |
| Fail-safe architecture | Robust management of anomalies, invalid states, and inconsistencies |
Main Benefits
- Intuitive configuration via dedicated selectors
- Compatible with
SwitchandFanactuators - Designed for real-world use, not just basic automations
- Reduces false starts, inconsistencies, and unstable behaviors
- Transforms a traditional exhaust fan into a smart ventilation system
- Ideal for use with smart relays, such as Shelly
Typical Scenario
A classic use case is a windowless bathroom with:
- traditional exhaust fan
- humidity sensor
- presence sensor
- smart relay
Result: fully automatic ventilation—smarter, more reliable, and more professional than standard logic.
Requirements
- Home Assistant
- 1 actuator (
SwitchorFan) - 1 humidity sensor
- 1 presence sensor
**Recommended Add-on:** `File Editor`
Installation
Ensure that the configuration.yaml file, located in the config folder of your Home Assistant server, contains the following configuration:
homeassistant:
  packages: !include_dir_named packages/
If the configuration is missing, add it, save the configuration.yaml file, and restart Home Assistant by navigating to: Settings → Developer Tools → Restart → Restart Home Assistant.
Verify the existence of the packages folder within the config directory of your Home Assistant server.
If the folder does not exist, create the following path:
\192.168.1.xxx\config\packages\aspiratore\master
This can be done, for example, using the File Editor add-on.
Within the \192.168.1.xxx\config\packages\aspiratore\master path, copy the following files downloadable from the GitHub repository via: Code → Download ZIP.
- aspiratore_master.yaml
- aspiratore_master_automazione_gestione_totale_sistema.txt
- aspiratore_master_automazione_verifica_spia_umidita.txt
- aspiratore_master_automazione_verifica_spia_rilevamento.txt
- aspiratore_master_scheda_manuale_interfaccia.txt
In Home Assistant, navigate to:
Settings → Automations & Scenes → Create Automation → Create New Automation
Then:
- click the three dots in the top right corner;
- select Edit in YAML;
- delete the existing content;
- paste the content of the file aspiratore_master_automazione_gestione_totale_sistema.txt;
- save the automation.
Once saved, return to the Automations & Scenes screen.
Repeat the same procedure described in the previous step for the following files:
- aspiratore_master_automazione_verifica_spia_umidita.txt
- aspiratore_master_automazione_verifica_spia_rilevamento.txt
In Home Assistant, navigate to:
Overview → Edit Dashboard (pencil icon) → Add Card → Manual
Then:
- select all existing code;
- delete it;
- paste the content of the file aspiratore_master_scheda_manuale_interfaccia.txt;
- save the card.
At the end of the installation:
- verify that the package has been correctly loaded;
- verify the presence of the imported automations;
- verify the correct display of the card in the dashboard.
Configuration
Configuration is done directly through the interface using:
Actuator SelectionHumidity Sensor SelectionPresence Sensor Selection
This allows you to change devices without manually modifying the YAML for every change.
Disclaimer
In no event shall Eng. Danilo Robotti be held liable for any direct, indirect, or consequential damages arising from the use of this software.
If this project was useful and you wish to support its development , scan the QR code below