
Link to Deployed Site
Ongoing research in the field of botany seems to indicate delightful things about flowers:
- Flowers can help heal the common cold.
- Flowers can help improve moods.
- Flowers improve memory.
- Flowers aid relaxation.
- Flowers increase energy.
Flowery Days is an online flower shop, which offers not only flower bouquets, but also a bunch of individual flowers for flower arrangements so that customers can enjoy arrangements by themselves.
The shop also publishes blog posts about flower arrangements, gardening and flowers/plants, where the site visitors can leave a comment.

This image is created with ami.responsivedesign.
- People who are looking to buy flowers / bouquets
- People who love flowers/botanies
- People who seek for presents for special occasions such as birthdays
- People who want to try to make a flower arrangement and decoration by themselves
- People who want to read interesting blog articles about flowers / botanies / gardening
- Purchase products in a smooth and secure way
- Get informed with the products before buying by product reviews / product information
- Gain interesting knowledge about flowers from blog articles and leave a comment on blog articles
- Provide customers with a secure and safe ecommerce shop
- Establish the shop's brand image
- Expand their business effectively
- Make profit from selling products / services
- Viewing and Navigation
| AS A/AN | I WANT TO BE ABLE TO ... | SO THAT I CAN... |
|---|---|---|
| Site User/ Shopper | access the website with any devices | Use the website anytime and anywhere |
| Shopper | Easily see what services are offered | Find the service I want to use |
| Shopper | All the important services are accesible from nav bar | Don't need to scroll to find important information |
| Shopper | Have a shopping cart icon on nav bar | Always check the current order and checkout when I want |
- Registration, User Accounts and User Community
| AS A/AN | I WANT TO BE ABLE TO ... | SO THAT I CAN... |
|---|---|---|
| Site User | Easily register for an account | Have a personal account where I can edit my information |
| Site User | View my order history | Purchase the same product again in the next order |
| Site User | Easily recover my password in case I forget it | Recover access to my account |
| Site User | Receive an email confirmation after registering | Verify that my account registration was successful |
| Site Owner | Post a blog about flower arrangement and gardening | Give site visitors interesting information of flowers |
| Site Owner | Let the site users log in when they leave comments/reviews | Track who left comments/reviews |
| Site User | Add comments to the blog posts | Write down my thoughts on the post |
- Online shopping
| AS A/AN | I WANT TO BE ABLE TO ... | SO THAT I CAN... |
|---|---|---|
| Shopper | Search a product with keywords | Find the most appropriate products |
| Shopper | View individual product pages that have prices, descriptions, sizes, etc | Get detailed information about the product before purchasing |
| Shopper | Filter by a specific category | Easily find products in a specific category |
| Shopper/Site Owner | Leave/View product reviews with scores | Understand which products are popular with other customers |
| Site Owner | Easily add a new product | Make sure the online site has the latest catalogue |
- Cart, Purchasing and Checkout
| AS A/AN | I WANT TO BE ABLE TO ... | SO THAT I CAN... |
|---|---|---|
| Shopper | Easily select the quantity and the color (if applicable) of a product after adding a product to a cart | Ensure I don't accidentally select the wrong product and the quantity |
| Shopper | The delivery information is prefilled if logged in | Smoothly proceed with my purchase |
| Shopper | Automatically suggest to log in if I did not log in | Smoothly proceed with my purchase |
Wireframes were created with balsamiq and moqups. You can find the wireframes here.
- Vision: Beautiful life surrounded by nature and flowers with your creativity.
- Mission: Provide a wide range of bouquets and flower arrangements that suit special occasions and moments in life which can be purchased with one click online. Be a wholesaler of individual flower bunches so the customers can enjoy flower arrangements themselves, without the hassle of going to a physical shops.
- Values: 1.Happiness - Improve your happiness with the power of nature, 2.Elegance - Appreciate everything around you in everyday life, 3.Nature - Inspired by the natural world and its beauty, 4.Creative - Express your creativity in flower arrangements
Color scheme is important as this is one of the first things site visitors notice when visiting the site. I chose white / black for the site's primary colors because these colors match the secondary earthy colors and make the website look professional and high-end. In addition to that, for the secondary colors of the site, I wanted to create a natural / delicate atmosphere to represent the calming sensation of flowers. For the secondary colors, I used Coolors.co to create a color pallet, which you can find below.

This pallet collects the earthy tones with luxury shades, which the shop aims to have as their brand image. The Twilight Lavender and Popster colors give the site an elegant and vibrant atmosphere while keeping harmony with the flowers. The Champagne Pink fills the gap between white and the other vivid colors, while giving calmer shades.
To reflect the flower shop's brand identity, the typeface Playfair Display by Claus Eggers Sørensen that falls under serif font family was chosen for the website unless there is any additional specific font setting. Playfair Display falls under a classic typography called 'serif' font family which is great to use when you want your brand to appear trustworthy and traditional. Playfair Display font has a mood of Elegance, Vintage, Classy and Stylish which matches the shop's branding. This article by Mana Habibian says “Playfair Display is a classical typeface with a modern feeling that will give designs the elegance they need.”
- Icon: FontAwesome is used for the main icon library accross the site.
- Favicon: I got the favicon by Freepik from www.flaticon.com.
Logo design is the cornerstone in your brand identity and presents a company's name, product and brand. I used Canva to create the brand logo file. The font represents the brand value elegance and the image of a branch at the top was added to represent Nature brand value.
![]()
This website is composed of 6 applications: home, blog, cart, checkout, products, profiles.
Landing Page is designed as a single page website to provide site visitors with enough information so they can understand what the business is about of this site. This page has minimal amount of information to let the site visitors take next actions. The page compose of Navbar, Carousel, About, Why Choose Us?, testimonials and Contact Form section. As scrolling down on thie page, the elements are smoothly being placed by Animate.css and wow.js animation effects to give a dynamic and sophisticated experience to the site visitors.
Navbar is fixed at the top of pages across the site, so that the site visitors easily navigate the whole site. Navbar contains Brand Logo, Search Box, Site Menu, My Account dropdown and Cart icon.
- Search box: This search box function allows the visitors to search the products on online shop with keywords. The keywords are searched over
nameanddescriotionfield of Product Model,namefield of Color Model andnamefield of Flower Model.(Details of these models will be described at the Information Architecture) This function uses "OR" condition not "AND" when searching the keywords, meaning, if the search query was "Tulip Rose", the search result shows the product found using the keyword "Tulip" OR "Rose". Searching with "OR" condition is chosen in order not to limit the possibilities for the products the potential customers want to purchase. - Site Menu & My Account dropdown: The site menu collapses to toggle icon less than 992px width. My Account dropdown is included to toggle menu for smaller screen.
- Cart icon: The number next to the cart icon shows the total of items added to the cart.
Navbar for larger screensizes (width > 992px)

Navbar for smaller screensizes (width < 992px)

Navbar for authenticated users

At the top of the landing page, I placed carousels with beautiful photos of the flowers and messages. This area is called the "Above the fold" area and site visitors engage more with the content in "Above the fold".
Three different images and messages are used in the carousel with call-to-action buttons that link to three different services in the site: Online Shop, Blog and Inquery (Contact Form). This way, the users can easily access the page they look for and also the business owners can maximize the sales opportunities.

About Us section explains what the business is and the brief history of the shop to the site visitor.

Why Choose Us? section showcases three sales points of the shop with icons representing each one.
Those two sections use the color of Popstrat and Champagne Pink from the color pallete for its background color that seamlessly matches the next section's background.

A customer testimonial section can contribute to building the trust of potential customers and also explain the benefits of your products or services. This section displays different customer's testimonials with smooth carousel auto-animation effects.

A simple contact form is placed at the end of the landing page. The email address field is prefilled if the users are logged into their account. Site visitors will fill out fields name, email, subject and message when they submit the form. An email with the inquiry from the form will be sent to the admin of the website (handling by django send_mail() functionality).

The footer section consists of two sections: 1. General information of the Shop and Quick Link, 2. Social Media icons.
- General Info and Quick Links: The first footer section includes the shop address and its opening hours and quick links to the pages within the site.

- Social media icons: In this milestone project, Social Media icons are linked to my personal social media accounts, but in a real settting they should be linked to business pages on social media, such as Facebook, Instragram, Twitter, Pinterest etc, for social media marketing purposes.

By clicking 'Online Shop' on the site menu, you can go to the online shop page. This page is filtered with 'Bouquet' category as a default as the shop owner wants to promote products that fall uner Bouquet category that has higher profit. However, the site visitor can adjust the filter condition very easily.
- Product Filter: There is a filter section at the left side of the online shop page, and you can filter products with
categories,color,flowerandoccasion/use. You can also select multiple choices within the same filter option and use several filters to get the results.(e.g. you can choose white and red for the color option and choose tulip and rose for the flower option. In this case, the result will show the products that fall under (white OR red color) AND (tulip OR rose).) I designed the filter this way in order not to narrow down the products the potential customers are looking for.

- Result Number: It's shown above the product cards. Customers can see how many results were found in total at a glance.

- Product Card: The products are displayed in cards that have
Product Name,Price,Unit, andView Detailsbutton when hovering ove the product image.Add to Cartbutton addes the product with 1 quantity to the cart and this button only appears for bouquet category, because the other product categories have color options, so the customers have to access the product detail page. If the user is logged in as a superuser, Edit / Delete option is also shown on each card.
Product Card for Bouquets

Product Card for Flowers

- Pagination Bar: At the bottom of this online shop page, I've set a pagination bar for easy navigation when there are many results to show. Setting up a pagination bar and limiting the number of the products reduce the loading time and make the site look more organized, which is crucial for a site like which offers many products for sale.
- Breadcrumb: Breadcrumb navigation is added at the top of the product detail page, which allows customers to keep track of their locations in the online shop.
- Product Image: On the left side of the product detail page (single_product.html), the product images are shown. When there are several images for the product, for example, some products have color options such as Carnation, the options will be shown under the main image.
- Product Information: On the right side of the product detail page, there is a
Product Name,Price,Description,Coloroption,Quantity,Add to Cartbutton.Coloroption is only visible when the product has the options. Also for superuser, Edit / Delete option will be shown. - Product Review Section: Customers can see the product scores and review messages by other customers. The users can leave a score from 1 to 5, and the average of the scores of the customer reviews is shown on the product page. To leave a product review, the user is asked to log in to their account. Also, to delete a review, the customer who left the review needs to log in and the delete option will be visible next to the review after logging in. At the moment, regardless of whether they have purchase history or not, the user is able to leave a review. This is one of the features left to implement to limit it so only the user who actually purchased the product will be allowed to review.

- The left side of this cart page shows the products added to the cart. Customers are able to change the quantity or remove the products in this cart page.
- On the right side of this cart page, there is an Order Summary section that shows
Cart Total,DeliveryandGrand Total. This way, customers are able to check the order summary at first glance even if they have added a lot of products to the shopping cart.

- On the checkout page, customers are asked to fill in delivery details. The customer can also select if they want gift wrapping for the product or not. At the moment, this shop does not collect user's billing information within the User Profile model or Order model.(However, the billing data is recorded in Stripe from the billing information added by the customer.) One of the features left to implement is to add the billing details on the Checkout page.
- Though the customer can complete the checkout process without having an account, if the customer hasn't logged in, the message "Create an account or login to save this information" is shown at the checkout page.
- A thank you message will be displayed after the checkout process as well as the table that holds the order details.
Keep Shoppingbutton is placed at the end of the page, and if the customer has been logged into their account,Back to Profilewill be shown.
- After clicking
Blogon the site menu at the top, Blog Feed page is loaded. On this page, blog posts will be displayed in descending order by the posted date. To display the blog posts beautifully, the layout that shows posts in 2-1-2 order was chosen.Pagination Baris also added at the end of the page. - On the left side of this page, I created categories of blog posts so the site visitors can navigate the blog posts easily. The number of posted blogs in the categories is also shown in brackets.
Breadcrumbnavigation is added at the top of the blog post detail page for easy navigation.Leave Commentfunction: Site visitors are able to leave comments on blog posts. It requires the visitors to log into their account to do so. Also, after logging in, they can delete comments they left in the past with the delete option shown next to their comment(s).- If user is logged in as superuser, they can see the choice of edit/delete at the top of the page.

- If user is logged in as superuser, they can access to Add / Edit Blog post page. This page is combined with two forms
BlogFormandBlogImageForm.
My Profile page is available for authenticated users and will be shown in the My Account Dropdown menu at the navbar which appears when you log into your account.
- In Profile Page, authenticated users can 1. edit
Delivery Informationand 2. seeOrder History.
Only authenticated superusers can access the admin page (1.products/add/, 2. products/edit/, 3. products/delete/, 4. 5. 6. ). If non-logged in users try to access the url directly, it will redirect to the sign in page. If a non-superuser tries to access the url, an error message pops up which says that only a superuser can access this page.
Base template for allauth has Back to Home button at the end of the page, for easy navigation for users.
- Sign Up: The users will be asked to fill out
E-mail,User NameandPasswordto create an account. When the sign up form is submitted, a verification email will be sent to the user's email address to complete the sign up process. - Log In: Users will be asked to input
User NameorEmail, andPasswordto login. If the user successfully logged in, a success message will pop up and redirect to the landing page. - Log out: Log out page is accessible from the site menu. After the user successfully signed out button on the sign out page, a success message will appear and redirect to the landing page.
- Forgot password: Forgot password page is accessible from Sign In page. Users will be asked to put in an email address which they have used for their registration to the site. An email with a link to reset the password will be sent after submitting the form.
There are some of features left to implement in the future which I could not add to the project this time due to time constraints. These features are great to be added for a more complete online shop service which would lead to higher customer satisfaction.
At the moment, all the authenticated users can leave reviews to any products if they are logged in. It should be limited to those who actually purchased the product for the validity of the reviews.
This function would be very helpful when there are many products in results. This was not implemented this time due to the time constraints and there are not that many products used in this project.
With the current checkout process, the user is asked to fill out delivery information. Billing information is required when the customer wants a receipt or when a billing address is different from a delivery address.
At the moment, even though the color options and images for each color are shown on its product page, these two are not changed if the other is changed. It would be more ideal if the action of those two elements is synced.
This function allows users to sign up / log into their account of the site, using an existing third party account such as Google and Facebook. This is beneficial to users and the site owners. For users, it's hassle free for remembering a password for the site and it gives the users a smooth registration process. For the site owners, there are many benefits gained by social login - such as increasing user sign ups, reducing bounce rate and gaining a user's social account details which is beneficial for marketing purpose.
To call more customers to purchase a product, it would be effective to link a product page which is related to a blog post theme.
For social media marketing purpose, adding a social media icon with a link to share products and blog posts would be effective.
To keep the customers informed with the status of their purchase, it would be nice if the site provides the order status such as shipment information in order history and email notifications.
If 404 and 500 error occured within the site, a page that has the message of the error and 'Back to Home' button so that the user would not be lost. The templates of 404.html and 500.html are added to the root template directory)
- Django Form Validation
- The
-
Development phase SQLight database was used for the development which is installed with Django.
-
Deployment phase PostgreSQL was used on deployment stage, which is provided as add-on by Heroku application.
-
User model is provided as a default by Django's authentication system.
Following is Entity Relationship Diagram of this project. I created this diagram with dbdiagram.io. When I designed this ERD, I referred to this article.

I made fixtures for Product, Color ,Image and Flower models on Google sheet (.csv file) first, and used this tool to .json file.
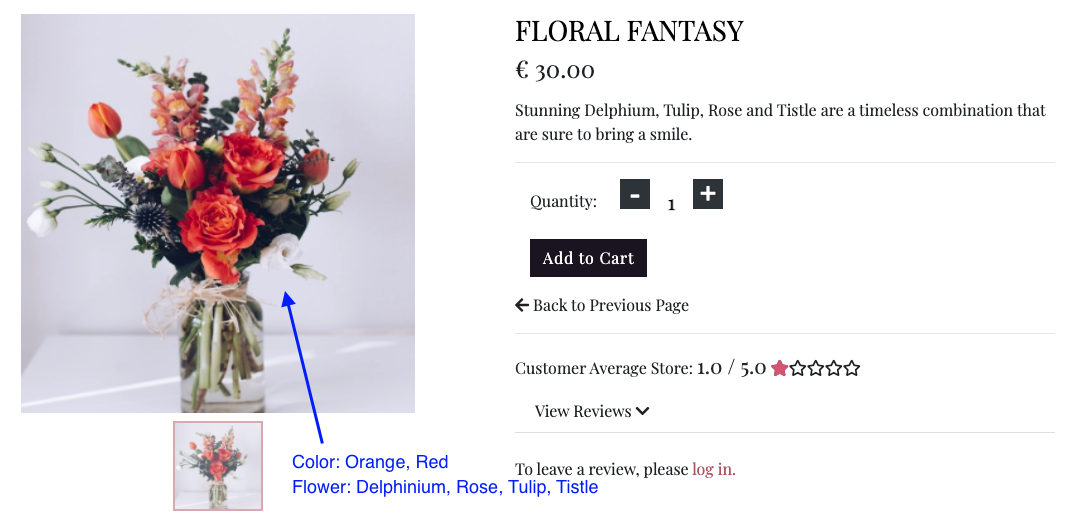
A bouquet could have several types of flowers and multiple colors. For example, below the product 'Floral Fantasy' has Delphinium, Rose, Tulip and Tistle for its flowers and it can be categorized as Red and Orange. To give customers a better search experience, meaning not to narrow down the search results with the search keyword, I wanted to enable customers to search/filter bouquets with their flower type(name) or their color. For example, if a customer uses a filter tulip, bouquets that contains tulip (such as the 'Floral Fantasy') and also individual tulip flower product (not bouquet) will be shown. Therefore, separated models Product, Flower, Color are created and connected inbetween. Image model is connected to Product model because some products could have several product images. Also Image model is connected to Color model, because each product image should a product that could have mutiple colors. There might have been a better implementation than this scheme, but at the time, this was the best idea I had.
Order model collects the delivery information, stripe_pid and order information. All the fields except user_profile field have null=false. The reason why user_profile does not have null=false is that guest customers (not authenticated users) can also purchase products and complete the checkout process without creating an account. Order model is connected to OrderLineItem model which collects information of purchased products.
BlogPost model has the essential information for blog post, such as a title, author, content, created date. This model is connected to User, BlogImage and BlogComment.
Profile is used for my profile page where the authenticated users can see their delivery details and their order history.
The main frontend development was created using HTML, CSS, JavaScript and their libraries. The main backend development was powered by Python and Django.
- HTML, CSS, JavaScript, Python
- Django
- Django Crispy Forms
- Django Allauth
- Bootstrap (v4.4.1)
- JQuery
- JQuery-UI
- Popper.js
- Font Awesome
- Animate.css
- Wow.js
- Stripe
- Google Fonts
- Git/GitHub
- Gitpod
- PIP
- Django Debug Toolbar
- dbdiagram.io
- AWS S3 bucket
- SQlite3- database used for development.
- PostgreSQL - database used for production.
Testing was conducted and recorded in a different file: Testing.md.
This website is deployed on Heroku, following these steps:
- Install these packages to your local environment, since these packages are required to deploy a Django project on Heroku.
- gnicorn:
gnicornis Python WSGI(web server gataway interface) server for UNIX. - psycopg2-binary:
psycopg2-binaryis PostgreSQL database adapter for the Python programming language. - dj-database-url:
dj-database-urlallows you to utilize the 12factor inspired DATABASE_URL environment variable to configure your Django application.
- Create a
requirements.txtfile and freeze all the modules with the commandpip3 freeze > requirements.txtin the terminal. - Create a
Procfilewriteweb: gunicorn boutique_ado.wsgi:applicationin the file. git addandgit commitandgit pushall the changes to the Github repositoty of this project.- Go to Heroku and create a new app. Set a name for this app and select the closest region (Europe) and click Create app.
- Go to Resources tab in Heroku, then in the Add-ons search bar look for Heorku Postgres(you can type postgres), select Hobby Dev — Free and click Submit Order Form button to add it to your project.
- In the heroku dashboard for the application, click on Setting > Reveal Config Vars and set the values as follows:
| Key | Value |
|---|---|
| AWS_ACCESS_KEY_ID | Your AWS Access Key |
| AWS_SECRET_ACCESS_KEY | Your AWS Secret Access Key |
| DATABASE_URL | Your Postgres Database URL |
| EMAIL_HOST_PASS | Your Email Password (generated by Gmail) |
| EMAIL_HOST_USER | Your Email Address |
| SECRET_KEY | Your Secret Key |
| STRIPE_PUBLIC_KEY | Your Stripe Public Key |
| STRIPE_SECRET_KEY | Your Stripe Secret Key |
| STRIPE_WH_SECRET | Your Stripe WH Key |
| USE_AWS | True |
- I used Djecrety to generate Django Secret Key.
- Comment out the current database setting in settings.py, and add the code below instead. This is done temporarily to migrate the datbase on Heroku.
  DATABASES = {
        'default': dj_database_url.parse("<your Postrgres database URL here>")
    }
- Migrate the database models to the Postgres database using the following commands in the terminal:
python3 manage.py migrate - Load the data fixtures(color_table, flower_table, image_table, product_table) into the Postgres database using the following command:
python3 manage.py loaddata <fixture_name> - Create a superuser for the Postgres database by running the following command:
python3 manage.py createsuperuser - Replace the database setting with the code below, so that the right database is used depending on development/deployed environment.
if 'DATABASE_URL' in os.environ:
    DATABASES = {
        'default': dj_database_url.parse(os.environ.get('DATABASE_URL'))
    }
else:
    DATABASES = {
        'default': {
            'ENGINE': 'django.db.backends.sqlite3',
            'NAME': os.path.join(BASE_DIR, 'db.sqlite3'),
        }
    }
- Disable collect static, so that Heroku won't try to collect static file with:
heroku config:set DISABLE_COLLECTSTATIC=1 - Add
'flowerydays.herokuapp.com', 'localhost', '127.0.0.1'toALLOWED_HOSTSin settings.py.
ALLOWED_HOSTS = ['flowerydays.herokuapp.com', 'localhost', '127.0.0.1']
- In Stripe, add Heroku app URL a new webhook endpoint.
- Update the settings.py with the new Stripe environment variables and email settings.
- Commit all the changes to Heroku. Medial files are not connected to the app yet but the app should be working on Heroku.
The static files and media files for this deployed site (e.g. image files for product/blog) are hosted in the AWS S3 Bucket. You will need to create S3 bucket, complete the setting up and upload static files and media files to the S3 bucket. You can find Amazon S3 documentation for more information on the setting. I used CORS configuration below:
[
  {
      "AllowedHeaders": [
          "Authorization"
      ],
      "AllowedMethods": [
          "GET"
      ],
      "AllowedOrigins": [
          "*"
      ],
      "ExposeHeaders": []
  }
]
- Setting for static/media files in settings.py
- Install
boto3anddjango-storageswith a commandpip3 install boto3andpip3 install django-storagesin your terminal, to connect AWS S3 bucket to Django. - Add 'storages' to
INSTALLED_APPSin settings.py. - Add the following in settings.py.
if 'USE_AWS' in os.environ:
    # Cache Control
    AWS_S3_OBJECT_PARAMETERS = {
        'Expires': 'Thu, 31 Dec 2099 20:00:00 GMT',
        'CacheControl': 'max-age=94608000',
    }

    # Bucket Config
    AWS_STORAGE_BUCKET_NAME = 'flowerydays'
    AWS_S3_REGION_NAME = 'eu-west-1'
    AWS_ACCESS_KEY_ID = os.getenv('AWS_ACCESS_KEY_ID')
    AWS_SECRET_ACCESS_KEY = os.getenv('AWS_SECRET_ACCESS_KEY')
    AWS_S3_CUSTOM_DOMAIN = f'{AWS_STORAGE_BUCKET_NAME}.s3-eu-west-1.amazonaws.com'

    # Static and media files
    STATICFILES_STORAGE = 'custom_storages.StaticStorage'
    STATICFILES_LOCATION = 'static'
    DEFAULT_FILE_STORAGE = 'custom_storages.MediaStorage'
    MEDIAFILES_LOCATION = 'media'

    # Override static and media URLs in production
    STATIC_URL = f'https://{AWS_S3_CUSTOM_DOMAIN}/{STATICFILES_LOCATION}/'
    MEDIA_URL = f'https://{AWS_S3_CUSTOM_DOMAIN}/{MEDIAFILES_LOCATION}/'
- Add custom_storages.py.
- Delete DISABLE_COLLECTSTATIC from Heroku Config Var.
- Push all the changes to Github/Heroku and all the static files will be uploaded to S3 bucket. By setting up above, Heroku will run python3 manage.py collectstatic during the build process and look for static and media files.
You can enable automatic deploy in the following steps that pushes update to Heroku everytime you push to github.
- Go to Deploy in Heroku dashboard.
- At
Automatic deploys, choose a github repository you want to deploy. - Click
Enable Automatic Deploys.
For local deployment, you need to have an IDE (I used Gitpod for this project) and you need to install the following:
- Git, Python3, PIP3 Also, you need to create account in the following services if you don't own yet:
- Stripe, AWS (S3 bucket), Gmail
- In the IDE you are using, copy and paste the following commane into the terminal to clone this repository.
git clone https://github.com/AsunaMasuda/FloweryDays.git(the other ways to clone a repository are written in this GitHub documentation) - Set up environment variable in your selected IDE, or you can create
.envfile in your root directory and add.envto.gitignorefile, and add the followings to the.envfile.
import os
os.environ["DEVELOPMENT"] = "True"
os.environ["SECRET_KEY"] = "<Your Secret Key>"
os.environ["STRIPE_PUBLIC_KEY"] = "<Your Stripe Public Key>"
os.environ["STRIPE_SECRET_KEY"] = "<Your Stripe Secret Key>"
os.environ["STRIPE_WH_SECRET"] = "<Your Stripe WH Secret Key>"
- Install all the required packages with
pip3 install -r requirements.txt - Migrate the models to crete a database using in your IDE with
python3 manage.py makemigrationsandpython3 manage.py migrate - Load the data fixtures(color_table, flower_table, image_table, product_table) into the database using the following command:
python3 manage.py loaddata <fixture_name> - Create a superuser for the Postgres database by running with
python3 manage.py createsuperuser - Now you can access the app using the command
python3 manage.py runserver
- I constantly read Django, Stripe and Python documenation and tutorial throughout the development.
- For
Blogapp, I referred to this tutorial. - I refered to this code snippet for the Testinonial section on the landing page.
- For search product function, I refered to several articles and video. Stack Overflow 1, Stack Overflow 2, Stack Overflow 3, Combine 2 Django Querysets from Different Models, Django Queryset:value_list() flat=True.
- For the hover show button on the product card, I refered to this code snippet.
- For multiselect dropdown menu which is used for the product filter function, I referred to these article: Stack Overflow 1, bootstrap-select.
- For creating custome template tags used in
BlogandProductapps, I refered to this video. - This project was developed refering to the Boutique Ado Django mini-project from Code Institute course materials. The codes are customized and modified to fit the purpose of this milestone project.
- All the icons in this website were provided by Font Awesome.
- Favicon is made by Freepik from www.flaticon.com.
- The credits for the images used in this site can be found in this separated file.
- To compress the image size, I used tinypng.
- Thanks to: my Code Institute Mentor Guido Cecilio Garcia Bernal for his advice throughout the development process.
- Code Institute Slack Community that gave me a light when I was stuck in my coding.
This website is created for educational purpose only.