##After you are done contributing and creating a PR, add a comment in the following manner:
For a list of all available contribution tags, click here You will be added to contributors list once the PR is merged!
Thank you for investing your time in contributing to our project! Any contribution you make will be reflected on zhcet-code-oasis.github.com ✨.
In this guide you will get an overview of the contribution workflow from opening an issue, creating a PR, reviewing, and merging the PR.
Here are some resources to help you get started with open source contributions:
- Finding ways to contribute to open source on GitHub
- Set up Git
- GitHub flow
- Collaborating with pull requests
-
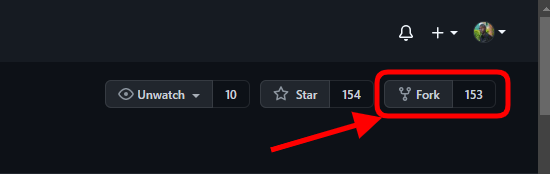
At the top right corner, you will see the term "fork". All you need to do is click it and you will have created a copy of the same project in your account.
After this operation the URL of the project will change to:
https://github.com/<YourUserName>/projectname -
Copy the forked project URL, and proceed to your local machine where you will open git bash, and proceed with the command below:
git clone https://github.com/<YourUserName>/<projectname>This will create a copy of the project on your local machine. Now that you have cloned the repo we will need to do two things:
First is to make the necessary changes/contribution and commit those changes. After making your changes and adding new files, its time to add those changes into a separate branch before pushing them to remote.
But, first let's create a branch. In your git bash, change the path to pint to your repository directory. To do that use this command:
cd project folder nameNow, to create a branch we will use the command:
git checkout -b your-new-branch-nameIt's time to add the new changes into the branch we created. In order to see all the changes you made, we will use the
git statuscommand:git statusThe command will list all the changes you made. To add them we will use git add *, which will add all the files to our branch.
git add *Let's add a commit message, briefly explaining what we added:
git commit -m "<message here>" -
Now that everything is set, it's time to let our maintainer know what we have added. That is made possible by pushing the changes with this command:
git push origin <add-your-branch-name>replacing
<add-your-branch-name>with the name of the branch you created earlier, in my case it will begit push origin feature/footer. -
If you go to your repository on GitHub and refresh the page, you'll see a Compare and pull request button. Click on that button.
-
On your enterprise, navigate to the main page of the repository.
-
Under your repository name, click Issues.
-
Click New issue.
-
If your repository uses issue templates, next to the type of issue you'd like to open, click Get started.
If the type of issue you'd like to open isn't included in the available options, click Open a blank issue.
-
Screenshot of the template chooser for an issue. Below the template choices, a link, labeled "Open a blank issue," is outlined in dark orange.
-
In the "Title" field, type a title for your issue.
-
In the comment body field, type a description of your issue.
-
When you're finished, click Submit new issue.
