- 이벤트 전파 : DOM 요소 노드에서 발생한 이벤트가 DOM 트리를 통해 전파되는 현상
- 생성된 이벤트 객체는 이벤트를 발생시킨 DOM 요소인 이벤트 타깃을 중심으로 DOM 트리를 통해 전파
<!DOCTYPE html>
<html>
  <body>
    <ul id="fruits">
      <li id="apple">Apple</li>
      <li id="banana">Banana</li>
      <li id="orange">Orange</li>
    </ul>
  </body>
</html>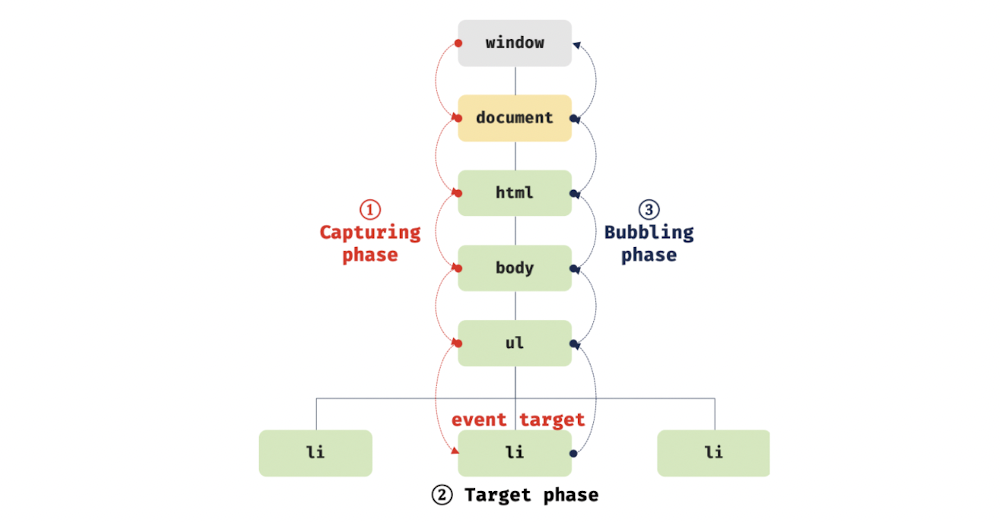
- 1️⃣ Capture Phase : 이벤트가 상위 요소에서 하위 요소 방향으로 전파
- 2️⃣ Tarket Phase : 이벤트가 이벤트 타깃에 도달
- 3️⃣ Bubbling Phase : 이벤트가 하위 요소에서 상위 요소 방향으로 전파
<!DOCTYPE html>
<html>
  <body>
    <ul id="fruits">
      <li id="apple">Apple</li>
      <li id="banana">Banana</li>
      <li id="orange">Orange</li>
    </ul>
    <script>
      const $fruits = document.getElementById('fruits');

      // #fruits 요소의 하위 요소인 li 요소를 클릭한 경우
      $fruits.addEventListener('click', (e) => {
        console.log(`이벤트 단계: ${e.eventPhase}`); // 3: 버블링 단계
        console.log(`이벤트 타깃: ${e.target}`); // [object HTMLLIElement]
        console.log(`커런트 타깃: ${e.currentTarget}`); // [object HTMLUListElement]
      });
    </script>
  </body>
</html>- Event Target =>
li - Current Target =
ul
- 캡처링 단계의 이벤트도 선별적으로 캐치 가능 =>
addEventListener메서드의 3번째 인수로true를 전달 - 이벤트를 발생시킨 이벤트 타겟은 물론 상위 DOM 요소에서도 캐치 가능
- DOM 트리를 통해 전파되는 이벤트는 이벤트 패스에 위치한 모든 DOM 요소에서 캐치 가능
- 이벤트 패스 : 이벤트가 통과하는 DOM 트리 상의 경로
<!DOCTYPE html>
<html>
  <body>
    <ul id="fruits">
      <li id="apple">Apple</li>
      <li id="banana">Banana</li>
      <li id="orange">Orange</li>
    </ul>
    <script>
      const $fruits = document.getElementById('fruits');
      const $banana = document.getElementById('banana');

      // #fruits 요소의 하위 요소인 li 요소를 클릭한 경우
      // 캡처링 단계의 이벤트를 캐치한다.
      $fruits.addEventListener(
        'click',
        (e) => {
          console.log(`이벤트 단계: ${e.eventPhase}`); // 1: 캡처링 단계
          console.log(`이벤트 타깃: ${e.target}`); // [object HTMLLIElement]
          console.log(`커런트 타깃: ${e.currentTarget}`); // [object HTMLUListElement]
        },
        true
      );

      // 타깃 단계의 이벤트를 캐치한다.
      $banana.addEventListener('click', (e) => {
        console.log(`이벤트 단계: ${e.eventPhase}`); // 2: 타깃 단계
        console.log(`이벤트 타깃: ${e.target}`); // [object HTMLLIElement]
        console.log(`커런트 타깃: ${e.currentTarget}`); // [object HTMLLIElement]
      });

      // 버블링 단계의 이벤트를 캐치한다.
      $fruits.addEventListener('click', (e) => {
        console.log(`이벤트 단계: ${e.eventPhase}`); // 3: 버블링 단계
        console.log(`이벤트 타깃: ${e.target}`); // [object HTMLLIElement]
        console.log(`커런트 타깃: ${e.currentTarget}`); // [object HTMLUListElement]
      });
    </script>
  </body>
</html>- 버블링을 통해 전파되지 않는 이벤트
- 포커스이벤트 :
focus/blur - 리소스이벤트 :
load/unload/abort/error - 마우스이벤트 :
mouseenter/mouseleave
<!DOCTYPE html>
<html>
<head>
  <style>
    html, body { height: 100%; }
  </style>
<body>
  <p>버블링과 캡처링 이벤트 <button>버튼</button></p>
  <script>
    // 버블링 단계의 이벤트를 캐치
    💎 document.body.addEventListener('click', () => {
      console.log('Handler for body.');
    });

    // 캡처링 단계의 이벤트를 캐치
    document.querySelector('p').addEventListener('click', () => {
      console.log('Handler for paragraph.');
    }, true);

    // 버블링 단계의 이벤트를 캐치
    💎 document.querySelector('button').addEventListener('click', () => {
      console.log('Handler for button.');
    });
  </script>
</body>
</html>


// Handler for paragraph.
// Handler for button.
// Handler for body.<!DOCTYPE html>
<html>
<head>
<style>
#fruits {
display: flex;
list-style-type: none;
padding: 0;
}
#fruits li {
width: 100px;
cursor: pointer;
}
#fruits .active {
color: red;
text-decoration: underline;
}
</style>
</head>
<body>
<nav>
<ul id="fruits">
<li id="apple" class="active">Apple</li>
<li id="banana">Banana</li>
<li id="orange">Orange</li>
</ul>
</nav>
<div>선택된 내비게이션 아이템: <em class="msg">apple</em></div>
<script>
const $fruits = document.getElementById('fruits');
const $msg = document.querySelector('.msg');
// 사용자 클릭에 의해 선택된 내비게이션 아이템(li 요소)에 active 클래스를 추가하고
// 그 외의 모든 내비게이션 아이템의 active 클래스를 제거한다.
function activate({ target }) {
[...$fruits.children].forEach(($fruit) => {
$fruit.classList.toggle('active', $fruit === target);
$msg.textContent = target.id;
});
}
// 모든 내비게이션 아이템(li 요소)에 이벤트 핸들러를 등록한다.
document.getElementById('apple').onclick = activate;
document.getElementById('banana').onclick = activate;
document.getElementById('orange').onclick = activate;
</script>
</body>
</html>- 이벤트 위임 : 여러 개의 하위 DOM 요소에 각각 이벤트 핸들러를 등록하는 대신 하나의 상위 DOM 요소에 이벤트 핸들러를 등록하는 방법
- 이벤트 위임을 활용한 예제
<!DOCTYPE html>
<html>
  <head>
    <style>
      #fruits {
        display: flex;
        list-style-type: none;
        padding: 0;
      }

      #fruits li {
        width: 100px;
        cursor: pointer;
      }

      #fruits .active {
        color: red;
        text-decoration: underline;
      }
    </style>
  </head>
  <body>
    <nav>
      <ul id="fruits">
        <li id="apple" class="active">Apple</li>
        <li id="banana">Banana</li>
        <li id="orange">Orange</li>
      </ul>
    </nav>
    <div>선택된 내비게이션 아이템: <em class="msg">apple</em></div>
    <script>
      const $fruits = document.getElementById('fruits');
      const $msg = document.querySelector('.msg');

      // 사용자 클릭에 의해 선택된 내비게이션 아이템(li 요소)에 active 클래스를 추가하고
      // 그 외의 모든 내비게이션 아이템의 active 클래스를 제거한다.
      function activate({ target }) {
        // 이벤트를 발생시킨 요소(target)가 ul#fruits의 자식 요소가 아니라면 무시한다.
        if (!target.matches('#fruits > li')) return;

        [...$fruits.children].forEach(($fruit) => {
          $fruit.classList.toggle('active', $fruit === target);
          $msg.textContent = target.id;
        });
      }

      // 이벤트 위임: 상위 요소(ul#fruits)는 하위 요소의 이벤트를 캐치할 수 있다.
      $fruits.onclick = activate;
    </script>
  </body>
</html>- 개발자가 원하던 DOM 요소가 맞는지 검사할 필요 존재 =>
Element.prototype.matches
🟠 Element.prototype.matches
- 인수로 전달된 선택자에 의해 특정 노드를 탐색 가능한지 확인
function activate({ target }) {
  // 이벤트를 발생시킨 요소(target)이 ul#fruits의 자식 요소가 아니라면 무시한다.
  if (!target.matches('#fruits > li')) return;
...🟠 preventDefault
- DOM 요소의 기본 동작을 중단
<!DOCTYPE html>
<html>
  <body>
    <a href="https://www.google.com">go</a>
    <input type="checkbox" />
    <script>
      document.querySelector('a').onclick = (e) => {
        // a 요소의 기본 동작을 중단한다.
        e.preventDefault();
      };

      document.querySelector('input[type=checkbox]').onclick = (e) => {
        // checkbox 요소의 기본 동작을 중단한다.
        e.preventDefault();
      };
    </script>
  </body>
</html>🟠 stopPropagation
- 이벤트 전파 중지
<!DOCTYPE html>
<html>
  <body>
    <div class="container">
      <button class="btn1">Button 1</button>
      <button class="btn2">Button 2</button>
      <button class="btn3">Button 3</button>
    </div>
    <script>
      // 이벤트 위임. 클릭된 하위 버튼 요소의 color를 변경한다.
      document.querySelector('.container').onclick = ({ target }) => {
        if (!target.matches('.container > button')) return;
        target.style.color = 'red';
      };

      // .btn2 요소는 이벤트를 전파하지 않으므로 상위 요소에서 이벤트를 캐치할 수 없다.
      document.querySelector('.btn2').onclick = (e) => {
        e.stopPropagation(); // 이벤트 전파 중단
        e.target.style.color = 'blue';
      };
    </script>
  </body>
</html><!DOCTYPE html>
<html>
<body>
<button onclick="handleClick()">Click me</button>
<script>
function handleClick() {
console.log(this); // window
}
</script>
</body>
</html>- 이벤트 핸들러 어트리뷰트의 값으로 지정한 문자열 => 암묵적으로 생성되는 이벤트 핸들러의 문
<!DOCTYPE html>
<html>
  <body>
    <button onclick="handleClick(this)">Click me</button>
    <script>
      function handleClick(button) {
        console.log(button); // 이벤트를 바인딩한 button 요소
        console.log(this); // window
      }
    </script>
  </body>
</html>- 이벤트 핸들러 내부의 this는 이벤트를 바인딩한 DOM 요소를 가리킴
<!DOCTYPE html>
<html>
  <body>
    <button class="btn1">0</button>
    <button class="btn2">0</button>
    <script>
      const $button1 = document.querySelector('.btn1');
      const $button2 = document.querySelector('.btn2');

      // 이벤트 핸들러 프로퍼티 방식
      $button1.onclick = function (e) {
        // this는 이벤트를 바인딩한 DOM 요소를 가리킨다.
        console.log(this); // $button1
        console.log(e.currentTarget); // $button1
        console.log(this === e.currentTarget); // true

        // $button1의 textContent를 1 증가시킨다.
        ++this.textContent;
      };

      // addEventListener 메서드 방식
      $button2.addEventListener('click', function (e) {
        // this는 이벤트를 바인딩한 DOM 요소를 가리킨다.
        console.log(this); // $button2
        console.log(e.currentTarget); // $button2
        console.log(this === e.currentTarget); // true

        // $button2의 textContent를 1 증가시킨다.
        ++this.textContent;
      });

      /*
      // addEventListener 메서드 방식
      $button2.addEventListener('click', (e) => {
        // 화살표 함수 내부의 this는 상위 스코프의 this를 가리킨다.
        console.log(this); // window
        console.log(e.currentTarget); // $button2
        console.log(this === e.currentTarget); // false

        // this는 window를 가리키므로 window.textContent에 NaN(undefined + 1)을 할당한다.
        ++this.textContent;
      });
      */
    </script>
  </body>
</html>addEventListener핸들러 내부의 this는 이벤트를 바인딩한 DOM 요소를 가리킴- 화살표 함수의
this는 상위 스코프의this를 가리킴 => 함수 자체의this바인딩을 갖지 않음
<!DOCTYPE html>
<html>
  <body>
    <button class="btn">0</button>
    <script>
      class App {
        constructor() {
          this.$button = document.querySelector('.btn');
          this.count = 0;

          // 🟠 increase 메서드를 이벤트 핸들러로 등록 🟠
          this.$button.onclick = this.increase;
        }

        increase() {
          // 이벤트 핸들러 increase 내부의 this는 DOM 요소(this.$button)를 가리킨다.
          // 따라서 this.$button은 this.$button.$button과 같다.
          this.$button.textContent = ++this.count;
          // -> TypeError: Cannot set property 'textContent' of undefined
        }
      }

      new App();
    </script>
  </body>
</html>- 클래스에서
this는 주의해야함
bind를 사용하여 클래스가 생성할 인스턴스를 가리키도록 한 예시
<!DOCTYPE html>
<html>
  <body>
    <button class="btn">0</button>
    <script>
      class App {
        constructor() {
          this.$button = document.querySelector('.btn');
          this.count = 0;

          // increase 메서드를 이벤트 핸들러로 등록
          // this.$button.onclick = this.increase;

          // 🟠 increase 메서드 내부의 this가 인스턴스를 가리키도록 한다. 🟠
          this.$button.onclick = this.increase.bind(this);
        }

        increase() {
          this.$button.textContent = ++this.count;
        }
      }

      new App();
    </script>
  </body>
</html>- 화살표 함수로 등록하여
bind대신 사용 가능
- 화살표 함수로 등록하여 클래스가 생성할 인스턴스를 가리키도록 한 예시
<!DOCTYPE html>
<html>
  <body>
    <button class="btn">0</button>
    <script>
      class App {
        constructor() {
          this.$button = document.querySelector('.btn');
          this.count = 0;

          // 화살표 함수인 increase를 이벤트 핸들러로 등록
          this.$button.onclick = this.increase;
        }

        // 클래스 필드 정의
        // 🟠 increase는 인스턴스 메서드이며 내부의 this는 인스턴스를 가리킨다. 🟠
        increase = () => (this.$button.textContent = ++this.count);
      }
      new App();
    </script>
  </body>
</html>- 함수 인수 전달 시 함수 호출할 때 전달해야 함
addEventListener메서드 사용 시 함수 호출문이 아닌 함수 자체를 등록해야 함 => 즉, 인수를 전달할 수 없음
- 인수 전달 방법
<!DOCTYPE html>
<html>
  <body>
    <label>User name <input type="text" /></label>
    <em class="message"></em>
    <script>
      const MIN_USER_NAME_LENGTH = 5; // 이름 최소 길이
      const $input = document.querySelector('input[type=text]');
      const $msg = document.querySelector('.message');

      const checkUserNameLength = (min) => {
        $msg.textContent =
          $input.value.length < min ? `이름은 ${min}자 이상 입력해 주세요` : '';
      };

      // 🟠 이벤트 핸들러 내부에서 함수를 호출하면서 인수를 전달한다. 🟠
      $input.onblur = () => {
        checkUserNameLength(MIN_USER_NAME_LENGTH);
      };
    </script>
  </body>
</html>- 이벤트 핸들러를 반환하는 함수를 호출하면서 인수 전달 가능
<!DOCTYPE html>
<html>
  <body>
    <label>User name <input type="text" /></label>
    <em class="message"></em>
    <script>
      const MIN_USER_NAME_LENGTH = 5; // 이름 최소 길이
      const $input = document.querySelector('input[type=text]');
      const $msg = document.querySelector('.message');

      // 🟠 이벤트 핸들러를 반환하는 함수 🟠
      const checkUserNameLength = (min) => (e) => {
        $msg.textContent =
          $input.value.length < min ? `이름은 ${min}자 이상 입력해 주세요` : '';
      };

      // 이벤트 핸들러를 반환하는 함수를 호출하면서 인수를 전달한다.
      $input.onblur = checkUserNameLength(MIN_USER_NAME_LENGTH);
    </script>
  </body>
</html>- 이벤트가 발생하면 암묵적으로 생성되는 이벤트 객체는 발생한 이벤트의 종류에 따라 이벤트 타입이 결정됨
- 커스텀 이벤트 : 개발자의 의도로 생성된 이벤트
- 첫 번째 인수, 이벤트 타입을 나타내는 문자열을 전달
// KeyboardEvent 생성자 함수로 keyup 이벤트 타입의 커스텀 이벤트 객체를 생성
const keyboardEvent = new KeyboardEvent('keyup');
console.log(keyboardEvent.type); // keyup

// CustomEvent 생성자 함수로 foo 이벤트 타입의 커스텀 이벤트 객체를 생성
const customEvent = new CustomEvent('foo');
console.log(customEvent.type); // foo- 커스텀 이벤트 객체는 버블링 되지 않음
preventDefault메서드 사용 불가bubbles와cancelable의 기본값은false
// MouseEvent 생성자 함수로 click 이벤트 타입의 커스텀 이벤트 객체를 생성
const customEvent = new MouseEvent('click');
console.log(customEvent.type); // click
console.log(customEvent.bubbles); // false
console.log(customEvent.cancelable); // falsetrue설정 방법
// MouseEvent 생성자 함수로 click 이벤트 타입의 커스텀 이벤트 객체를 생성
const customEvent = new MouseEvent('click', {
  bubbles: true,
  cancelable: true,
});

console.log(customEvent.bubbles); // true
console.log(customEvent.cancelable); // true- 이벤트 고유의 프로퍼티 값 지정 방법
// MouseEvent 생성자 함수로 click 이벤트 타입의 커스텀 이벤트 객체를 생성
const mouseEvent = new MouseEvent('click', {
  bubbles: true,
  cancelable: true,
  clientX: 50,
  clientY: 100,
});

console.log(mouseEvent.clientX); // 50
console.log(mouseEvent.clientY); // 100

// KeyboardEvent 생성자 함수로 keyup 이벤트 타입의 커스텀 이벤트 객체를 생성
const keyboardEvent = new KeyboardEvent('keyup', { key: 'Enter' });

console.log(keyboardEvent.key); // Enter- 커스텀 이벤트는
dispatchEvent메서드로 디스패치 가능 - 이벤트 객체를 인수로 전달하면서 호출하면 인수로 전달한 이벤트 타입의 이벤트 발생
dispatchEvent메서드는 동기 처리 방식 호출
<!DOCTYPE html>
<html>
  <body>
    <button class="btn">Click me</button>
    <script>
      const $button = document.querySelector('.btn');

      // 🟠 버튼 요소에 click 커스텀 이벤트 핸들러를 등록 🟠
      // 커스텀 이벤트를 디스패치하기 이전에 이벤트 핸들러를 등록해야 한다.
      $button.addEventListener('click', (e) => {
        console.log(e); // MouseEvent {isTrusted: false, screenX: 0, ...}
        alert(`${e} Clicked!`);
      });

      // 커스텀 이벤트 생성
      const customEvent = new MouseEvent('click');

      // 🟠 커스텀 이벤트 디스패치(동기 처리). click 이벤트가 발생한다. 🟠
      $button.dispatchEvent(customEvent);
    </script>
  </body>
</html>- 임의의 이벤트 타입을 지정하여 이벤트 객체를 생성하는 경우 일반적으로
CustomEvent이벤트 생성자 함수를 사용 - 두번째 인수로 이벤트와 함께 전달하고 싶은
detail프로퍼티를 포함하는 객체를 전달
<!DOCTYPE html>
<html>
  <body>
    <button class="btn">Click me</button>
    <script>
      const $button = document.querySelector('.btn');

      // 버튼 요소에 foo 커스텀 이벤트 핸들러를 등록
      // 커스텀 이벤트를 디스패치하기 이전에 이벤트 핸들러를 등록해야 한다.
      $button.addEventListener('foo', (e) => {
        // e.detail에는 CustomEvent 함수의 두 번째 인수로 전달한 정보가 담겨 있다.
        alert(e.detail.message);
      });

      // CustomEvent 생성자 함수로 foo 이벤트 타입의 커스텀 이벤트 객체를 생성
      const customEvent = new CustomEvent('foo', {
        detail: { message: 'Hello' }, // 🟠 이벤트와 함께 전달하고 싶은 정보 🟠
      });

      // 커스텀 이벤트 디스패치
      $button.dispatchEvent(customEvent);
    </script>
  </body>
</html>