Angular is a TypeScript-based, open-source framework for building single-page web applications (SPAs). It's a popular choice for developers due to its robust features, extensive documentation, and large community.
Open-source development allows anyone to view the source code, contribute to its development, and report bugs. This transparency fosters a strong community around Angular, where developers can learn from each other, share knowledge, and collaborate on improvements.
for eg :
if i am developing some application for my users and making it public such that anyone can see the code and can use it, if they want can give me feedbacks and report bugs so that by this means developers can engage other developers and can get good insight about the application.
- Open-source development allows for a more rapid pace of innovation. Bug fixes, improvements, and new features can be implemented and released quickly,
Suppose we want to build a house, basic materials that is needed to build a house are bricks , cement, steel , labour.
now building a house can be done in 2 ways:
- if a person himself takes responsibilty of everything
- if he delegated the work to someone else (in this case a professional developer) who will look after all the things.
same is with like framework -> a framework is a complete package, it is a collection of tools and everything needed to build a complete thing.
What angular provides :
angular routing, compiler ,security, angular-forms, karma and jasmine frameworks for testing.
Yes, Angular is a js framework, but it uses typescript, which later converts into js only. but angular is a typescript based.
Angular was first launched in 2010, by that time it was built using javascript only, but due t few limitations nd more features of typescript in 2016 angular developers came up with new version of angular which was angular 2+, which was complete revamp of angular, and this time they used typescript.
Question: But Browsers can only understand Javascript how angular application which is in typescipt run on browsers ?
Typescript is a language by microsoft. it is a superset of javascript, means it is built on javascript using its all features and adding its own features.
Typescript is compiled into javascript. thats how angular application works.
Typescript code -----ts compiler ----> javascript code
-
Features
  1. Static Typing: Statically typed, meaning types are checked during compilation, catching errors early
  2. Type Inference: Can infer types from variable assignments and function parameters.
  3. Interfaces:Supports classes and inheritance with improved syntax.
  4. Decorators:Allows attaching metadata to declarations for code generation, configuration, and other purposes.
  5. Private and protected members:Supports access modifiers like private and protected for greater control over object member visibility.
  6.  Advanced object-oriented features:
  7. Build tooling integration:Compiles TypeScript code to JavaScript, supporting various build tools and configuration options.
Before coming to Single page application consider we have to build a ecommerce website which sells apparels of mens, womens, kids.
consider the theoretical design of website like below

we know this is web applications contains all these elements

consider we have developed a website using html and css only.
in this case we would have developed 3 html pages like:
- mens.html
- womens.html
- kids.html
and initialy a page where we will show some home content and 3 links
when user will click on men then we will open a new page mens.html
there is no way to re-use the functionality which is common.
- in normal applications there are individual pages for a different section or functionality.
- SPA : A single-page application (SPA) is a web app that loads a single HTML page and then updates the content dynamically without reloading the entire page. This is different from traditional web applications, which load a new page every time the user clicks a link or submits a form.
Here's how to install Angular on different operating systems:
1. Install Node.js:
Angular requires Node.js to run. You can download and install the latest version from the official website: https://nodejs.org/en/download
https://www.freecodecamp.org/news/what-is-node-js/
2. Install Angular CLI:
Once Node.js is installed, open a terminal and run the following command to install the Angular CLI globally:
npm install -g @angular/cli
This will install the Angular CLI globally on your system. You can use the ng command to access Angular CLI commands.
3. Create a new Angular project:
Run the following command to create a new Angular project named my-app:
ng new my-app
This will create a new directory called my-app with the basic structure for an Angular application.
4. Start the development server:
Navigate to the project directory and run the following command to start the development server:
cd my-app
ng serve
This will start a development server on port 4200. You can access the application in your web browser by navigating to https://locall.host/4200/.
- node -v
- npm -v
- ng version
node js is a javascript runtime.
now what is javascript runtime
- as we all know only browsers had the power to run the javascript because browsers only had the javascript engines.

and javascript was only limited to frontend applications.

but as the software system evolved many companies started building and developing a new and better javascript engine, their own engine which could run javascript.
Node js is also one of them. it can run our javascript.
-
Benefits of NODE js
- node js comes up with node package manager (NPM).NPM allows you to install and manage the various dependencies required by your Angular project.
- we need angular cli for angular related stuff, it needs node js to run.
- Node allows you to spin up a lightweight web server to host your application locally in your system.
In the download process,we download three things
- node js
- npm
- angular-cli
we didnt downloaded angular, we downloaded angular-cli ??
The Angular CLI (Command Line Interface) is a powerful tool that plays a vital role in Angular development. It provides a set of commands that you can use to automate various tasks, such as:
Project creation and management:
- Create new Angular projects.
- Add, remove, and update components, services, directives, and other features.
- Generate boilerplate code for various elements.
- Manage dependencies with NPM.
Development and testing:
- Start and stop the development server for local testing.
- Run unit and end-to-end tests.
- Lint your code for errors and stylistic consistency.
- Build and deploy your application for production.
Code scaffolding and generation:
- Generate boilerplate code for components, services, pipes, and other common Angular elements.
- Quickly create basic structure for new features in your application.
Version management:
- Update Angular versions and other dependencies.
- Upgrade your application to newer versions of Angular with minimal effort.
Here are some of the key reasons why the Angular CLI is essential for Angular development:
- Improved productivity: Repetitive tasks can be automated, saving you time and effort.
- Reduced errors: Consistent code generation and boilerplate reduces the risk of manual errors.
- Better development workflow: Streamlines development process, making it easier to manage projects.
- Enhanced code quality: Enforces best practices and improves code maintainability.
- Standardized project structure: Ensures consistency across projects and teams.
- Faster build times: Optimizes build process for production deployments.
- Community support: Extensive documentation and community resources available.
In summary, the Angular CLI is an indispensable tool for any Angular developer. It provides a comprehensive set of features that simplify and accelerate the development process, while also promoting consistent and high-quality code. Learning and mastering the Angular CLI will significantly enhance your productivity and overall development experience with Angular.
To create angular application we need to use command ng generate
ng generate new-app
The ng new command in the Angular CLI serves a crucial role in initializing and setting up new Angular projects. It performs several key tasks to get you started with development:
1. Creates a New Project Directory:
The command creates a new directory for your project with a standard structure recommended by the Angular team. This structure includes folders for components, services, directives, assets, and other essential elements.
2. Generates Initial Project Files:
It generates the essential files like package.json, tsconfig.json, angular.json, and others that define your project configuration, dependencies, and build settings.
3. Installs Dependencies:
The command automatically installs all necessary dependencies for your project, including the Angular framework itself, libraries, and other tools required for development.
4. Sets Up Routing:
It configures basic routing for your application, allowing you to define navigation between different views and components.
when we created our projet with ng new we saw , cli generated the basic folder structure for our project with few files.
1.angular.json : we know angular-cli is used to generate and do other stuff for angular, like creating a new project , creating a local server, build our angular application.
so how does angular knows that on which command , what it has to do, these all configuration related to workspace is maintained in angular.json file.
- It stores information about the project's architecture, dependencies, build and test configurations, and other settings.
- This file allows you to control the build and runtime settings for your Angular application, as well as manage the different environments and configuration profiles for your project.
2.package.json
In an Angular application, the package.json file plays a crucial role in managing the project's dependencies and build configurations. It acts as a central hub for storing information about the application, including:
1. Project metadata: * Name of the project * Version number * Description * Author information * License information
2. Dependencies:
* Lists all the external libraries and modules your application uses
* Specifies their versions and compatibility requirements
* Distinguishes between dependencies needed for development (devDependencies) and those needed for production (dependencies)
3. Scripts: * Defines custom commands for automating tasks like building, testing, serving, and deploying the application
4. Build configurations: * Specifies how the application should be built for different environments (development, production, etc.) * Includes settings for optimization, minification, source maps, and other build options
5. Other configurations: * May contain additional settings specific to your project, such as linting rules, code formatting rules, and environment variables
Importance of package.json:
- Dependency management: Allows easy installation, update, and management of dependencies through tools like
npmandyarn. - Build automation: Enables efficient build processes through defined scripts and configurations.
- Project information: Provides a single location for centralizing project metadata and essential information.
- Collaboration: Facilitates smooth collaboration by ensuring everyone uses the same versions of dependencies and follows consistent build processes.
Overall, the package.json file serves as the backbone of your Angular application's development ecosystem. Understanding its structure and contents is crucial for managing dependencies, automating tasks, and ensuring efficient and consistent builds.
3.Package-lock.json
package-lock.json is a file automatically generated by npm (Node Package Manager) when you install packages in your project. It serves as a lockfile that records the exact versions of all your dependencies and their sub-dependencies, creating a deterministic build environment.
Here's what it does:
Locks package versions:
package-lock.jsonensures that everyone working on the project installs the same versions of dependencies, regardless of their local environment or internet connection. This prevents unexpected behavior and inconsistencies during development and deployment.
Reproducible builds:
- By locking versions,
package-lock.jsonguarantees that your project can be built with the same dependencies every time, regardless of when or by whom it is built. This is crucial for maintaining consistency and reproducibility across different environments.
Reduced network traffic:
- Since the exact versions are recorded, subsequent package installations only need to download new versions if necessary. This can significantly reduce network traffic and save time, especially for projects with large dependencies.
Conflict resolution:
- If conflicting versions of a dependency are found,
package-lock.jsonhelps resolve the conflict by choosing the closest compatible version. This prevents build errors and ensures that your project runs smoothly.
Avoids dependency drift:
package-lock.jsonhelps prevent unintentional changes in dependencies due to minor version bumps or updates in the npm registry. This ensures that your project remains stable and avoids unexpected regressions.
Overall, package-lock.json plays a vital role in maintaining a stable, predictable, and reproducible development environment for your project. It ensures consistent builds, prevents dependency conflicts, and reduces network traffic, making it an essential part of modern JavaScript development.
4.tsConfig.json
In an Angular application, tsconfig.json is a crucial configuration file that defines how the TypeScript compiler should process your code. It plays a vital role in various aspects of the development process, including:
Compilation:
- Specifies the compiler options for your TypeScript code, including the target JavaScript version, module resolution strategy, type checking, and other settings.
- Defines how the compiler generates the JavaScript files that your application runs on.
Building:
- Integrates with the Angular CLI to build your application for different environments like development and production.
- Allows configuration of the build process, including optimizations, minification, and asset handling.
Linting:
- Can be used with tools like TSLint or ESLint to enforce coding style and best practices.
- Helps maintain code quality and consistency throughout your project.
Debugging:
- Enables the generation of source maps, which map the compiled JavaScript code back to your original TypeScript code.
- Facilitates easier debugging by allowing you to inspect the original code when encountering errors.
IDE Support:
- Provides information to IDEs like Visual Studio Code or WebStorm to support features like syntax highlighting, code completion, and navigation.
- Enhances the development experience by making it easier to write and understand your code.
Structure of tsconfig.json:
The tsconfig.json file typically follows a specific structure with different sections:
- compilerOptions: Defines the core compiler settings for your TypeScript code.
- include: Specifies the files that the compiler should include in the build process.
- exclude: Specifies the files that the compiler should exclude from the build process.
- files: explicitly lists the files to be included in the compilation process.
- references: references other tsconfig files for more complex projects.
- extends: allows inheriting configurations from another tsconfig file.
Importance of tsconfig.json:
A well-configured tsconfig.json file is essential for ensuring a smooth and efficient development process. It allows you to control how the compiler processes your code, optimize the build process, and improve the overall quality and maintainability of your project.
General options:
- compileOnSave: Whether to automatically compile TypeScript files on save. Set to
falsefor better performance. - baseUrl: Base directory for resolving non-relative imports.
- outDir: Output directory for compiled JavaScript files.
- forceConsistentCasingInFileNames: Enforces consistent casing in filenames for better IDE support.
- strict: Enables stricter type checking for better accuracy.
- noImplicitOverride: Requires explicit override of inherited members.
- noPropertyAccessFromIndexSignature: Prevents accessing properties directly from index signatures.
- noImplicitReturns: Requires explicit return values for functions.
- noFallthroughCasesInSwitch: Prevents fallthrough behavior in switch statements.
- sourceMap: Generates source maps for easier debugging.
- declaration: Whether to generate type declaration files. Set to
falsefor production builds. - downlevelIteration: Enables compatibility with older browsers.
- experimentalDecorators: Enables support for experimental decorator syntax.
- moduleResolution: Strategy for resolving non-relative imports.
- importHelpers: Enables importing helper functions for better performance.
- target: Target JavaScript version for compilation.
- module: Module format for compiled JavaScript code.
- useDefineForClassFields: Whether to use
definefor class fields. - lib: List of TypeScript standard libraries to include.
Importance of these options:
- These options help ensure code quality, maintainability, and compatibility.
- They allow you to fine-tune the compiler's behavior to suit your project's needs.
- They improve performance and optimize the build process.
Angular-specific options:
- enableI18nLegacyMessageIdFormat: Enables legacy message ID format for internationalization.
- strictInjectionParameters: Enforces stricter type checking for injection parameters.
- strictInputAccessModifiers: Enforces stricter access modifiers for inputs.
- strictTemplates: Enables stricter type checking for templates.
Importance of these options:
- These options ensure proper behavior of Angular features.
- They help catch errors related to internationalization, dependency injection, and templates.
Specific examples:
strict: Helps avoid subtle bugs and type errors.sourceMap: Allows debugging using original TypeScript code.downlevelIteration: Supports older browsers that don't understand modern JavaScript features.importHelpers: Improves performance by avoiding code duplication.lib: Ensures your code has access to necessary standard libraries.experimentalDecorators: Enables using experimental features of Angular.moduleResolution: Allows resolving imports based on your project's structure.target: Ensures compatibility with your target browser or environment.module: Determines how your code is organized and exported.useDefineForClassFields: Improves compatibility with older tools.
Overall, understanding and adjusting these options in tsconfig.json can greatly improve the development experience and ensure the quality and performance of your Angular application.
5.tsconfig-app.json
In an Angular application, tsconfig-app.json is a configuration file that serves as an extension to the main tsconfig.json file. It allows you to define specific TypeScript compiler options for your application code, offering more granular control and flexibility.
Here's a breakdown of its role and benefits:
Purpose:
- Extend and override options: While
tsconfig.jsonsets the general compiler options,tsconfig-app.jsonallows you to further tailor them specifically for the application code. - Modular configuration: This separation keeps the core configuration separate from application-specific settings, improving maintainability and clarity.
- Targeting specific code: You can define compiler options that only apply to the application code, avoiding unnecessary processing for other parts of the project.
Benefits:
- Fine-grained control: Adjust settings like source maps, strictness, and target JavaScript version for your application needs.
- Improved performance: Optimize the build process by targeting specific options for the application code.
- Modular development: Keep configurations organized and focused on specific parts of the project.
- Enhanced developer experience: Tailored configurations cater to specific coding needs and preferences.
Typical configuration:
- extends: Reference to the main
tsconfig.jsonfile to inherit its base settings. - compilerOptions: Specific compiler options for the application code, overriding or extending the base settings.
- include/exclude: Define which files to include or exclude from compilation for the application.
Example:
{
  "extends": "./tsconfig.json",
  "compilerOptions": {
    "sourceMap": true, // Enable source maps for debugging
    "declaration": false, // Don't generate type declaration files for production
    "outDir": "./out-tsc/app" // Set output directory for compiled files
  },
  "include": [
    "src/**/*.ts" // Include all TypeScript files in the src directory
  ]
}
Overall, tsconfig-app.json is a powerful tool for customizing the TypeScript compiler settings for your Angular application. It allows you to achieve finer-grained control over the build process and ensure a tailored development experience.
6.node_modules
In Node.js, node modules are directories containing reusable code packages. They are analogous to libraries or modules in other programming languages and play a crucial role in building and managing dependencies in your application.
Here's a breakdown of what they are and their significance:
What are node modules?
- Each node module is a directory containing various files, including the actual JavaScript code, package metadata (e.g., name, version, dependencies), and other relevant resources.
- They are typically installed using tools like
npmoryarn, which download and manage the packages for your project. - Node modules can be:
- Built-in: Included with Node.js core and accessible without installation (e.g.,
fs,http). - Third-party: Created and published by developers and available through online repositories like npmJS.
- Built-in: Included with Node.js core and accessible without installation (e.g.,
Benefits of using node modules:
- Code reuse: Avoid reinventing the wheel by utilizing existing functionality from established modules.
- Faster development: Focus on your core logic while leveraging readily available functionalities.
- Maintainability: Keep your code organized and modular by separating functionalities into distinct modules.
- Community contributions: Benefit from a vast ecosystem of open-source modules and collaborate with other developers.
- Dependency management: Tools like
npmandyarnsimplify managing dependencies, ensuring compatibility and avoiding conflicts.
Structure of a node module:
package.json: Contains metadata about the module, including name, version, dependencies, scripts, and other configurations.- JavaScript files: The actual code implementing the module's functionalities.
- Other files: May include documentation, tests, assets, or other relevant resources.
Using node modules in your project:
- You can install modules using
npm install <module-name>, which downloads the module and adds it to your project'snode_modulesdirectory. - You can then import the module's functionalities into your code using the
requirefunction.
Overall, node modules are essential building blocks for modern Node.js development. They enable code reuse, promote modularity, and foster a collaborative ecosystem for building robust and maintainable applications.
The terms "build" and "serve" refer to two different stages in the development lifecycle of an application. Here's a breakdown of their differences:
Build:
- Process: Building involves compiling your source code and resources (e.g., images, fonts) into a format that can be executed by the intended platform.
- Output: The build process generates the final, deployable version of your application. This typically includes bundled JavaScript files, optimized images, and other resources needed to run the application.
- Purpose: Building is necessary to prepare your application for deployment to a production environment or for distribution to users.
Serve:
The ng serve command is intentionally for fast, local and iterative developments and also for builds, watches and serves the application from a local CLI development server.
- Process: Serving refers to the act of running your application on a web server and making it accessible to users through a web browser.
- Output: Serving doesn't generate any new files. It simply allows users to access and interact with the already-built application.
- Purpose: Serving is used for testing and development purposes. It allows you to see how your application looks and behaves in a real environment without needing to deploy it.
Here's a table summarizing the key differences:
| Feature | Build | Serve |
|---|---|---|
| Process | Compiles and bundles code | Runs the built application |
| Output | Deployable files | None |
| Purpose | Prepares for deployment | Testing and development |
| Frequency | Less frequent (after code changes) | More frequent (during development) |
In simpler terms, build is like preparing a meal to be stored and transported, while serve is like cooking and serving the meal to be eaten.
In an Angular application's package.json file, the key differences between dependencies and devDependencies lie in their purpose and usage:
Dependencies:
- Purpose: These are libraries and modules essential for the application's runtime functionality. They are necessary for the application to run correctly in both development and production environments.
- Examples: Angular core libraries, UI libraries like Bootstrap or Material Design, utility libraries like core or rxjs, forms, router.
- Bundled: Included in the final production build of the application.
DevDependencies:
- Purpose: These are libraries and modules used only during development. They are helpful for tasks like building, testing, linting, and formatting code, but are not required for the application to run.
- Examples: Webpack, Babel, TypeScript compiler, Karma test runner, Prettier code formatter.
- Installation: Installed using the
npm install -Doryarn add -Dcommand. - Not bundled: Excluded from the final production build of the application.
Key benefits of separating dependencies and dev dependencies:
- Clean production builds: Only the essential libraries required for runtime are included, resulting in a smaller and faster application.
- Improved development workflow: Dev dependencies provide tools and libraries specifically for development tasks, enhancing efficiency and productivity.
- Clear project structure: Separating dependencies makes it easier to understand what your application needs to run versus what is used only during development.
src folder is the main folder which contains code related to angular application. The files package.json, angular.json,tsconfig.json are the the files required for workspace configuration.
src folder contains:
    app |
         app-routing.module.ts
         app.component.css
         app.component.html
         app.component.spec.ts
         app.component.ts
         app.module.ts

    assets
    favicon.icon
    index.html
    main.ts
    styles.css
Note : index.html will load first in the browser. When index.html is loaded, the Angular core libraries, third-party libraries are loaded. Now the Angular will locate the entry point. The entry point of Angular application is main.ts. Which located under "src/main.ts".
index.html
In an Angular application, the index.html file plays a crucial role as the entry point for the application. It acts as the initial HTML document that your web browser loads and serves as a container for your application's content.
main.ts
The main.ts file is a crucial component of any Angular application. It serves as the entry point for your application and plays a key role in bootstrapping the application and initializing its functionalities.
Here’s a breakdown of the main functions and importance of main.ts:
Primary functions:
- Imports essential modules: This includes the Angular core libraries, your application's main module (e.g.,
app.module.ts), and any other necessary libraries or dependencies. - Bootstraps the application: It uses the
platformBrowserDynamic().bootstrapModulefunction to launch the application and initiate its core functionality. - Provides initial configuration: It might contain initial configuration options like platform providers or application settings.
- Application entry point: It acts as the starting point for executing your application code and rendering the user interface.
Importance of main.ts:
- Essential for application startup: Without
main.ts, your Angular application cannot launch and display the user interface. - Bootstrapping process: It orchestrates the initialization of the application, including modules, components, and services.
- Centralized configuration: It provides a single point for configuring the application environment and initial settings.
Typical content of main.ts:
- Imports: You’ll find imports for the Angular libraries, your main application module, and any additional modules or dependencies needed.
- Platform bootstrapping: The code will typically include a call to the
platformBrowserDynamic().bootstrapModulefunction, specifying the main application module as an argument. - Optional configuration: You might find configuration options for the platform providers or application settings.
Here’s a simplified example structure of main.ts:
import { platformBrowserDynamic } from '@angular/platform-browser-dynamic';
import { AppModule } from './app/app.module';

platformBrowserDynamic().bootstrapModule(AppModule)
  .catch(err => console.error(err));
Understanding the role of main.ts is crucial for building successful Angular applications. It acts as the foundation for launching and initializing your application, ensuring its smooth functioning and user interface rendering.
assets
In an Angular application, the assets folder within the src directory serves as the container for all static assets used by your application. These assets include but are not limited to:
- Images: Logos, icons, illustrations, background images, etc.
- Fonts: Custom fonts used in your application.
- Data files: JSON files, CSV files, configuration files, etc.
- Media files: Audio files, video files, etc.
- Other static content: Any other file that doesn't require compilation or processing.
Here's what makes the assets folder crucial:
- Centralized location: Provides a dedicated space for all your static assets, making them easy to manage and access.
- Accessibility: All files within the
assetsfolder are publicly accessible during development and production builds. - Build process integration: Angular's build process automatically copies the contents of the
assetsfolder to the output directory (usuallydist/), ensuring they are included in the final application package. - Separation of concerns: Keeps your code and static assets separate, improving code organization and maintainability.
styles.css
In Angular applications, the main difference between styles.css in the src directory and CSS files associated with individual components lies in their scope and purpose:
1. styles.css in src:
- Global styles: This file typically contains styles applied to the entire application, regardless of the component being rendered.
- Base styles: It often defines basic styles for common elements like fonts, colors, layout, and borders, establishing a consistent visual identity across the application.
- Shared styles: You can also include styles that are shared by multiple components to avoid code duplication and maintain consistency.
2. CSS files with individual components:
- Component-specific styles: These files contain styles tailored to the specific visual appearance and behavior of a single component.
- Encapsulation: Component styles encapsulate the styles within the component's scope, preventing them from affecting other components and ensuring cleaner and more predictable styling.
- Modularization: Having separate CSS files for each component promotes modularity and separation of concerns, making your code easier to maintain and organize.
Here's a table summarizing the key differences:
| Feature | styles.css in src |
Component CSS Files |
|---|---|---|
| Scope | Global | Component-specific |
| Purpose | Define global styles | Define styles for specific components |
| Encapsulation | No | Yes |
| Modularity | Limited | High |
| Code duplication | More likely | Less likely |
| Maintainability | Can be challenging | Easier to maintain |
Choosing the right approach depends on the specific context:
- Use
styles.cssfor global styles and shared styles used across the application. - Use component-specific CSS files for styles that are unique to a single component.
- Utilize a combination of both approaches to achieve the desired balance between global consistency and component-specific customization.
Here are some additional tips for managing CSS in Angular applications:
- Consider using CSS preprocessors like Sass or Less for enhanced features and cleaner syntax.
- Use CSS frameworks like Bootstrap or Tailwind CSS to speed up development and ensure consistent design patterns.
- Implement linting tools to enforce coding standards and maintain code quality.
- Leverage component isolation tools like Shadow DOM to further enhance style encapsulation.
By understanding the differences and best practices for managing CSS files in Angular, you can achieve a clean, maintainable, and visually appealing application.
In Angular applications, platformBrowserDynamic plays a crucial role in bootstrapping the application and launching it in the browser environment. It essentially acts as the bridge between your Angular application code and the browser platform.
Here's a breakdown of its functions and significance:
Functions of platformBrowserDynamic:
- Creates a platform: It creates a platform instance specifically designed for running Angular applications in the browser environment.
- Loads modules: It dynamically loads the necessary Angular modules, including the core libraries and your application's main module.
- Bootstraps the application: It initializes the application by instantiating the root component and rendering it to the DOM (Document Object Model) of the browser.
- Provides services: It provides platform-specific services like zone.js and reflection, which are essential for Angular's functionality.
Significance of platformBrowserDynamic:
- Application startup:
platformBrowserDynamicis the starting point for your Angular application in the browser. - Module loading: It ensures that all necessary modules are loaded before your application starts running.
- Component rendering: It facilitates the rendering of your application's components to the browser window.
- Platform services: It provides essential platform-specific services for smooth application execution.
Typical usage of platformBrowserDynamic:
import { platformBrowserDynamic } from '@angular/platform-browser-dynamic';
import { AppModule } from './app/app.module';

platformBrowserDynamic().bootstrapModule(AppModule)
  .catch(err => console.error(err));
This code snippet imports the platformBrowserDynamic function and your application's main module (AppModule). It then bootstraps the application by calling the bootstrapModule method, specifying the AppModule as an argument.
Additionally, platformBrowserDynamic offers various configuration options:
- Extra providers: You can provide additional providers during bootstrapping for services needed throughout the application.
- Error handling: You can specify a callback function to handle errors that occur during application initialization.
Overall, platformBrowserDynamic is a fundamental component in the Angular framework. It plays a vital role in launching your application and ensuring its smooth operation in the browser environment.
- Angular is modular language which contains components and modules.
Component is basically a class which contains the html file and css file with it .
hey
In Angular, a component is the fundamental building block of the user interface (UI). It represents a specific section of the UI and encapsulates its functionality, behavior, and presentation logic.
Here are some key characteristics of Angular components:
1. Reusable: Components are designed to be reusable. You can use the same component multiple times in different parts of your application, reducing code duplication and improving maintainability.
2. Encapsulation: Components encapsulate their own logic and data. This means that the internal implementation details of a component are hidden from other parts of the application, preventing unexpected interactions and promoting modularity.
3. Composed: Components can be composed together to create complex UIs. You can nest components within other components to build hierarchical structures and modular layouts.
4. Data-driven: Components are data-driven, meaning their behavior and appearance are determined by the data they receive. This allows for dynamic UIs that can react to changes in data.
5. Template-based: Components are defined using a combination of HTML templates and TypeScript code. The HTML template defines the UI structure, while the TypeScript code defines the component's logic and behavior.
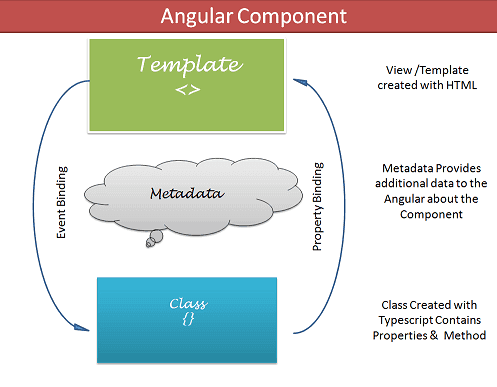
Here's a breakdown of the components' structure:
- Template: HTML code that defines the component's visual structure and includes placeholders for data binding.
- Class: TypeScript code that defines the component's behavior, including its lifecycle hooks, methods, and properties.
- Metadata: Annotations that provide information about the component, such as its selector, inputs, outputs, and providers.
In Angular, a module is a container for organizing and managing related functionalities within your application. It serves as a structural unit that groups components, directives, pipes, services, and other reusable building blocks.
Here are some key characteristics of Angular modules:
1. Grouping related functionalities: Modules allow you to group related functionalities together, such as components related to a specific feature or domain of your application. This promotes modularity and separation of concerns, making your code easier to understand and maintain.
2. Lazy loading: Modules can be lazy-loaded, meaning they are only loaded when needed. This improves initial load times and reduces memory consumption, especially for large applications.
3. Dependency injection: Modules provide a mechanism for injecting dependencies into components, directives, and other modules. This allows you to share services and other resources among different parts of your application without manual instantiation and configuration.
4. Configuration: Modules can be configured with metadata that defines their dependencies, providers, and other aspects. This configuration helps ensure that modules are properly initialized and interact with each other correctly.
5. Hierarchical structure: Modules can be nested within other modules to create a hierarchical structure. This allows you to organize your application into smaller, more manageable units.
Here's a breakdown of the key components of a module:
- Components: Reusable UI building blocks that represent specific sections of the application's interface.
- Directives: Modify the behavior of DOM elements or components.
- Pipes: Transform data for display in the template.
- Services: Provide reusable services and functionalities across the application.
- Providers: Define how dependencies are injected into components, directives, and other modules.
Benefits of using modules in Angular:
- Improved code organization: Modules help organize and group related functionalities, leading to cleaner and more manageable code.
- Modular development: Enables independent development of different parts of your application, reducing dependencies and improving maintainability.
- Lazy loading: Optimizes initial load times and memory consumption by loading modules only when needed.
- Dependency injection: Simplifies the process of sharing resources and services across different parts of your application.
- Cleaner code: Promotes separation of concerns and reduces code duplication.
Overall, modules are fundamental structural units in Angular applications. Understanding their purpose, structure, and benefits is crucial for building organized, modular, and maintainable applications.
A angular component is a typescript class which contans the template or view and associated style for it and the business logic.

in the above picture, if we seprate out the business logic and html for the particular functionality we can get the fundamanetal buidling blocks of a web application.
These fundamental blocks are known as Components.
A component is the fundamental building block of the user interface (UI). It represents a specific section of the UI and encapsulates its functionality, behavior, and presentation logic.

-
When we generate angular application, angular provides us with the basic initial component which is app component or starting point of the application.
We can generate as many components we wishcommand for generating components: ng generate component <component-name> eg : ng generate components heade
When we will hit enter, the command will create a folder with 4 files Header | header.component.html | header.component.ts | header.components.spec.ts | header.component.css
components : fundamental building block, a class where we encapsulate the logic and view together which can be re-used by others.
Module is also a class, but it is different from the component. Component contains the logic for a specific functionality, whereas
module is used for binding
for an example:
consider example of a government
in a government there are members or different post given who work standalone for the beterment to deliver their work.
Railway minister : look after railway
Finance minister : look after finances and creates finance policy

these individual ministers are components single unit which performs the task.

but on wider scale they all are binded to the party or a part of a big group.

like in India the ministers are part of ruling part

where each minister can be regarded as a component
and a party which is a collection of minister, workers and other people can be termed as module.
modules are a fundamental organizational unit that help you structure your application. A module in Angular is a mechanism to group related components, directives, pipes, and services together. It encapsulates the functionality of a specific feature or a set of features within your application.
javascript
in angular module is a class which contains or group the related components , directives, pipes and services.
how does module seprate out things
module creates 3 different buckets
- declarations: all components goes inside declaration bucket
- providers : all services goes inside providers
- imports : all modules goes inside imports
Answer :
In angular components, Modules,directives,pipes are all classes caterong to different needs.
But How does angular knows which class to be treated as component, which to be treated as module.
This is done by decorators. Decorators are part of typescript. They are used to provide metadata to the class, so that how the class is processed and used at runtime.
1. Purpose: Decorators define key aspects of the component, such as its selector, template, and providers. They tell Angular how to compile and render the component in the application.
2. Syntax: Decorators are declared using the @ symbol followed by the decorator function name and parentheses containing configuration options.
Answer : we know angular component is a class which contain view (HTML), CSS and logic related to a particular thing.
- Angular components are re-usable.
So if some component wants that header in that page how that component can get the header code or header ?
lets see the structure of a component class.

@Component({
  selector:'app-header',
  templateUrl:'./header.component.html'
})
class HeaderComponent{

}
- the selector help us to identify and instantiate the component, if some component needs header comonent code, then simply that component can do or call the selector.
<app-header></app-header>
Role of selector :
1. Identifying components: The selector defines a unique identifier for each component. This identifier allows Angular to determine where to insert the corresponding component within the DOM (Document Object Model) based on the matching HTML element.
2. Instantiation and rendering: When Angular encounters an HTML element that matches the component's selector, it instantiates the component and renders its template. This process allows building dynamic and flexible user interfaces.
3. Types of selectors: Angular supports various types of selectors, each offering different levels of specificity and flexibility:
- Element selector: Matches specific HTML elements, like
app-hero-list. - Class selector: Matches HTML elements with a specific class attribute, like
.hero-list. - Attribute selector: Matches HTML elements with a specific attribute and value, like
[app-hero-list]. - CSS selector: Matches any valid CSS selector, offering maximum flexibility.
When we generated our angular project using ng new , angular by default provides us with the default component with the name App component.
- The component contains the data( in the ts file) and the view.
- we need component class so that we can pass data to the view . https://www.tektutorialshub.com/wp-content/uploads/2016/09/Angular-Component.png
- A component is a typescript class.
- A component has a
@componentdecorator. - A decorator is a way to give my class a super power of being a component.
- A deorator contains
selector,templateUrl,stylesUrl.
Building Blocks of Compoonent
-
Template (View) The Template defines the layout and content of the View. Without the template, there is nothing for Angular to render to the DOM.
-
Class
The Class provides the data & logic to the View. It contains the Typescript code associated with Template (View). We use TypeScript to create the class.
*** we can also create our own components *** There are 2 ways to create components
- Using CLI
- Manually creating a component class
Creating components in Angular involves several steps. Here's a basic guide on how to create components in Angular:
Make sure you have the Angular CLI installed globally. If not, you can install it using the following command:
npm install -g @angular/cliCreate a new Angular project using the CLI:
ng new your-project-nameChange to the newly created project directory:
cd your-project-nameUse the Angular CLI to generate a new component:
ng generate component your-component-nameOr, use the shorthand version:
ng g c your-component-nameThe Angular CLI will generate several files for your new component inside the src/app directory. Key files include:
your-component-name.component.ts(Component TypeScript file)your-component-name.component.html(Component HTML template)your-component-name.component.css(Component CSS styles)your-component-name.component.spec.ts(Component unit test)
Edit the generated files to add your component logic, HTML template, and styles. The component class is in the .ts file, the template in the .html file, and the styles in the .css file.
Example of a simple component:
// your-component-name.component.ts

import { Component } from '@angular/core';

@Component({
  selector: 'app-your-component-name',
  templateUrl: './your-component-name.component.html',
  styleUrls: ['./your-component-name.component.css']
})
export class YourComponentNameComponent {
  // Component logic goes here
}
<!-- your-component-name.component.html -->
<p>Hello, this is your component!</p>Use your component in other parts of your application by referencing its selector in other templates or routing configurations.
Run the application using the following command:
ng serveVisit http://localhost:4200/ in your browser to see your Angular app in action. Your new component is likely used in the app.component.html file by default.
That's it! You've successfully created a new Angular component. You can now build upon this foundation to create more complex components and integrate them into your Angular application.
lets say we have created a component using cli or manually.
eg: lets say i have created a login component - which contains code related to login finctionality.
now i want that it should be visible on starting of application, but the component which we have generated, as of now angular does not know about it (if we generate it manually). so make angular aware that we have created a new class we have to provide the component name in declarations array.
Standalone components in Angular are a relatively new feature introduced in Angular 14 (released in June 2023). They offer a different way to build Angular applications by removing the need for NgModule modules to configure and bundle component dependencies. Here's a breakdown of standalone components:
What are they?
Standalone components are self-contained building blocks for your Angular application. They encapsulate logic, data, and UI elements within a single component file, independent of NgModule declarations and imports. This simplifies component creation and reduces boilerplate code related to NgModule configuration.
When to use them?
Standalone components are particularly useful for:
- Micro-frontends: When building independent UI components that can be easily plugged into different applications without requiring complex module configurations.
- Libraries: When developing reusable UI components that can be consumed by other applications directly without the need for custom NgModule setup.
- Simple applications: For small applications with a limited number of components, standalone components can provide a lightweight and efficient alternative to traditional NgModule-based structures.
Benefits:
- Improved developer experience: Standalone components simplify component creation and maintenance by eliminating the need for NgModule configurations.
- Reduced code complexity: The codebase becomes cleaner and easier to understand as component dependencies and relationships are more explicit.
- Increased modularity: Standalone components promote better isolation and reusability, making them ideal for microservices and library development.
- Smaller bundle size: By removing the overhead of NgModule compilation, standalone components can potentially lead to smaller application bundles.
Things to keep in mind:
- Limited tooling support: As a new feature, tooling support for standalone components is still evolving. Some IDEs and code editors might not yet have proper syntax highlighting or autocompletion for standalone component syntax.
- Backward compatibility: Standalone components are not directly compatible with older versions of Angular (prior to v14). You might need to adjust your development workflow and tooling if you want to utilize them in existing projects.
Overall, standalone components offer a promising approach for building and structuring Angular applications. Their simplicity, modularity, and improved developer experience make them a valuable addition to the Angular ecosystem. However, they are still under development, and it's important to consider the limitations and ensure compatibility with your existing tools and projects.
lets understand data binding powerful feature in angular by comparing it with native js.
case :
  lets say we have
     <h1 id="heading1"></h1>

     if i want to add the text between h1 element dynamic or using js then the code will be look like.

     <script>
           const name = "Hello Javascript"
           let ele = document.getElementById("heading1");
           ele.innerHTML = name;
     </script>
- The above code can be minimized in angular by the use of data binding feature.
Angular provides a way by which we can bind the data in the component class with the view, and angular automatically updates the view
TYPES OF DATA BINDING
- ONE WAY DATA BINDING
- TWO WAY DATA BINDING
it is a way of data binding when data flows in one direction only.
- either view to the component
- or from component to the view
But How data can flow ??
- Interpolation :
Interpolation allows us to include expressions as part of any string literal, which we use in our HTML. The angular evaluates the expressions into a string and replaces it in the original string and updates the view.
  The Angular uses the {{ }} (double curly braces) in the template to denote the interpolation. The syntax is as shown below

  {{ templateExpression }}
Interpolation in Angular refers to the process of embedding expressions or variables within double curly braces ({{ }}) in the template. It allows you to dynamically bind values from your component's class to your HTML templates.
Here's a simple example to illustrate interpolation:
// app.component.ts

import { Component } from '@angular/core';

@Component({
  selector: 'app-root',
  template: `
    <h1>{{ pageTitle }}</h1>
    <p>{{ 'Welcome, ' + userName }}</p>
    <p>The sum of 2 + 3 is {{ 2 + 3 }}</p>
  `
})
export class AppComponent {
  pageTitle = 'Angular Interpolation Example';
  userName = 'John';
}
In this example:
{{ pageTitle }}: Interpolates the value of thepageTitleproperty from the component class and displays it in the<h1>element.{{ 'Welcome, ' + userName }}: Concatenates the string 'Welcome, ' with the value of theuserNameproperty and displays it in the<p>element.{{ 2 + 3 }}: Evaluates the expression2 + 3and displays the result in the<p>element.
Angular automatically updates the DOM when the values of these properties change in the component class. Interpolation is a powerful feature that makes it easy to bind dynamic data to your templates.
Property Binding (Component to View):
In this example, we'll bind a property from the component to an HTML element attribute.
The Property binding allows us to bind HTML element property to a property in the component. Whenever the value of the component changes, the Angular updates the element property in the View. You can set the properties such as class, href, src, textContent, etc using property binding.
- Create a simple component:
// app.component.ts

import { Component } from '@angular/core';

@Component({
  selector: 'app-root',
  template: `
    <h1>{{ pageTitle }}</h1>
    <img [src]="imageUrl" alt="Angular Logo">
  `
})
export class AppComponent {
  pageTitle = 'Angular One-Way Binding Example';
  imageUrl = 'https://angular.io/assets/images/logos/angular/angular.png';
}
In this example, we use property binding with [src] to bind the imageUrl property from the component to the src attribute of the img element.
In this example, we'll bind an event from the view to a method in the component.
- Modify the component to include event binding:
// app.component.ts

import { Component } from '@angular/core';

@Component({
  selector: 'app-root',
  template: `
    <button (click)="showMessage()">Click me</button>
    <p>{{ message }}</p>
  `
})
export class AppComponent {
  message: string = '';

  showMessage(): void {
    this.message = 'Button clicked!';
  }
}
In this example, we use event binding with (click) to bind the showMessage() method from the component to the click event of the button element.
These examples illustrate the basic concepts of one-way data binding in Angular. Property binding allows you to set properties of HTML elements based on data in your component, while event binding allows you to respond to user actions and update data in your component.
In one way data binding , we have seen data flows from either component to the view using interpolation and property binding.
and data flows from the view to the component using event binding.
lets take example of a input box of type text, and inside which we have a value property. lets say i bind the value property with the name variable in my ts file.
  // app.component.ts
     name = "John"

  // app.component.html

  <input type="text" [value]="name">
  {{name}}
- let say if some user changes the name inside the input box, which is binded with name inside the ts file, will the name value also changes ????
in this way i have to do things one is one way binding and second event binding .
-
there is a better way which is provided by angular, which is ngModel for 2 way binding.
-
ngModel is a part of FormsModule so we cannot durectly use it we have to import FormsModule in our app.module then we can use.
syntax:
[(ngModel)] = "variable"
When we generated our angular application , angular default provided us with app.component. App component is the root component or host component.
- Components are the re-usable individual unit.
lets understand how the folder structure of the e commerce website will look like in the form of components and modules way .
Flipkart
        | Common module
                      | header Component
                      | Footer Component
                      | Navbar Component

        | Mens Module
                     | Mens.component

        | Womens Module
                    | Women Component
Here Module refers to the collection of related code
-
Mens Module will have everytthing related to mens like all the components and services created for the mens module.
-
in this way it will help us to keep our code modular, and seprate.
lets say we have 3 components
- App , Customers-Listing and Customer_Signup .
i want to show customer listing on my app or when page loads (idealy when angular application loads it will automatically load the app component via index.html and main.ts file).
if i want to show customer listing or lists of customer then there are 2 ways:
- Routing (To be Discussed)
- using selector in app component
when we will add the selector of customer-list component in the ap component, the app component being the host or parent component others components will be treated as a child component.
The Angular directive helps us to manipulate the DOM. You can change the appearance, behavior, or layout of a DOM element using the Directives.
There are 3 Types of Directives :
-
Structural Directives : Structural directives can change the DOM layout by adding and removing DOM elements. All structural Directives are preceded by Asterix symbol.
-
Attribute Directives : An Attribute or style directive can change the appearance or behavior of an element.
In Angular, there are three main structural directives:
-
NgIf:
*ngIfis used for conditional rendering. It adds or removes elements from the DOM based on the truthiness of an expression.- Example:
<div *ngIf="isVisible">This is visible</div>
-
NgFor:
*ngForis used for iteration. It repeats a set of elements for each item in an iterable such as an array.- Example:
<ul>
  <li *ngFor="let item of items">{{ item }}</li>
</ul>
-
NgSwitch:
*ngSwitchis used for conditional rendering based on a switch expression. It's often combined with*ngSwitchCaseand*ngSwitchDefault.- Example:
<div [ngSwitch]="color">
  <div *ngSwitchCase="'red'">Red color</div>
  <div *ngSwitchCase="'blue'">Blue color</div>
  <div *ngSwitchDefault>Default color</div>
</div>
These structural directives provide powerful tools for manipulating the structure of the DOM based on dynamic conditions or iterating over collections. They are prefixed with an asterisk * in the template syntax.
Attribute directives in Angular are a type of directive that allow you to change the appearance or behavior of an element, component, or another directive by applying them as attributes in the HTML markup. Attribute directives are prefixed with ng- in many cases, but you can also create your own custom attribute directives.
Here are some examples of built-in attribute directives in Angular:
-
NgClass:
[ngClass]allows you to conditionally apply CSS classes to an element based on the evaluation of an expression.- Example:
<div [ngClass]="{'active': isActive, 'inactive': !isActive}">Toggle Class</div>
-
NgStyle:
[ngStyle]allows you to conditionally apply inline styles to an element based on the evaluation of an expression.- Example:
<div [ngStyle]="{'color': isRed ? 'red' : 'blue', 'font-size': isBig ? '20px' : '14px'}">Styled Text</div>
-
NgModel:
[(ngModel)]is used for two-way data binding. It binds a model property to an input element, allowing changes in the input to reflect in the model and vice versa.- Example:
<input [(ngModel)]="username" />
You can also create your own custom attribute directives to encapsulate and reuse specific behaviors in your Angular applications. Custom attribute directives are created using the @Directive decorator in Angular.
While you can use class property binding to conditionally apply classes to elements, the ngClass directive in Angular provides a more concise and expressive way to manage complex or dynamic class conditions. Here are some reasons why you might choose ngClass over direct class property binding:
-
Simplifies Code:
-
ngClassallows you to define multiple class conditions in a cleaner and more readable way. It's especially beneficial when dealing with multiple classes and complex conditions.<!-- Using ngClass --> <div [ngClass]="{'active': isActive, 'highlight': isHighlighted, 'error': hasError}">Content</div> <!-- Using direct class property binding --> <div [class.active]="isActive" [class.highlight]="isHighlighted" [class.error]="hasError">Content</div>
-
-
Dynamic Classes:
-
ngClassis particularly useful for scenarios where the classes need to be determined dynamically based on component properties or expressions.<div [ngClass]="{'active': isActive, 'disabled': isDisabled, 'custom-class': customCondition}">Content</div>
-
-
Object or Array Syntax:
-
ngClassallows you to pass an object or an array to conditionally apply classes, providing flexibility in defining class conditions.<!-- Object syntax --> <div [ngClass]="{'active': isActive, 'highlight': isHighlighted, 'error': hasError}">Content</div> <!-- Array syntax --> <div [ngClass]="['class1', 'class2', condition ? 'class3' : 'class4']">Content</div>
-
-
Expression Evaluation:
-
ngClasscan evaluate expressions and functions to determine whether to apply a class.<div [ngClass]="getClassObject()">Content</div>
-
-
Default Classes:
-
ngClassallows you to specify default classes that are always applied, making it convenient for styling purposes.<div [ngClass]="{'default-class': true, 'additional-class': condition}">Content</div>
-
In summary, while both approaches can be used for class binding, ngClass is a powerful and concise directive that offers additional features and syntax for managing dynamic and complex class conditions in your Angular templates. It provides a more declarative and readable way to express the logic for applying classes based on various conditions.
Angular Pipes takes data as input and formats or transform the data to display in the template.
like :
- Directices : they add behavior like add/remove/styling elements
- pipes : transforming the data
syntax :
Expression | pipeOperator[:pipeArguments]
lets say we have a name property in our ts file and we want to bind in the html or show it to the user, but name should be uppercase.
There are 3 ways we can avhieve this
-
Using a class
-
using or storing the name default in uppercase as "JOHN"
-
using pipes.
// app.components.ts
name = "john"// app.component.html
{{name | uppercase}}
Angular Built in pipes
- date pipe
- uppercase pipe
- lowercase pipe
- titlecase pipe
- slice pipe
- currency pipe
In Angular, services are a way to share data and functionality across different parts of an application. They are classes that can be injected into components and other services, and they are used to encapsulate logic that is not specific to a particular component.
Services are a good way to organize and share code that is not directly related to the UI of your application. They can be used to abstract away complex logic, such as calling a REST API or performing calculations, and make it available to multiple components.
-
component's job is to enable only the user experience. A component should present properties and methods for data binding to mediate between the view and the application logic. The view is what the template renders and the application logic is what includes the notion of a model.
-
lets take example of Mobile moudle and a component mobile-list which requires the list of mobiles avaialable in the inventory and for sale.
- so mobile -list component will make an api call to fetch the mobiles list, so ideally we will be placing the function to fetch the details inside the mobile -list only. this way our component keeps the data and functions which it does not directly needs.
if some other compoennr lets say accessories component also want to use the same fuinction which is defined inside the mobile-list component then it has to define the same in accessories component as well which will lead to code redundancy.
by combining each and every thing inside a component, the modularity of the component decreases and there is no abstraction of data.
so there comes services.
Services in angular are the classes which are used specific for the abstraction of logic
A component should use services for tasks that don't involve the view or application logic. Services are good for tasks such as fetching data from the server, validating user input, or logging directly to the console. By defining such processing tasks in an injectable service class, you make those tasks available to any component.
- this is not a much do thing, its a principle with hekp of which we can seprate out our code and compoennt.
component should only contain code related to the view and data, services should contain the data .
- Features that are independent of components such a logging services
- Share logic or data across components
- Encapsulate external interactions like data access
https://angular.io/guide/dependency-injection
like Humans also have a lifecycle
birth -> baby/Infant -> adolscent -> adult -> death
same is with the components.
- components are classes, and we know if we want to use the methods or fields of classes we need to instantiate the class first or create the object of the class and call its method.
- but when using angular, to use the component we just use its selector , and angular renders the view associated with the component.
We didnt instantiate or created the object of the class so who does it
Answer --> Angular does it by itself, when we use selector of a component
`<header></header>`
angular creates the object of the class and loads its properties and view.
but there is also a lifecyle of a component class , which is known as life cycle hooks -
- component also goes with the life cyle of birth till death, in case of component classes those life cyle hooks are functions which are called when that event is occured. (eg: when component class is born or instantiates a function will be called).
As we know life cyle hooks are nothing just a callback function which angular invokes during the component life cycle.
the various life cycle hooks are -
- ngOnChanges()
- ngOnInit()
- ngDoCheck()
- ngAfterContentInit()
- ngAfterContentChecked()
- ngAfterViewInit()
- ngAfterContentChecked()
- ngOnDestory()
Angular first created or loads the component class then it renders the template or the view
Change detection is a mechanism by which angular detect the changes in the views.
lets say we have a variable in the component class and we bind it in the view using interpolation.
- when the data in the component class is changed it automatically gets updated in the view, this is known as change detection.
first life cyle hook which angular invoke is ngOnChanges()
when ?
- The Angular invokes the ngOnChanges life cycle hook whenever any data-bound input property of the component or directive changes. Initializing the Input properties is the first task angular carries during the change detection cycle. And if it detects any change in property, then it raises the ngOnChanges hook.
- Input properties are those properties which we define using the @Input decorator. It is one of the ways by which a parent communicates with the child component.
The Angular raises the ngOnInit hook after it creates the component and updates its input properties. It raises it after the ngOnChanges hook.
This hook is fired only once and immediately after its creation (during the first change detection).
The Angular invokes the ngDoCheck hook event during every change detection cycle. This hook is invoked even if there is no change in any of the properties.
Angular invoke it after the ngOnChanges & ngOnInit hooks.
Use this hook to Implement a custom change detection whenever Angular fails to detect the changes made to Input properties. This hook is convenient when you opt for the Onpush change detection strategy.
ngAfterContentInit Life cycle hook is called after the Component’s projected content has been fully initialized. Angular also updates the properties decorated with the ContentChild and ContentChildren before raising this hook. This hook is also raised, even if there is no content to project.
The content here refers to the external content injected from the parent component via Content Projection.
ngAfterContentChecked Life cycle hook is called during every change detection cycle after Angular finishes checking of component’s projected content. Angular also updates the properties decorated with the ContentChild and ContentChildren before raising this hook. Angular calls this hook even if there is no projected content in the component.
ngAfterViewInit hook is called after the Component’s View & all its child views are fully initialized. Angular also updates the properties decorated with the ViewChild & ViewChildren properties before raising this hook.
The View here refers to the template of the current component and all its child components & directives.
This hook is called during the first change detection cycle, where angular initializes the view for the first time.
At this point, all the lifecycle hook methods & change detection of all child components & directives are processed & Component is entirely ready.
The Angular fires this hook after it checks & updates the component’s views and child views. This event is fired after the ngAfterViewInit and after that, during every change detection cycle.
This hook is very similar to the ngAfterViewInit hook. Both are called after all the child components & directives are initialized and updated. The only difference is that ngAfterViewChecked is raised during every change detection cycle. While ngAfterViewInit during the first change detection cycle.
This hook is called just before the Component/Directive instance is destroyed by Angular
You can Perform any cleanup logic for the Component here. This is where you would like to Unsubscribe Observables and detach event handlers to avoid memory leaks.
Angular components go through a lifecycle during their creation, rendering, and destruction. Angular provides a set of lifecycle hooks that allow you to tap into different moments of the component's lifecycle. Here are the main lifecycle hooks in Angular:
-
ngOnChanges:
- When Called: Called after the component's input properties change.
- Purpose: Allows you to respond to changes in input properties.
-
ngOnInit:
- When Called: Called once, after the component is initialized.
- Purpose: Used for initialization logic. It's a good place to fetch data from a server.
-
ngDoCheck:
- When Called: Called during every change detection run.
- Purpose: Allows you to implement your own change detection logic.
-
ngAfterContentInit:
- When Called: Called once after the first
ngDoCheck. - Purpose: Respond to changes after the component's content (ng-content) has been initialized.
- When Called: Called once after the first
-
ngAfterContentChecked:
- When Called: Called after every check of the component's content.
- Purpose: Respond to changes after the content has been checked.
-
ngAfterViewInit:
- When Called: Called once after the first
ngAfterContentChecked. - Purpose: Respond to changes after the component's view (and child views) has been initialized.
- When Called: Called once after the first
-
ngAfterViewChecked:
- When Called: Called after every check of the component's view (and child views).
- Purpose: Respond to changes after the view has been checked.
-
ngOnDestroy:
- When Called: Called just before the component is destroyed.
- Purpose: Cleanup logic (unsubscribe from observables, clear intervals, etc.).
Here's a brief overview of each hook:
-
Initialization:
ngOnInitis commonly used for initialization logic.ngAfterContentInitandngAfterViewInitare used when dealing with content projection and view initialization.
-
Change Detection:
ngOnChangesis used to respond to changes in input properties.ngDoCheckallows you to implement custom change detection logic.ngAfterContentCheckedandngAfterViewCheckedare used after content and view checks, respectively.
-
Destruction:
ngOnDestroyis used for cleanup operations before the component is destroyed.
Content projection in Angular is a mechanism that allows a component to accept and render content provided by its parent component. It provides a way to compose components and create more flexible and reusable component structures. Content projection is achieved using the <ng-content> element in the child component's template.
Here's why content projection is needed and how it works:
-
Dynamic Component Composition:
- Content projection enables dynamic composition of components by allowing a parent component to inject content into specific slots defined by the child component. This makes components more versatile and reusable.
-
Flexibility in Template Structure:
- Content projection gives the child component control over its template structure, allowing it to determine where the content provided by the parent should be placed. This flexibility is especially useful when creating generic or container components.
-
Passing Arbitrary Content:
- With content projection, the parent component can pass arbitrary content (HTML, other components, etc.) to the child component. This is beneficial when the child component needs to work with different types of content provided by different parent components.
-
Creating Container Components:
- Content projection is often used to create container components that define a specific layout or structure and allow the parent component to inject content into that layout. This promotes the separation of concerns and modular design.
-
Encapsulation and Reusability:
- Content projection enhances component encapsulation by allowing the child component to encapsulate its own template structure while still accepting external content. This promotes reusability as components can be composed in various ways.
Example:
Consider a simple example where a modal dialog component allows the parent component to provide custom content for the dialog body:
<!-- Modal Component Template -->
<div class="modal">
  <div class="modal-header">
    <h2>{{ title }}</h2>
  </div>
  <div class="modal-body">
    <ng-content></ng-content>
  </div>
  <div class="modal-footer">
    <button (click)="close()">Close</button>
  </div>
</div>
<!-- Parent Component Template -->
<app-modal title="Custom Modal Title">
<p>This is the custom content for the modal body.</p>
<button (click)="handleButtonClick()">Click me</button>
</app-modal>In this example, the parent component uses the <app-modal> component and provides custom content for the modal body. The child component (<app-modal>) uses <ng-content> to project and render the content provided by the parent.
In summary, content projection is a powerful feature in Angular that promotes component composition, flexibility, and reusability by allowing components to accept and work with dynamic content provided by their parent components.
In Angular, passing data between components can be done through both input properties and content projection. Here's a brief overview of the differences between these two approaches:
-
Input Properties:
-
Definition: In Angular, a child component can accept data from its parent component by using input properties. Input properties are defined in the child component with the
@Inputdecorator. -
Flow of Data: Data flows from the parent component to the child component. The parent component sets the values for the input properties in the template where the child component is used.
-
Example:
// Child Component
@Input() dataFromParent: any;
<!-- Parent Component Template -->
<app-child [dataFromParent]="parentData"></app-child>
-
-
Content Projection:
-
Definition: Content projection allows a parent component to project content (HTML, other components, etc.) into a designated area in the child component's template using the
<ng-content>element. -
Flow of Data: The child component has control over its template structure and where the projected content is placed. The parent component provides the content, and the child component decides how to use it.
-
Example:
<!-- Child Component Template -->
<div>
  <h2>Child Component Content</h2>
  <ng-content></ng-content>
</div>
<!-- Parent Component Template -->
<app-child>
  <p>Content projected from parent</p>
</app-child>
-
Key Differences:
-
Direction of Data Flow:
- Input Properties: Data flows from parent to child.
- Content Projection: Parent provides content, and the child decides how to use it.
-
Control over Template Structure:
- Input Properties: Child components have less control over the structure of their templates.
- Content Projection: Child components have more control over the structure of their templates, including where content is placed.
-
Use Cases:
- Input Properties: Suitable for passing specific data or configuration options from parent to child.
- Content Projection: Suitable when the child component needs to incorporate dynamic or arbitrary content provided by the parent.
-
Flexibility:
- Input Properties: More rigid in terms of data passing and template structure.
- Content Projection: More flexible as it allows the parent to provide arbitrary content.
Both input properties and content projection are powerful techniques, and the choice between them depends on the specific requirements of your application and the desired level of flexibility in component composition.
ng-container> is a non-rendered container element that allows us to apply structural directives without introducing additional DOM elements. It acts as a wrapper for multiple elements and provides a clean and concise way to group and manipulate them.
Understanding is a non-rendered container element that allows us to apply structural directives without introducing additional DOM elements. It acts as a wrapper for multiple elements and provides a clean and concise way to group and manipulate them.
When and Where to Use Structural Directives: is particularly useful when working with structural directives such as *ngIf, *ngFor, or *ngSwitchCase. It allows us to apply these directives to a group of elements without affecting the DOM structure. Template Organization: helps in organizing and grouping elements within your templates. It allows you to apply logic or conditions to a set of elements while keeping the markup clean and uncluttered. Coding Example Let’s consider a scenario where we want to conditionally display a list of items. We can use along with *ngIf to achieve this:
<ng-container *ngIf="showList">
  <h2>List of Items</h2>
  <ul>
    <li *ngFor="let item of items">{{ item }}</li>
  </ul>
</ng-container>
<button (click)="toggleList()">Toggle List</button>
In this example, when the “showList” flag is true, the and its contents will be rendered, displaying the list of items. When the flag is false, the entire and its contents will be omitted from the DOM. This allows for conditional rendering without introducing an extra HTML element.
Consider there is a wedding function In a indian family.
The function involves numerous guest coming and arranging food and other amenities for them.
But just think if the family members are the one or they take the responsibilty to do each and every thing like A) Preparing food B) Arranging Hotels
In this case the family members wont be able to enjoy the function which is integral part.
So Ideally What they do , they hire the agency or Professionals so that theirs work can be delegated and they can cfocus on what is important.
==> same way is our component,
==> same thing is with components, components needs data, but the thing is data can come from any of ways a) can come from another component b) can come from server
If data is coming from other place like other comppnent or server, we have to write a code to fetch the data.
==> "component here is a family , who has some important event , family takes care about event but cant look over all the things."
But is my component concerned about how data is fetched or from where it is coming ?
NO. A big No.
it is only concerned about data.
so lets compare this with categres and house analogy.
Is it necessary to keep the code which does not belongs to the component in the same component ?
No .
==> same is with component, we don’t want to put the code for fetching the data in the component class itself, because component is concerned only about data not about the way we fetch it.
once the data is fetched we prvide the data to the component class.
so where and who does this work for us ?
A service .
A service is a class which can be injected or is used for providing assitance to the component classes.
A Service is a class decorated with @Injectable decorator.
now consider there are 2 components A and B. Both components neeed the list of customers enrolled data from the server. If the concept of services is not there then this thing we would have done in :
In A component
code to fetch the customers enrolled.
In B Component code to fetch the customers enrolled.
This has below drawbacks :
1. Code is not centralized , and code redundancy
2. Tight Coupling between the code and no sepration of concern (means component classes has the code which they are not dependend or concerned).
Service can help us to mitigate the drawbacks here by 1. Reducing Coupling 2. Reducing Code redundancy
Now What Are classes and how they do look ?
Services are classes, which contains the code for providing services to other components.
Or we can say services act as a mediator
Component request to ----> Service -----> Server
Whats Different ?
They are annotated with @injectable()
@Injectable() Class DataService{
}
Question : How does component interacts with services ?
Components ask for dependency in their constructor. What actually happens when we use the selectfor for the component, angular instantiates that class.
The concept here applicable is DEPENDENCY INJECTION.
Our component depends upon DataService to get the data from the server, so DataService is Dependency for the component and Component is a consumer of the dependency.
So now we know that DataService or any Service is a dependency for the component.
==> So now how does componet uses the class to get the work done ?
Now as we seprated out the logic from the component and placed in the seprate class, but now how the component will communicate with the service class to fetch the data or get information.
As service is nothing just a class with methods so if component wants to use the methods of a service then it has to create the object of the class and can continue using its methods.
But Work of angular is to eases the task of a developer, angular give the new way of creating objects which is dependency injection.
What actually is dependency injection is ?
Our component A and B depends upon the DataService class to get the data.
means A and B component Depends upon the DataService or DataService is a dependency for A and B Component.
now What is injection ?
Injection is a way to insert the dependency into the component.
==>
"Dependency Injection (DI) is a technique in which a class receives its dependencies from external sources rather than creating them itself."
<==
Here our component is Consumer that needs the dependency.
and DataService is the dependency that we need in our componeny class.
How we can inject the dependency in pur component ?
First we have to let the module that we will be needing the these dependencies in our components by providing the services in providers array
providers:[ServiceName]
now what does providers do different ? Why we need to provide the service name here.
==>Module is a group of related components and services and directives and modules.
lets say a module contains 10 components ,
2 components out of them depend on A service
5 components dpend upon the B service
3 Components depend upon the C service
We need to tell the module that these services are which all components will need in their life stime
providers : [Aservice,Bservice,Cservice]
now it will be responsibility of module to manage the dependency. "Manage" means when module will be loaded module will create the object of all the services .
If any component needs they will see object created in the module so they will get it from the module.
But providing in providers array is dependency injection
injecting dependency is done in component class in constructor
now lets inject the dependency in the A component
export class Acomponent{
// to inject the dependency we have to follow the below format. Constructor(accessModifer instancevariable: ServiceName) { } }
Private/public/Protected dataService:DataService
When we provide the service in the @ngModule of the root module or any eagerly loaded module, the will be available everywhere in the application.
If we provide the services in the @Component, @pipe or @Directive then they are available only in that component and all of its child components
The Services provided in the @ngModule of the lazy loaded module are available in that module only.
==>
Each Injector creates a singleton object of the dependency registered by the provider. For Example, consider a service configured in @ngModule. Component A asks for the service it will get a new instance of the service. Now if Component B Asks for the same service, the injector does not create a new instance of the service, but it will reuse the already created service.
What are singleton services ?
Consider you want to get something from the market. you ordered your brther to get this You ordered your siblings to get this You ordered your friends to get this
All of them visited the market and got the thing
But what actually happened we wasted the 3 resources , where we could get that done by one .
In Classes terminology we create a object , objects are the storage. What if we create multiple objects , they will eat up the space.
So what are singleton services ?
Services who instance is created only once and shared by all are services known as singleton services.
How can I make my services singleton?
By providing
provideIn:'root'
Or adding services in
Providers of root module
When we created our project in angular using ng new
We came across a option in angular which asks do you need routing y/n ?
We have done y as of now.
But what is the use of that
If we say "Y" the angular adds app.routing.module.ts file in our src->app folder.

And if reply it with "N"
Angular does not add app.routing.module.ts file.
the routing.ts file contains the information about the routes of application.
- when we say routes we mean what should when user clicks on this link or button.
When we created our project in angular using ng new
We came across a option in angular which asks do you need routing y/n ?
Initially we submitted -> y
But what is the use of that response y
If we say "Y" the angular adds app-routing.module.ts file in our src->app folder.
And if reply it with "N"
Angular does not add app-routing.module.ts file.
Angular Handles Route in a different way like in normal html.
In simple html say if we have 3 pages 1. First.html 2. Second.html 3. Main.html
Say If I want to navigate to first.html page frpm main.html I have to give href like
This way of navigation is one page to anopther page.
But in Angular there is just a single page.
So how does Angular handles that routing
What is Routing
Routing allows you to move from one part of the application to another part or one View to another View.
In Angular Routing is handled by Routing Module.
Router is a seprate module in angular inside @angular/router folder which handles the Routing related things.
How does Angular handles the Routing in the application
Angular being the SPA, means there are not multiple pages. Just single page under which all other pages are shown. We can say in a parent and child behavior.
Angular uses the routing module file to resolve the routes.
In Angular we don’t use href attribute because it leads to the re loading of page.
Instead we use routerLink and navigate method.
How do we define routes in Angular
We have a angular application there can be multiple components , to naviate to fromone component to another we have to define routes in app-routing module.ts file.
Lets consider in our angular application we have login and signup components
2 links in app.component
Login. Signup
When user clicks on Login -> login component should appear When user clicks on Signup-> Signup component should appear
Step 1: Define route in routing.module.ts {path:'login',component:LoginComponent} Step Define link on page Login Page
step 3 Add router outlet where to show the content.
How does route looks like ???
Whenever we serve our application we see the url as
Localhost:4200 -> if we have not modified the port
Lets consider a website such as flipkart or book my show.
In that website there are varius categories like movies,plays.
When we click on movies url becomes Bookmyshow/movies
--> when user clicks on play url looks like Bookmyshow/play
--> when user clicks on offer url looks like Bookmyshow/offers
Here url refers to what page to be shown.
here /offers means inside the folder bookmyshow -> show the contents inside the folder offers.
--> bookmyshow/movies -> inside the bookmyshow folder show content inside the folder movies.
Child Routes
Consider a nested folder structure like
D: Movies Action old new
		Comedy
			   old
			    new
If I want to go inside old action movies I would have to go like
D://movies/action/old
In url terms it would be
Movies/action/old
Where action is a folder in itself and old is a child or sub folder.
In same way there can be child components of child components.
How do we give route for the child components.
{ Path:'path-name', Component: Component-to-load, Children:[ //children routes here. ] }
Route Params
Consider there are 2 components 1. Products -> Listing of all Products 2. Products Details -> it needs the id of the product to be shown it shows the details of the product selected.
So route for products page will look like
{ Path:'products', Component:ProductComponent }
// inside product component we will show list of products.
When user clicks on products I want to show the details of product and details page should be child route of products.
Note : --> in this case we need the id of the product to be selected to pass to the component to show the detail.
There are 2 ways we can do this: 1. Using services 2. Using route params
Then route would look like:
/details/2 -> to define a route like this we can do
{ Path:'details/:id', Component:DetailsCOmponent }
But how component willl get this data of id ????
USING THE ACTIVATED ROUTE SERVICE.
How to use activated route to get the route params
Activated Route is a service, so first we have to inject the service.
Then activatedRoute Service provudes us with the snapshot of the url.
From that snapshot object we can get the params object.
QueryParams
Just like params which are in the form of route params like route/:id pr something ,
Query parameters are parameters attached to the end of a URL and separated from the URL by a question mark (?).
For example, in https://www.google.com/search?q=abstract%20api,
Query parameters are additonal way to pass information to component or url.
Params are mandatory Query params are optional