I initially created this GitHub repository to document how I set up my environment my Mac. But my daughter has a PC and wanted to play with TensorFlow as well. This is how I set up my daughter's PC to do ML object detection.
I am following Nicholas Renotte's Tensorflow Object Detection YouTube tutorial for much of these instructions.
- My daughter has a 64-bit Windows 10 machine.
- I will be using Python Virtual Environments.
- I am using Git version controller
- I am using two package managers for this: PIP and Homebrew.
- I am not using Conda.
- You are familiar with shell applications such as Command Prompt or Git CMD (what I'm using). (NOTE: If using Git Bash some of the commands will differ and line up more with Mac/Linux commands)
- You are familiar with the Jupyter Notebook IDE
- You have the latest versions of PIP and Homebrew
Follow Nicholas Renotte's Tensorflow Object Detection YouTube tutorial for a step-by-step to install these dependencies.
Source: CUDA Installation Guide for Microsoft Windows
If you have an NVIDIA GPU, then you might be able to use CUDA and CUDNN to leverage your GPU when training. This will speed up your training immensely.
- First check your Windows Device Manager against the CUDA list of CUDA-capable GPUs. (Open your device manager via command line with
devmgmt.msc.) - Choose the right CUDA and CUDNN to use based on TensorFlow version at https://www.tensorflow.org/install/source_windows#gpu.
For example, if you are using TensorFlow 2.3.0 you would use:
Google's protocol buffers are a language- and platform-neutral method for serializing structured data. Tensorflow uses this format. Protoc is the tool to be used with protocol buffers. Learn more on Google's protocol buffers page
Remember to follow Nicholas Renotte's Tensorflow Object Detection YouTube tutorial for step-by-step instructions of these dependencies since there are a lot of intricacies in these installations.
TensorFlow doesn't yet work with Python 3.9. And it's best practice anyway to have different versions of Python on your machine and then pick one to build a virtual environment from.
Python programmer has an excellent instruction video on installing multiple python versions using virtual environments.
- In a shell, create a directory for various python versions.
mkdir python_versions
- Within
python_versionscreate a folder to hold the particular python release you will be installing. She currently has Python 3.9.5 installed in a folder called3.9.5. I will be creating a folder for Python 3.8.10 for use with TensorFlow.
cd python_versions
mkdir 3.8.10
- Download the correct Windows Installer file (I'm using the 64-bit installer). Then launch the installer.
- Do NOT check the "Add Python 3.8 to PATH" option. We will not need it when running virtual environments.
- Choose the Customize Installation option rather than "Install Now".
- Use the default Optional Features.
- Add the "Precompile standard library" option to the selected Advanced Options.
- Customize your install location by selecting your version directory to install your Python version into. For example:
C:\Users\sally_sue\python_versions\3.8.10
These instructions assume you now have Python 3.8 installed. As a reminder, Python programmer has an excellent instruction video on installing multiple python versions using virtual environments.
- In terminal, create a directory to hold your Python virtual environment(s) and then navigate to it. We'll call ours "python_projects".
mkdir python_projects
cd python_projects
- Create a virtual environment (this will also create a new directory). We'll call it "funEnv". You will also be sipulating the Python version to use (you can check it with
--version). I will be using Python 3.8.10. (as of this writing, TF is not compatible with 3.9)
C:\Users\Sally_Sue\python_versions\3.8.10\python -m venv funEnv
- Activate your virtual python environment. We'll call ours "funEnv"
funEnv\Scripts\activate
(NOTE: if you are using Git Bash the activation command will match the Mac instructions instead, namely: source funEnv/Scripts/activate)
When you see the name of the environment in parentheses at the front of the prompt you know it is active. For example:
(funEnv) [sally_sue]python_projects$
- Navigate to your virtual environment
cd funEnv
- IMPORTANT: make sure to update PIP before using it.
python -m pip install --upgrade pip
FYI: To deactivate your virtual Python environment just type:
deactivate
Are you having trouble with pip and python or defaulting to older versions of them? Are you unable to start Jupyter Notebook or run TensorFlow?
That's usually a sign that your venv (Python virtual environment) is inactive.
Even opening a new terminal window will default to a deactivated venv state. You need to activate venv on each terminal window if you are working in venv. You will know it's active if the first thing you see in the terminal prompt is the name of the venv directory in parentheses:
(funEnv) [sally_sue]python_projects$
- Ensure the virtual environment is active.
- Navigate to the virtual environment folder.
- Make sure pip is up to date
- Install Jupyter Notebook
python -m pip install notebook
Type jupyter notebook at the command line prompt.
jupyter notebook
If it doesn't launch automatically, copy the url from your shell and paste it into your browser. This runs an instance of Jupyter Notebook on localhost.
FYI: To end the Jupyter session click the "Quit" button at the top right of the IDE interface.
For reference: https://www.tensorflow.org/install
- Ensure the virtual environment is active
- Navigate to the virtual environment folder
- IMPORTANT: make sure to update PIP before using it.
python -m pip install --upgrade pip
- Make sure all dependencies are installed (see the section on dependencies at the top of this document)
Different Windows OS have different methods. For Windows 10 I did this through the Regedit settings using the Windows Club directions
- Type
RegEditin the start menu - Paste
HKEY_LOCAL_MACHINE\SYSTEM\CurrentControlSet\Control\FileSysteminto the address bar and click "Enter".

- Double click on
LongPathsEnabledin the FileSystem folder.
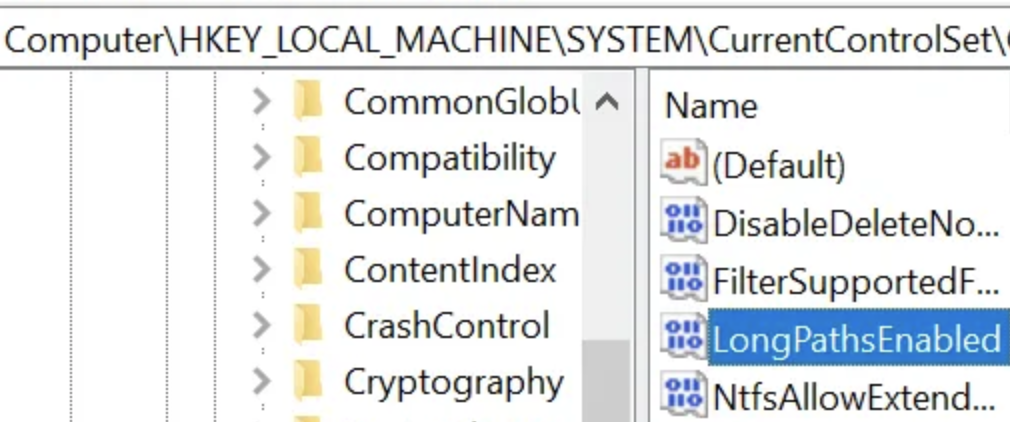
- Change Value Data to
1(default is 0) and click "OK"
python -m pip install --upgrade tensorflow
python -c "import tensorflow as tf;print(tf.reduce_sum(tf.random.normal([1000, 1000])))"
something like this should be returned: tf.Tensor(-1402.6809, shape=(), dtype=float32)
View the current list of packages installed within the virtual environment:
pip list
Use pip to install any of the packages below that weren't listed
- numpy
- keras
- opencv-contrib-python
- scikit-image
- pillow
- imutils
- scikit-learn
- matplotlib
- progressbar2
- beautifulsoup4
- pandas
python -m pip install <package name>
Refer to the Object Detection API with TensorFlow 2 installation instructions
- Ensure the virtual environment is active
- Navigate to the virtual environment folder
- Clone the Tensorflow Model Garden. This installs a models directory in the virtual environment root directory.
git clone https://github.com/tensorflow/models.git
- Navigate to models > research
cd models\research
- Compile protos using protoc
protoc object_detection/protos/*.proto --python_out=.
- Copy setup file from object detection packages into current directory
copy object_detection\packages\tf2\setup.py .
- Install all dependencies needed for our object detection library (ignore warnings)
python -m pip install --use-feature=2020-resolver .
- Confirm installation was successful (ignore CUDA and GPU warnings if you are not leveraging your GPU)
python object_detection/builders/model_builder_tf2_test.py
It should result in something like:
Ran 21 tests in 27.946s
OK (skipped=1)
If, instead you get a ModuleNotFoundError, install the module using pip install (see last part of Step 3)
Use LabelImg to prepare images you want to use for training data. Watch Nicholas Renotte's "Real Time Face Mask Detection" video to see how he uses LabelImg to prep his training data.
I installed LabelImg from tzutalin's version of LabelImg on GitHub since Douglas Meneghetti mentioned it's better than the version you can install with pip.
I am following the Mac instructions from tzutalin's LabelImg GitHub page for "Windows"
- Ensure the virtual environment is active
- Navigate to the virtual environment folder
- Clone Tzutalin's LabelImg version
git clone https://github.com/tzutalin/labelImg.git
python -m pip install --upgrade pip
- Navigate to the LabelImg directory
cd labelImg
- Install PyQt5
pip install PyQt5
- Install lxml
pip install lxml
pyrcc5 -o libs/resources.py resources.qrc
python labelImg.py
If you are new to TensorFlow, or even machine learning in general take a look at the following resources:
- 3Blue1Brown's "Neural Network" YouTube series
- ML Hello World with TensorFlow
- Beyond Hello World
- ML Zero to Hero with TensorFlow: Part 1, Part 2, Part 3, Part 4
If you are ready to delve into object detection with TensorFlow, check out Nicholas Renotte's YouTube channel for excellent tutorials.
Here are some of my favorites from his channel: