翻了一下之前的日报,发现还没有人教如何手写OJ。那么捡漏走起
首先,这篇文章介绍如何一步步手写OJ。
也许你会问“为什么我们不直接配置HustOJ/UOJ呢?”
下面我们了解一下配置现成OJ的缺点:
- 安装配置复杂(大多数需要安装mysql,而mysql对armhf平台有兼容性问题QAQ)
- 系统占用高 (树莓派和小型vps很难带动,更别提执行效率了)
- 不易上手(要自己查文档)
本项目在Codeanywhere上进行编写、调试。
Codeanywhere,一个在线PHP执行平台,速度快,功能强大。
在codeanywhere注册一个账号,新建一个Project。
关于Codeanywhere的使用不再赘述,身为开发者多年的你一定会认为这个IDE简单有趣。
另外,后期我主要使用Codenvy,因为我把CodeAnywhere的账号密码忘掉了。
一下部分有完善的注释,直接阅读注释即可。
Day1全部代码下载
我们从评测部分写起。Day1的任务是实现一个简单的ide,类似洛谷IDE。
实现原理
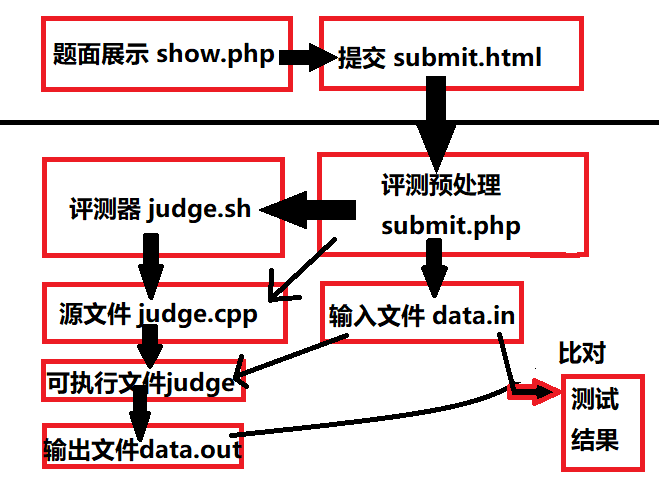
大概就是这样。
观察实现原理图,我们发现需要创建一下的文件:
- submit.html : submit.php的前端显示页面
- submit.php : 用于创建judge.cpp和data.in并在评测后返回结果
- judge.sh : 编译judge.cpp并进行测试,输出data.out
首先创建一个文件夹:judge,新建一个脚本:judge.sh,在新弹出的编辑器里写入
# judge.sh 类似对拍程序。
rm judge # 保险起见,删除上次的可执行文件。
g++ judge.cpp -O2 -o judge # 编译
./judge < data.in > data.out # 运行
记得chmod 755 judge.sh
然后是submit.php。先看submit.php的伪代码:
删除上次评测时的临时文件
写入judge.cpp和data.in
调用judge.sh编译
将data.out输出至网页
下面上代码。
<?php

$code = $_POST["code"];// 获取 代码
$input = $_POST["input"];//获取 输入

unlink ("judge"); //删除 judge,以下类推
unlink ("data.in");
unlink ("data.out");
unlink ("judge.cpp");

$file = fopen("judge.cpp","w+") or exit("Unable to Open CPP."); //将 代码 写入 judge.cpp
fwrite($file,$code);
fclose($file);

$fin = fopen("data.in","w+") or exit("Unable to Open Input"); //将 输入 写入 data.in
fwrite($fin,$input);
fclose($fin);

system("./judge.sh");//执行 judge.sh

$fout = fopen("data.out","r") or exit("Unable to Open File."); // 输出 data.out
while (!feof($fout)){
  echo fgets($fout);
}
fclose($fout);

?>
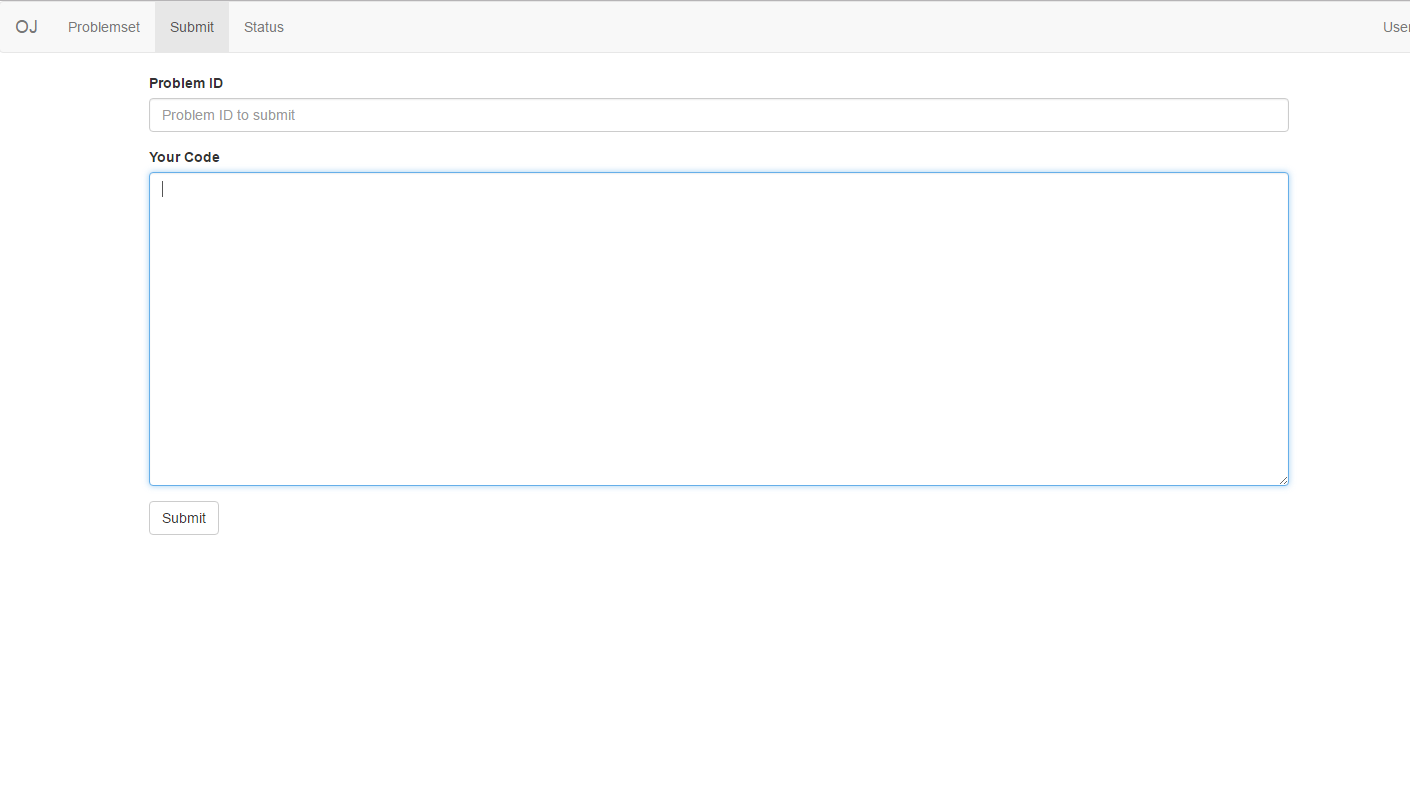
然后submit.html就极其简单易懂了。
<html>

<head>
  <title>Submit Your Code</title>
</head>

<body>
  <form action="submit.php" method="post">
    <textarea name="code" height="200px" width="80px"></textarea>
    <br>
    <textarea name="input" height="100px" width="40px"></textarea>
    <input type="submit">
  </form>
</body>

</html>
Day2全部代码下载
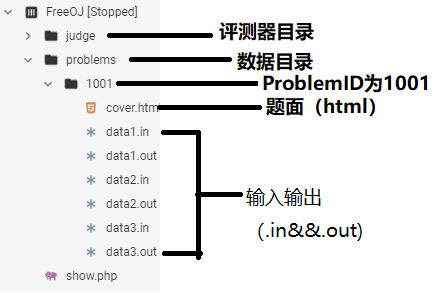
一个OJ只有IDE是不行的,还需要测试数据和题面展示。 测试数据的摆放方式是这样的:
首先我们要修改/judge/submit.php,让它支持多组数据的评测。
<?php
function judge($code,$path){
//echo $path;
unlink ("judge");
unlink ("data.in");
unlink ("data.out");
unlink ("judge.cpp");
$file = fopen("judge.cpp","w+") or exit("Unable to Open CPP.");
fwrite($file,$code);
fclose($file);
if (!is_file($path)) exit("Bad Problem ID!");
copy($path,"./data.in");
system("./judge.sh");
$fout = fopen("data.out","r") or exit("Unable to Open File.");
$ret = "";
while (!feof($fout)){
$ret = $ret . fgets($fout);
//echo $ret;
}
fclose($fout);
return $ret;
}
$code = $_POST["code"]; //代码
$pid = $_POST["pid"]; // ProblemID
$curj = 1;//初始化当前数据点编号
$p_fnt = "../problems/" . $pid . "/"; //生成数据目录相对路径
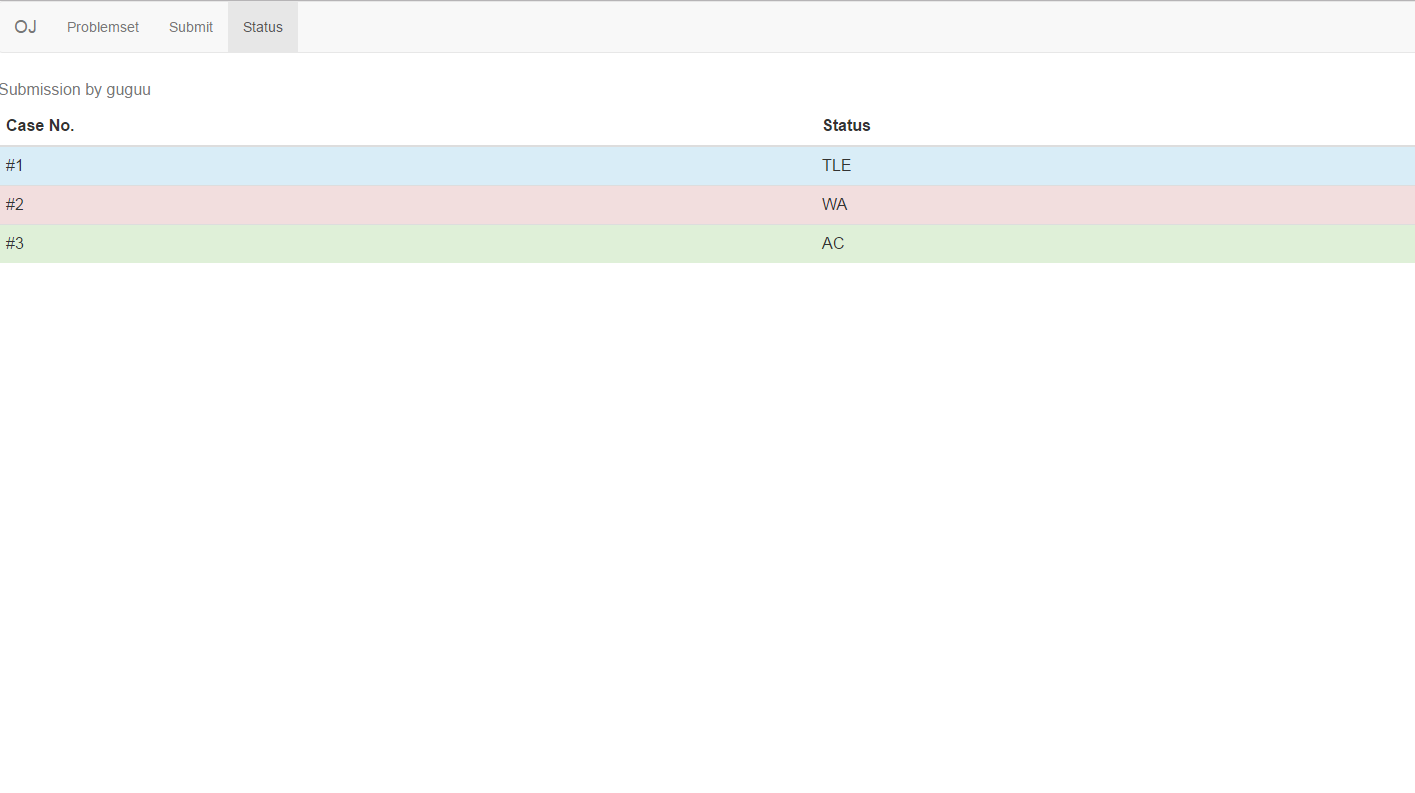
while (is_file($p_fnt . "data" . (string)($curj) . ".in")){//枚举数据点编号
//echo $p_fnt . "data" . (string)($curj) . ".in";
judge($code,$p_fnt . "data" . (string)($curj) . ".in");//评测当前测试点
$file1 = md5_file("./data.out"); // 计算提交代码的输出的MD5
$file2 = md5_file($p_fnt . "data" . (string)($curj) . ".out");//计算数据文件中输出的MD5
if ($file1 == $file2) //比对
echo "AC<br>";
else
echo "WA<br>";
$curj = $curj + 1; //下一个测试点
}
?>
然后修改judge/submit.html(略,详见代码包)
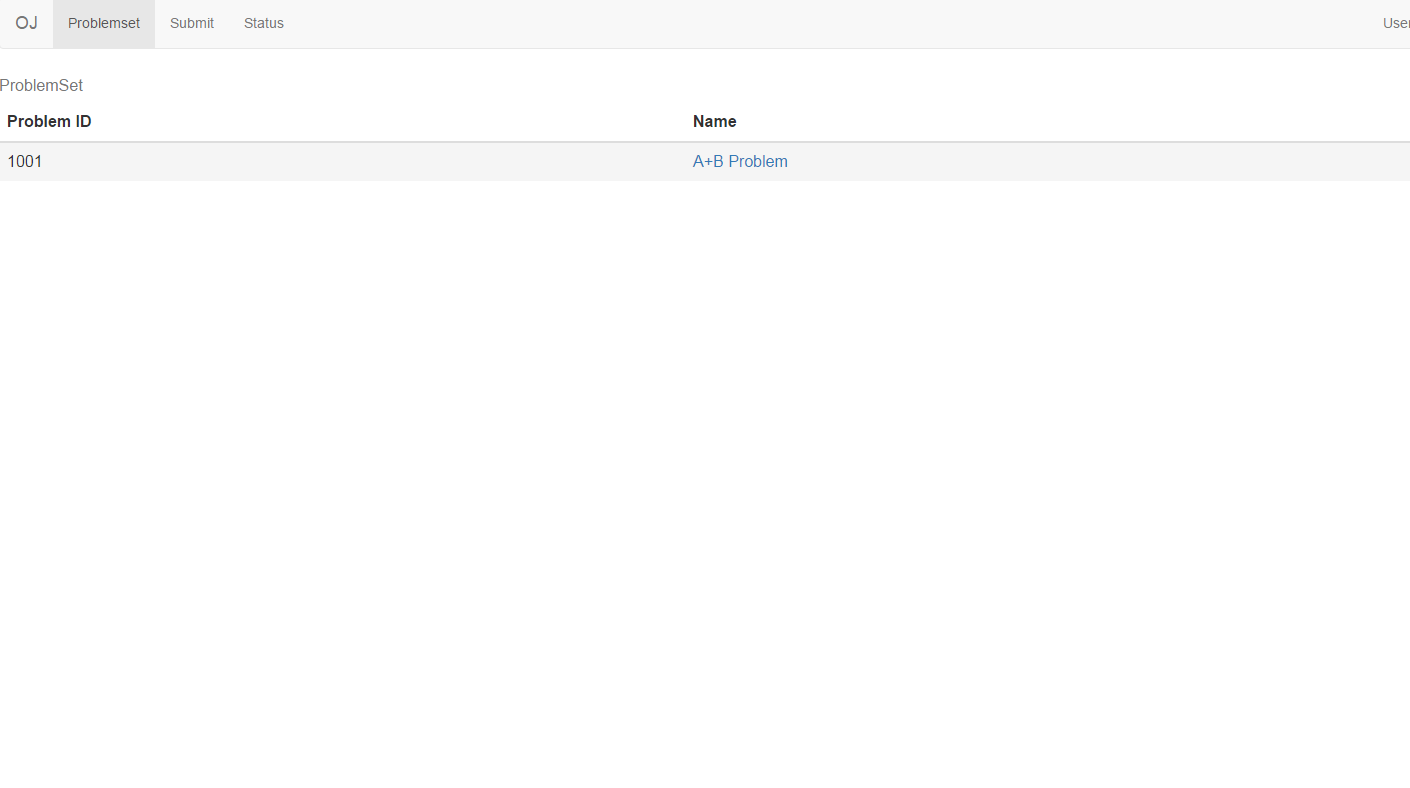
收集任意一题的数据包(此处以A+B Problem为例),解压至problem/1001。
在problem/1001中新建题面文件cover.html,写入
<title>A+B Problem</title>
<h1>A+B Problem</h1>
<p>
  Please Caculate A+B.
  <br>
  Input:a,b:Integer
  <br>
  Output:a+b
</p>
写完了...不,没有。还有show.php呢。
show.php的访问格式为show.php?pid=[你要访问的ProblemID]
下面上代码:
<?php

$probid = $_GET["pid"]; //ProblemID
$cover = "./problems/" . $probid . "/cover.html"; //题面相对目录

if (!is_file($cover)) exit("Bad Problem ID!");//确认题面存在

$file = fopen($cover,"r") or exit("Bad Cover!");

echo "<h3>Problem id:" . (string)$probid . "</h3>";//输出PID

while (!feof($file)){
  echo fgets($file);//逐行输出题面
}

fclose($file);

echo "<a href=\"judge/submit.html\">Submit</a>"; //submit链接

?>
到Day2为止,一个基本的OJ就建成了。它拥有题面展示、评测功能。
Day3全部代码下载
首先优化了一下结果显示页,添上了测试点编号和颜色,详见代码包。
一个网站没有index.php怎么行呢?
我们简单的写一下index.php,让它可以显示所有题目。
<?php
// /index.php
exec("ls ./problems",$prbs); // 获取所有文件
$cur = [];
foreach ($prbs as $cur)
  echo "<a href=\"show.php?pid=" . $cur . "\">" . $cur . "</a>"; //逐个输出
?>
按理说这样这一节就写完了,然后我意识到,这样的话就没法判别TLE了。无法判别TLE会使试图卡暴力的毒瘤出题人不开心,所以我们要加入TLE的判别。
如何实现TLE的判别呢?我们选择使用linux的命令“timeout”
Usage:timeout time command [return_val]
好了,在了解语法后,我们创建一个/judge/judge.php,然后删除/judge/judge.sh,因为它已经光荣退役了。
下面上/judge/judge.php的代码:
<?php
function Do_judge($time_limit){ //进行评测
  unlink ("judge");
  unlink ("data.out");
  system("g++ judge.cpp -O2 -o judge"); //编译
  //echo "timeout " . (string)($time_limit) . " ./judge < data.in > data.out";
  $return_var = 0;
  system("timeout " . (string)($time_limit) . " ./judge < data.in > data.out",$return_var); //测试
  if ($return_var == 124) return false; else return true;
}
?>
然后修改/judge/submit.php
<?php
require ("judge.php"); //这里!

function judge($code,$path,$t_l){
  (略)
  return Do_judge($t_l); //这里! true:没TLE false:TLE

  //$fout = fopen("data.out","r") or exit("Unable to Open File.");
  //$ret = "";
  //while (!feof($fout)){
  //  $ret = $ret . fgets($fout);
    //echo $ret;
  //}
  //fclose($fout);
  //return $ret;
}
(略)

while (is_file($p_fnt . "data" . (string)($curj) . ".in")){
  //echo $p_fnt . "data" . (string)($curj) . ".in";
  echo "<h3>Test Case #" . (string)($curj) . ":</h3>";
  if (!judge($code,$p_fnt . "data" . (string)($curj) . ".in",1/*时限一秒*/))//这里!
    echo "<h3 style=\"background-color:#4169E1\">TLE</h3>";
  else{
  (略)
  }
(略)
}

?>
Day4全部代码下载
AC...WA...TLE(RE)...还差CE。如何判定CE呢?看看编译后有没有输出文件即可。
核心代码如下。
  (略)
  if (!file_exists("judge")){ ///没有输出judge
    return -1;
  }
  (略)
我们修改一下submit.php中显示答案的部分,让它兼容现有的judge.php。
<?php
(略)

function judge($code,$path,$t_l){
(略)
}
(略)
while (is_file($p_fnt . "data" . (string)($curj) . ".in")){
  echo "<h3>Test Case #" . (string)($curj) . ":</h3>";
  $j_stat = judge($code,$p_fnt . "data" . (string)($curj) . ".in",(int)(get_prb_time_limit($pid)));
  if ($j_stat == 0){
    echo "<h3 style=\"background-color:#4169E1\">TLE</h3>";
  }elseif ($j_stat == -1){
    echo "<h3 style=\"background-color:#FF4500\">CE</h3>";
  }elseif ($j_stat == 1){
	(略)
  }
(略)
}

?>
测试一下...可以判别CE了。
我们的代码里写着这样一行:
if (!judge($code,$p_fnt . "data" . (string)($curj) . ".in",1/*时限一秒*/))
可是,每题的时限怎么可能都是一秒呢?我们要想办法解决这个问题。
PHP有自带的保存数据的方式json,它简单有趣,可以通过json_encode函数解析成数组。
我们在/library/prbinfo.php中写入
<?php
//be called like 'require ("./library/prbinfo.php");'
function get_prb_info($pid){ //获取题目信息
    $file = fopen("../problems/" . (string)($pid) . "/attrib.json","r");
    $attr = fgets($file);
    return json_decode($attr,true);
}

function get_prb_name($pid){//获取题目名称
    $pinfo = get_prb_info($pid);
    return $pinfo["name"];
}

function get_prb_time_limit($pid){//获取题目时限
    $pinfo = get_prb_info($pid);
    return $pinfo["time_limit"];
}
?>
然后把那一行改成$j_stat = judge($code,$p_fnt . "data" . (string)($curj) . ".in",(int)(get_prb_time_limit($pid)));
别的文件也要进行适配修改,此处不再赘述。
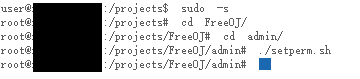
我们还加入了setperm.sh和unperm.sh便于修复权限。此处不再赘述。
至此,我们已经凑齐了四种编译状态。
Day5全部代码下载
想象一下两个用户在你的OJ同时提交了代码,突然...
为什么呢?新来的judge.cpp把旧的覆盖了!
所以我们要实现评测队列。评测队列就相当于操作系统中的多任务,把每个评测都放到独立的容器中评测,互不干扰。
正常评测队列原理如下。
开一个Docker
把代码放进去跑
关闭该Docker
实现评测队列,其实就是把原来的judge.php,submit.php,submit.html三个核心评测文件单独复制到一个特殊的文件夹内进行评测。文件夹较docker轻量化,占用资源更少。其实只是docker咕了
我们把judge文件夹重命名为judge-module,作为评测机的模板。
将submit.php中的评测函数搬到judge.php中。
submit.php
<?php
require ("./judge.php"); //链接judge.php
$code = $_POST["code"];//代码
$pid = $_POST["pid"];//problem id

unlink("./submit.html");//删除submit.html
Result($code,$pid);//评测
unlink("./submit.php");//删除submit.php
header('location:' . dirname($_SERVER["PHP_SELF"]) . "/result.html");//跳转至result.html
?>是不是精简多了?但是judge.php又变长了QAQ...
judge.php
<?php
require ("../../library/prbinfo.php"); //获取时限
function Do_judge($time_limit){
  (略)
}

function judge($code,$path,$t_l){
  (略)
}

function Result($code,$pid){
	$fsub=fopen("result.html","w+") or exit("(略)"); //将网页输出至result.html
    (略)
    while (is_file($p_fnt . "data" . (string)($curj) . ".in")){
        fwrite($fsub,"<h3>Test Case #" . (string)($curj) . ":</h3>");
        (略)
        if ($j_stat == 0){
            fwrite($fsub,"<h3 style=\"background-color:#4169E1\">TLE</h3>");
        }elseif ($j_stat == -1){
            fwrite($fsub,"<h3 style=\"background-color:#FF4500\">CE</h3>");
        }elseif ($j_stat == 1){
            (略)
            if ($file1 == $file2)
                fwrite($fsub,"<h3 style=\"background-color:#00FF00\">AC</h3>");
            else
                fwrite($fsub,"<h3 style=\"background-color:#FF4500\">WA</h3>");
        }
        $curj = $curj + 1;
    }

    fclose($fsub);
    unlink ("judge"); //删除judge
    unlink ("data.in"); //删除data.in
    unlink ("data.out"); //删除data.out
    unlink ("judge.php"); //删除judge.php
}
在/library目录下创建filesys.php作为文件系统库:
<?php
function copydir($source, $dest) //复制目录
{
    if (!file_exists($dest)) mkdir($dest);
    $handle = opendir($source);
    while (($item = readdir($handle)) !== false) {
        if ($item == '.' || $item == '..') continue;
        $_source = $source . '/' . $item;
        $_dest = $dest . '/' . $item;
        if (is_file($_source)) copy($_source, $_dest);
        if (is_dir($_source)) copydir($_source, $_dest);
    }
    closedir($handle);
}

function rmdirs($path) //删除目录
{
    $handle = opendir($path);
    while (($item = readdir($handle)) !== false) {
        if ($item == '.' || $item == '..') continue;
        $_path = $path . '/' . $item;
        if (is_file($_path)) unlink($_path);
        if (is_dir($_path)) rmdirs($_path);
    }
    closedir($handle);
    return rmdir($path);
}

?>
在根目录下创建submit.php。
<?php
require ("./library/filesys.php"); //链接库
$j_path = "submissions/judge" . md5(uniqid(microtime(true),true)); //新容器的目录
copydir("./judge-module",$j_path);把容器模型复制一份过去
header('location:' . $j_path . "/submit.html");跳转至新容器下的submit.html这样,我们的容器部分就完成了。容器使用过后,只留下结果result.html和源代码,可以当评测机录用。
最后,我们进行一些整理。我们将setperm.sh和unperm.sh移至/admin下。至于里面的dashboard.html/.php,这是两个彻底的失败。在之后的版本会被删除的。
至此,我们已经有多个用户同时评测的能力了。
Day6全部代码下载
Day6最适合咕咕咕了!
删除一些注释,给界面画画表格然后收工!
Day7全部代码下载
没有用户支持的话,这个OJ还只能算一个半成品。我们在第一周就要给它加上用户支持,这样就可以用剩下的时间来优化它了。
我们把用户的数据存到user/database/{uid}.json,举个例子:
{"name":"gugu","passwd":"123456","record":"[\"1001\"]","intr":"abc"}
不难看出,用户数据是由以下部分构成的json:
| 名称 | 意义 |
|---|---|
| name | 用户名 |
| passwd | 密码 |
| record | 提交记录 |
| intr | 个性签名 |
在PHP中处理json很简单,就像在Day4说的那样。
我们创建library/libuser.php
<?php
define('WWWROOT',str_replace('\\','/',realpath(dirname(__FILE__).'/'))."/");
function get_user_info($uid){ //获取用户信息,返回信息数组
    //echo BASE_PATH . "problems/" . (string)($pid) . "/attrib.json";
    $file = fopen(WWWROOT . "../user/database/" . (string)($uid) . ".json","r");
    $attr = fgets($file);
    fclose($file);
    return json_decode($attr,true);
}

function set_user_info($uid,$pinfo){ //写入用户信息,写入信息数组
    //echo BASE_PATH . "problems/" . (string)($pid) . "/attrib.json";
    $file = fopen(WWWROOT . "../user/database/" . (string)($uid) . ".json","w+");
    fwrite($file,json_encode($pinfo));
    fclose($file);
}

function get_user_name($uid){ //获取用户名称
    $pinfo = get_user_info($uid);
    //echo $pinfo["name"];
    return $pinfo["name"];
}

function get_user_passwd($uid){ //获取用户密码
    $pinfo = get_user_info($uid);
    return $pinfo["passwd"];
}

function get_user_intr($uid){ //获取用户签名
    $pinfo = get_user_info($uid);
    return $pinfo["intr"];
}

function get_user_record($uid){ //获取用户记录
    $pinfo = get_user_info($uid);
    return json_decode($pinfo["record"],true);
}

function set_user_name($uid,$name){ //写入用户名称
    $pinfo = get_user_info($uid);
    $pinfo["name"] = $name;
    set_user_info($uid,$pinfo);
}

function set_user_passwd($uid,$passwd){ //写入用户密码
    $pinfo = get_user_info($uid);
    $pinfo["passwd"] = $passwd;
    set_user_info($uid,$pinfo);
}

function set_user_intr($uid,$intr){ //写入用户签名
    $pinfo = get_user_info($uid);
    $pinfo["intr"] = $intr;
    set_user_info($uid,$pinfo);
}

function set_user_record($uid,$record){ //写入用户记录
    $pinfo = get_user_info($uid);
    $arr = json_decode($pinfo["record"],true);
    array_push($arr,$record);
    $arr = array_unique($arr);
    $pinfo["record"] = json_encode($arr);
    set_user_info($uid,$pinfo);
}

function auth_user($uid,$passwd){ //验证用户信息是否正确
    if ($uid == 0) return false;
    if (get_user_passwd($uid) == $passwd)
        return true;
    else
        return false;
}

function create_user($name,$passwd){ //创建用户
    $cuid = 1; //当前用户id
    while (file_exists(WWWROOT . "../user/database/" . (string)($cuid) . ".json"))
        $cuid = $cuid + 1;

    $file = fopen(WWWROOT . "../user/database/" . (string)($cuid) . ".json","w+");
    $pinfo = array("name"=>$name,"passwd"=>$passwd,"record"=>"{}","intr"=>"This user is very lazy so that he didn't ...");
    fwrite($file,json_encode($pinfo));
    fclose($file);
    return $cuid;
}

function cookie_uid(){ //从cookie读取用户id
    if (!isset($_COOKIE["uid"])) return -1;
    else return $_COOKIE["uid"];
}

function cookie_passwd(){ //从cookie读取密码
    if (!isset($_COOKIE["uid"])) return -1;
    else return $_COOKIE["passwd"];
}

function auth_cookie(){ //验证cookie中的用户信息
    //echo cookie_uid() . '  ' . cookie_passwd();
    return auth_user(cookie_uid(),cookie_passwd());
    //echo $blk;
}
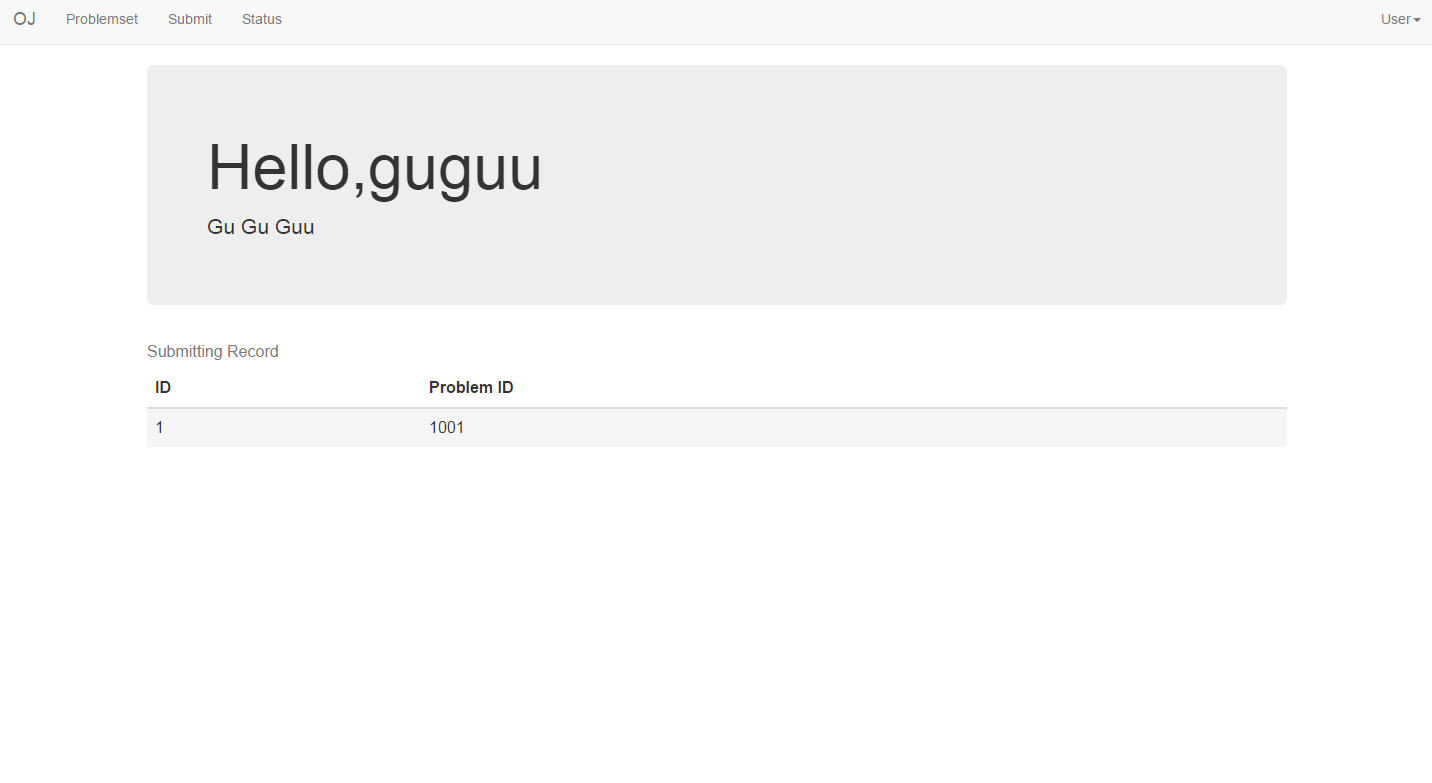
user/show.php:使用user/show.php?uid={uid}调用时,显示该id用户信息,否则显示当前用户信息。
<?php
require ("../library/libuser.php");
echo "<html><head><title>User Infomation</title></head>";
if (isset($_GET["uid"])){ //有uid参数
$uid = $_GET["uid"];
echo "<h3>Hello,". get_user_name($uid) ."</h3>";
echo "<h3>Introduction:</h3><p>";
echo get_user_intr($uid);
echo "<br><h3>Submitting Record</h3>";
foreach (get_user_record($uid) as $cur){
echo $cur . " ";
}
}else if (auth_cookie()){ //已登录
echo "<h3>Hello,". get_user_name(cookie_uid()) ."</h3>";
echo "<h3>Introduction:</h3><p>";
echo get_user_intr(cookie_uid());
echo "<br><h3>Submitting Record</h3>";
foreach (get_user_record(cookie_uid()) as $cur){
echo $cur . " ";
}
}else{
header('location:' . "login.html"); //跳转至登陆界面
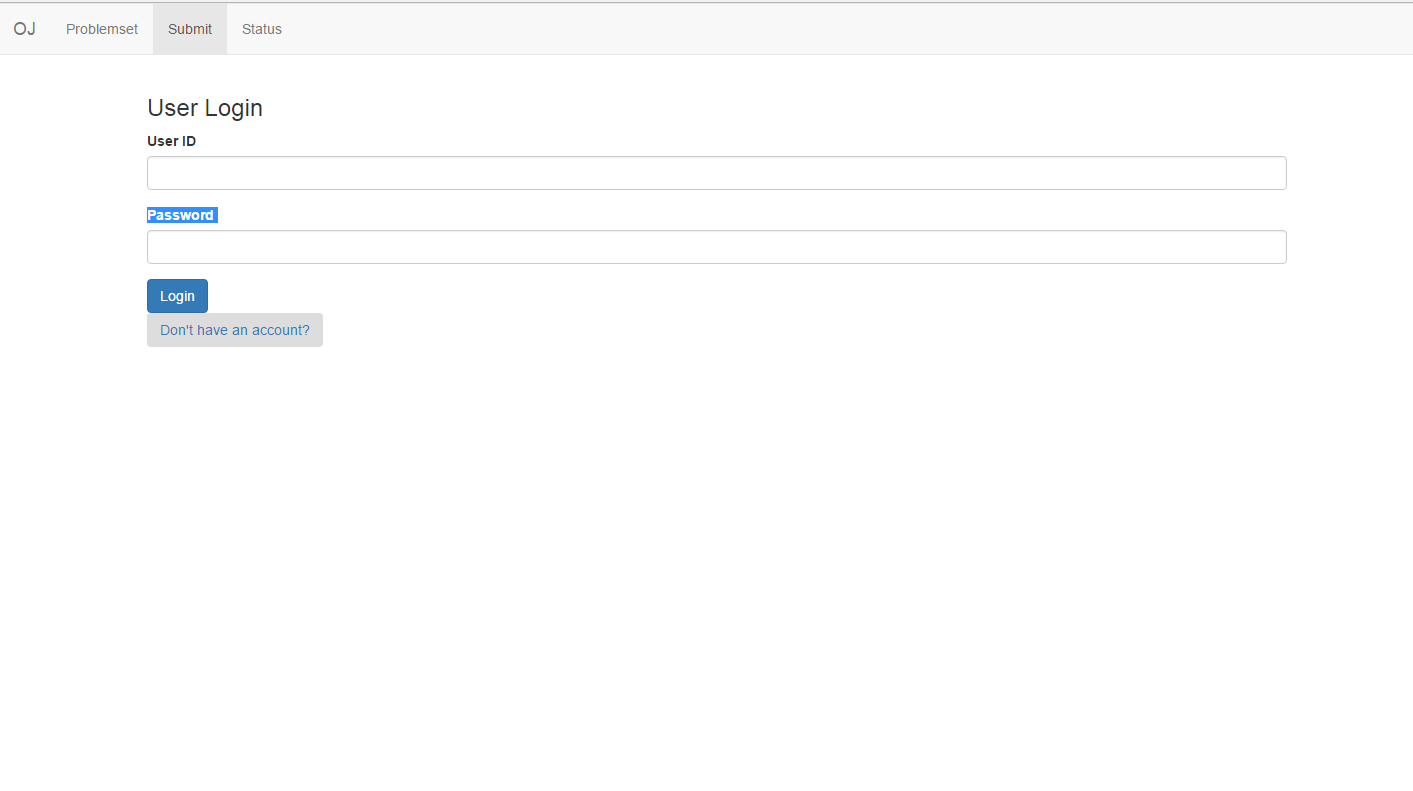
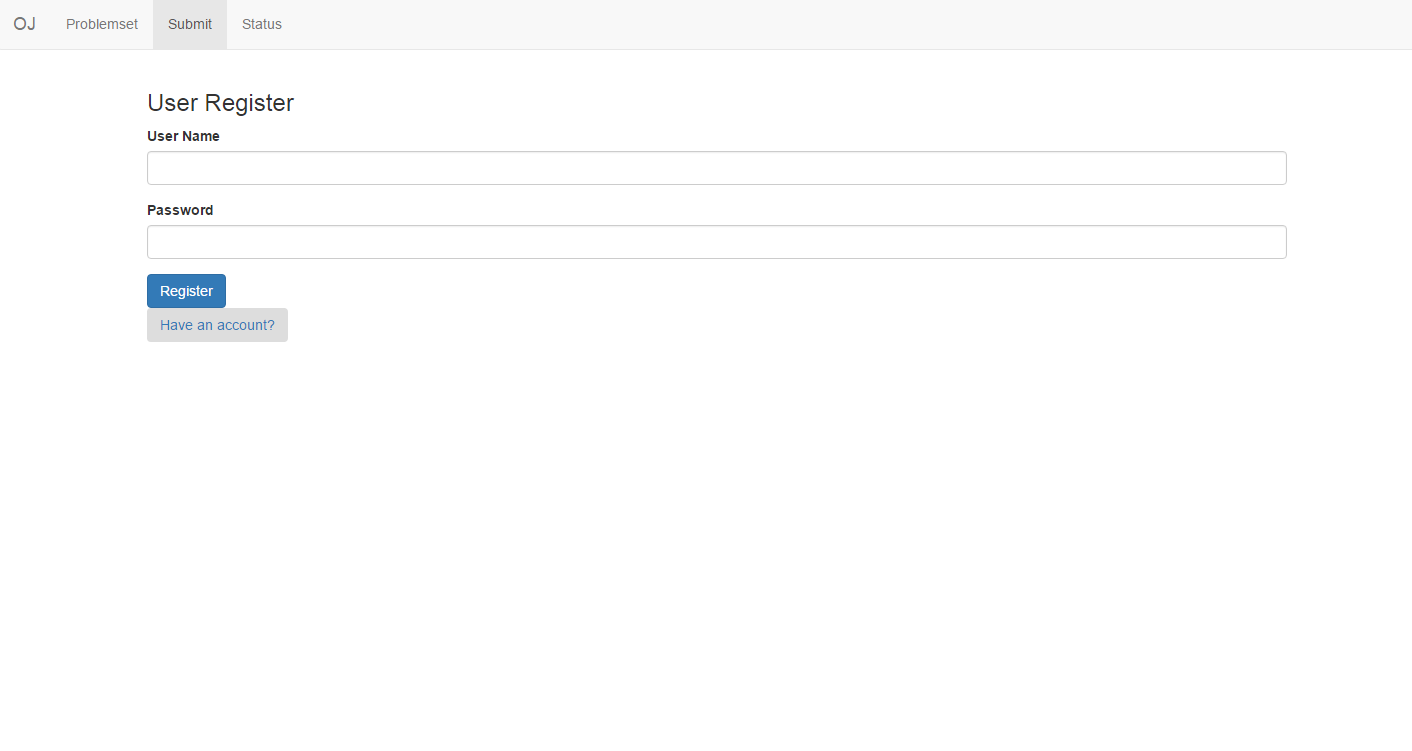
}还要添加login.php/html,register.php/html,修改submit.html,请自行阅读代码。
至此,oj已基本支持用户,但是还有一些小问题。比如...
额。。。Day8再修吧。
Day8全部代码下载
首先我们解决Day7留下的Bug。在不改动apache配置的情况下,我们没有办法阻止查看{uid}.json,但是如果将密码加密,就算密文被看到也无法得出密码了。
PHP自带加密函数crypt(),我们采用crypt($passwd,$passwd)进行加密。
直接将libuser.php中所有的 &ndsp;passwd 全部改为 crypt($passwd,$passwd)即可。篇幅有限,请直接看代码。
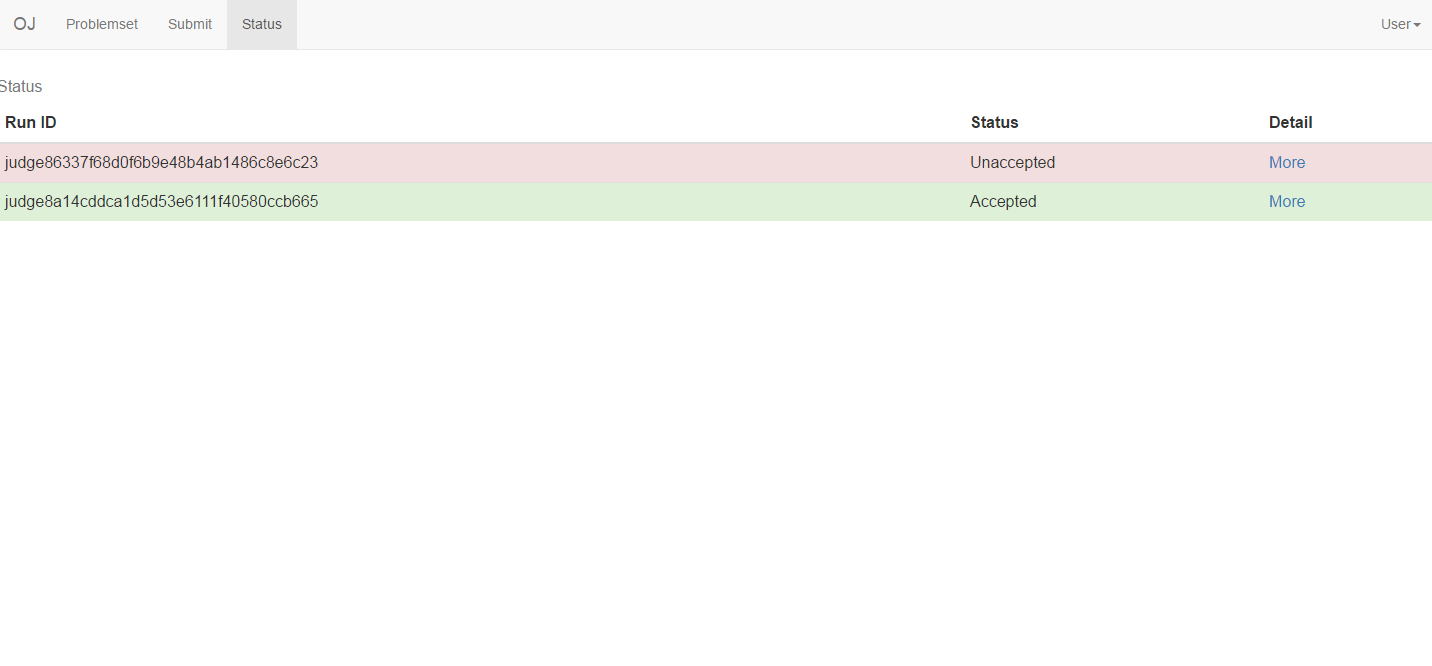
思路:
在评测时创建一个辅助文件,它可能是"Unused","unaccepted","accepted"
若该文件是”unused“,表明未进行评测或评测错误。
若该文件是”unaccepted“,表明评测未通过。
若该文件是”accepted“,表明评测通过。

在status.php被调用时,扫描/submissions下的每一个评测记录,根据以上法则判断评测结果输出。
下面上status.php代码。
<?php
echo "<body><table class=\"table\"><caption>Status</caption>";
echo "<thead><tr><th>Run ID</th><th>Status</th><th>Detail</th></tr></thead><tbody>";
exec("ls -tr ./submissions",$stl);
//"<tr class=\"warning\"><td>All</td><td>CE</td></tr>"
foreach ($stl as $cur){
    //echo $cur . "<br>";
    if (file_exists("./submissions/" . $cur . "/unused"))
        echo "<tr class=\"warning\"><td>" . $cur . "</td><td>Submitting/Judgement Failed</td>" . "<td><a href=\"submissions/" . $cur . "/result.html\">More</a></td></tr>";
    elseif (file_exists("./submissions/" . $cur . "/accepted"))
        echo "<tr class=\"success\"><td>" . $cur . "</td><td>Accepted</td>" . "<td><a href=\"submissions/" . $cur . "/result.html\">More</a></td></tr>";
    elseif (file_exists("./submissions/" . $cur . "/unaccepted"))
        echo "<tr class=\"danger\"><td>" . $cur . "</td><td>Unaccepted</td>" . "<td><a href=\"submissions/" . $cur . "/result.html\">More</a></td></tr>";
    else
        echo "<tr class=\"active\"><td>" . $cur . "</td><td>Judging</td>" . "<td>Detail(unavailable)</td></tr>";
}

echo "</tbody></table></body></html>";
其他文件还需要修改,篇幅原因省略。
到Day8为止,一个OJ的核心就完成了。仅仅14.87KB的代码,甚至比Win7自带的计算器(758KB)还要小!在完成核心之后,我们只需进行一些优化即可。
附:FreeOJ核心下载:这里
Day9全部代码下载
哇!Bootstrap真TM漂亮!这导航栏...这列表...
推荐一个很好的Bootstrap设计器:这里
咳咳,我们在每个网页前面都加上导航栏,然后进行一些UI美化。美化的过程极其枯燥,直接看代码包吧。
结果展示:
这个签名真鸡肋啊。。。又不能改的说。。。对了,我们增加一个用户信息修改页面吧。
user/dashboard.php
<?php
require ("../library/libuser.php");

if (!auth_cookie()/*没有登陆*/) header("location:/user/login.html");

$uid = cookie_uid();//cookie中的UID

if (isset($_POST["nname"])){//修改用户名
    //Modify Username
    set_user_name($uid,$_POST["nname"]);
}

if (isset($_POST["npasswd"])){//修改密码
    //Modify Passwd
    set_user_passwd($uid,$_POST["npasswd"]);
}

if (isset($_POST["nintr"])){//修改简介
    //Modify Introduction
    set_user_intr($uid,$_POST["nintr"]);
}
还要添加user/dashboard.html和导航栏,篇幅有限略去。
这样,我们就可以通过user/dashboard.html或导航栏修改用户信息了!
Day10全部代码下载
用户这么多,不管理怎么行呢?我们需要管理员!欸...当管理员很烦?你不见那位姓陈的管理员......真TM爽!
总之,我们要设计一个用户管理界面user/admin.php,让它充当管理面板吧。
首先,我们要在用户参数中添加priv一项,表示该用户是否为管理员("user":普通用户,"admin":管理员)。这里priv就是privilege的意思啦。
我们修改user/libuser.php,如果读过前面章节的话,一定知道怎么改吧。
(略)
然后我们添加user/admin.php,作为管理页面。
<?php
require ("../library/libuser.php");
require ("../library/libui.php");
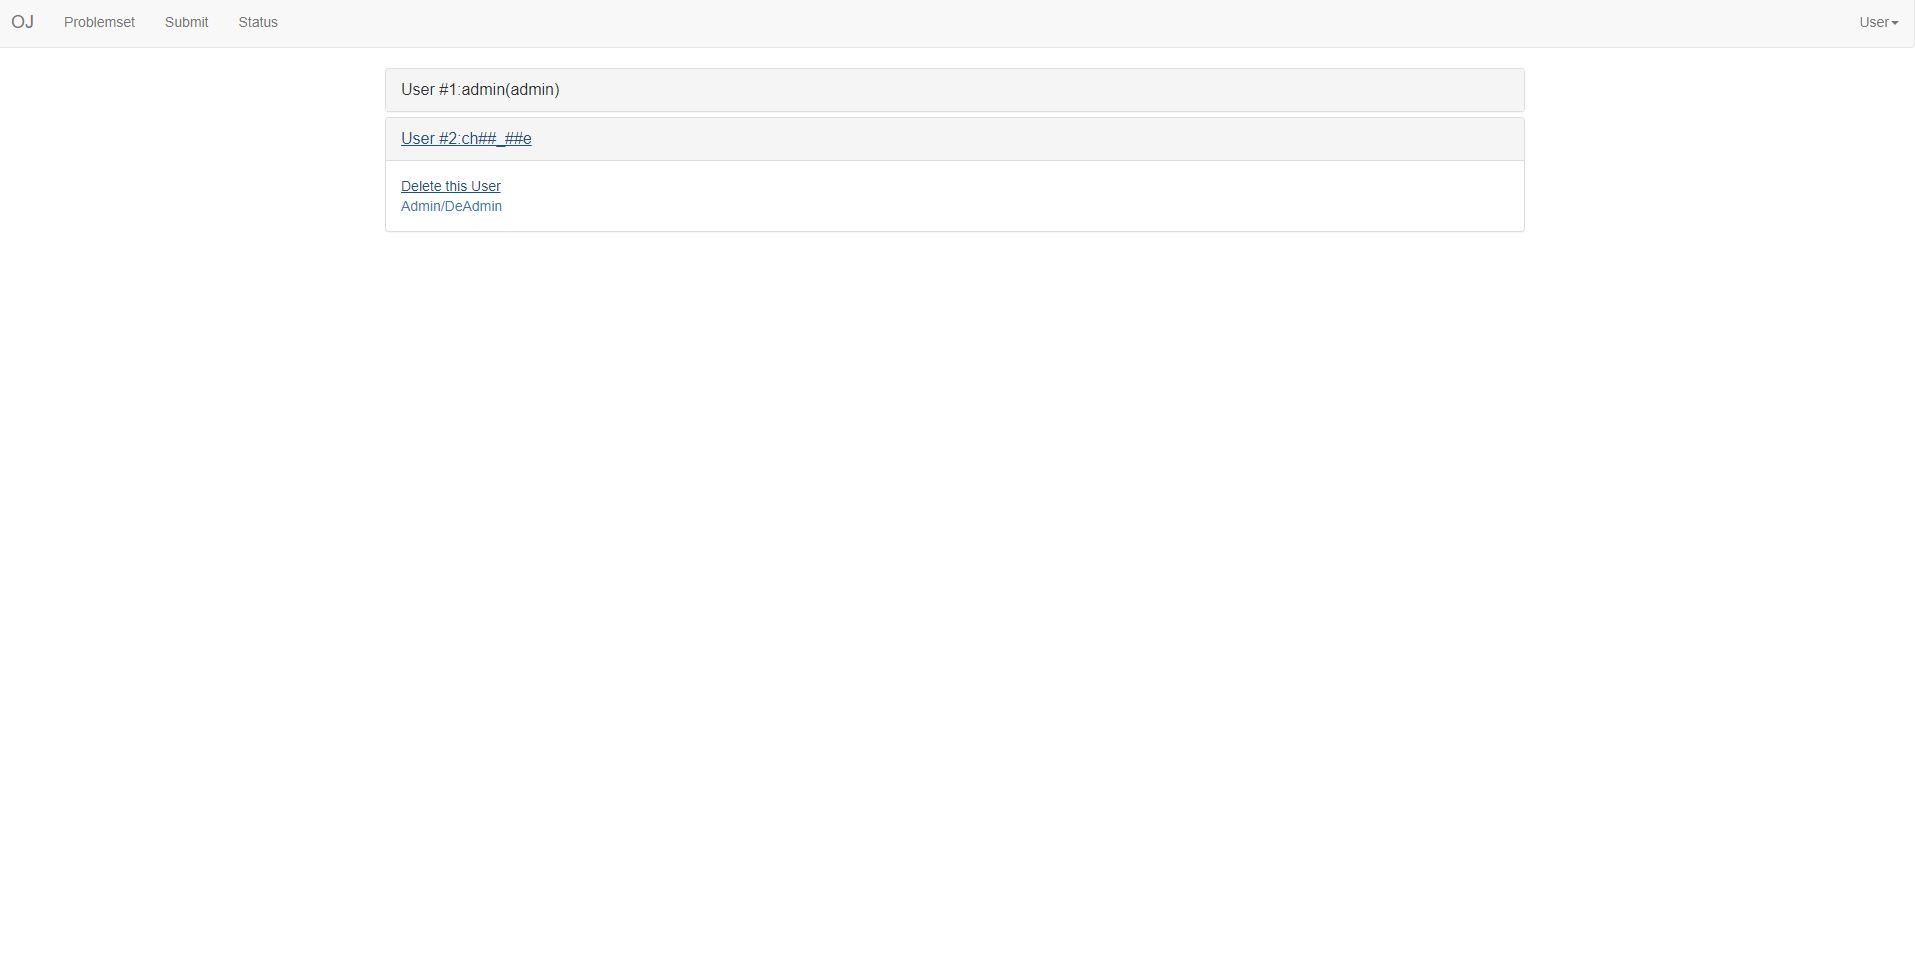
function gen_opr_link($uid){ //产生操作链接
return '<a href="admin.php?action=delete&uid='.(string)($uid) . '">Delete this User</a><br>' .
'<a href="admin.php?action=cpriv&uid='.(string)($uid) . '">Admin/DeAdmin</a>';
}
function disp_adm($uid){ //显示管理员标记
if (auth_admin($uid))
return "(admin)";
else
return "";
}
echo html_head("Administration");
echo html_navbar();
if (auth_cookie() && auth_admin(cookie_uid())) //已登录且为管理员
$aduid = cookie_uid();
else{
echo '<div class="alert alert-danger">You are not an administrator!</div>';
exit("");
}
if (!isset($_GET["action"])){ //无动作,显示管理页面
echo '<div class="container">
<div class="row clearfix">
<div class="col-md-12 column">
<div class="panel-group" id="panel-207182">';
$cu = 0;
exec("ls ./database",$arr);
foreach ($arr as $cur){
$cu = (int)(strtok($cur,"."));
echo ' <div class="panel panel-default">
<div class="panel-heading">
<a class="panel-title collapsed" data-toggle="collapse" data-parent="#panel-207182" href="#panel-element-' . $cu . '">User #' . $cu . ':' . get_user_name($cu) . disp_adm($cu) . '</a>
</div>
<div id="panel-element-' . $cu . '" class="panel-collapse collapse">
<div class="panel-body">' .
gen_opr_link($cu).
'</div>
</div>
</div>';
$cu = $cu + 1;
}
echo "</div></div></div></div>";
echo "</body></html>";
}else{
if ($_GET["action"] == "delete"){ //删除操作
system('rm database/' . $_GET["uid"] . '.json');
}
elseif ($_GET["action"] == "cpriv"){//提权/降权操作
if (get_user_priv((int)($_GET["uid"])) == "user")
set_user_priv((int)($_GET["uid"]),"admin");
else
set_user_priv((int)($_GET["uid"]),"user");
}
header("location:admin.php");
}
效果图:
看看submissions/目录下,这简直乱成一锅粥了嘛...RunID这么长怎么可能记住啊......我们进行一些简单的移植:
将judge.php移入submit.php
将judge.php移入根目录下
删除 judge_module
同时,将记录放入record目录下,这样评测完可以直接删除评测目录。
代码变动略。
同时,为了避免大量注册用户攻击,我们需要在必要的时候关闭注册。我们创建一个库liboj.php,将OJ有关的信息写入ojcfg.json。
<?php
define('OJROOT',str_replace('\\','/',realpath(dirname(__FILE__).'/'))."/");
function get_oj_info(){
    $file = fopen(OJROOT . "../ojcfg.json","r");
    $attr = fgets($file);
    fclose($file);
    return json_decode($attr,true);
}

function get_oj_regstat(){//获取oj注册状态
    $pinfo = get_oj_info();
    //exit($pinfo["enable_register"]);
    return $pinfo["enable_register"] == "true";
}然后在user/register.php中写入
if (!get_oj_regstat()) exit("Register Disabled!");
elseif (!isset($_POST["name"]) || !isset($_POST["passwd"])) exit("Invalid Username/Password!");
只要在ojcfg.json中写入{"enable_register":"false"}就可以关闭注册,这样oj就不会被炸掉啦!
呃...其实Day8的加密一点也不加密。我们应该在library/libuser.php中单独写一个加密函数。
像这样
function pass_enc($pass){
    $eps = $pass;
    $times = 10;$i=1;
    while ($i <= $times){
        $i = $i+1;
        $eps = crypt($eps,$eps);
    }

    return $eps;
}
为了确保加密性,请将这个函数修改为自己的风格。 只要这个函数不泄露,就算天王老子也猜不出来密码了。
Day11全部代码下载
完善一下管理界面,加上修改OJ名的功能。
就算只改一个功能,也要改变全部的Navbar,真讨厌啊...
我们创建一个UI库,像这样。
<?php
define('UIR',str_replace('\\','/',realpath(dirname(__FILE__).'/'))."/");
require_once(UIR . "/liboj.php");
require_once(UIR . "/libuser.php");
function pick_navright(){//判断用户名
if (auth_cookie())
return get_user_name(cookie_uid());
else
return "User";
}
function html_head($title){//输出HTML头
return '<html><head>
<meta charset="utf-8">
<title>' . $title . '</title>
<link rel="stylesheet" href="https://cdn.staticfile.org/twitter-bootstrap/3.3.7/css/bootstrap.min.css">
<script src="https://cdn.staticfile.org/jquery/2.1.1/jquery.min.js"></script>
<script src="https://cdn.staticfile.org/twitter-bootstrap/3.3.7/js/bootstrap.min.js"></script>
</head><body>';
}
function html_navbar(){//输出导航栏
return '<nav class="navbar navbar-default" role="navigation">
<div class="container-fluid">
<div class="navbar-header">
<a class="navbar-brand" href="/index.html">' . get_oj_name() . '</a>
</div>
<div>
<ul class="nav navbar-nav">
<li><a href="/problemset.php">Problemset</a></li>
<li><a href="/submit.php">Submit</a></li>
<li><a href="/status.php">Status</a></li>
</ul>
</div>
<ul class="nav navbar-nav navbar-right">
<li class="dropdown">
<a href="#" class="dropdown-toggle" data-toggle="dropdown">' . pick_navright() . '<strong class="caret"></strong></a>
<ul class="dropdown-menu">
<li>
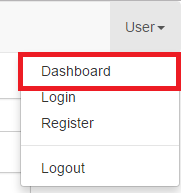
<a href="/user/dashboard.html">Dashboard</a>
</li>
<li>
<a href="/user/login.html">Login</a>
</li>
<li>
<a href="/user/register.html">Register</a>
</li>
<li class="divider">
</li>
<li>
<a href="/user/login.php?logout=true">Logout</a>
</li>
</ul>
</li>
</ul>
</div>
</nav>';
}
function html_tail(){ //输出HTML尾部
return '</body></html>';
}
然后,每个PHP文件前面影响美观的一大段输出就可以改为
echo html_head("Your Title");
echo html_navbar();
最后再加上
echo html_tail();就可以轻松写出规范的HTML了!
Day12全部代码下载
还有什么缺少的呢?emm...
博客!好像所有OJ都支持博客。而且支持了博客,我们只需稍加改进就可以支持题解和犇犇了。
我们把博客信息用json存储。json的优势和操作方法之前讲过了。
| 标识 | 意义 |
|---|---|
| uid | 作者 |
| time | 最近修改时间 |
| title | 标题 |
| content | 内容 |
然后在library目录下创建博客库library/liblog.php
内容大致是这样的:
<?php
define('BLROOT',str_replace('\\','/',realpath(dirname(__FILE__).'/'))."/"); // root地址
require_once(BLROOT . "/libuser.php");

function blog_exists($bid){//判断博客是否存在
    return file_exists(BLROOT . "../blog/content/" . $bid . ".json");
}
function find_idle_bid(){//寻找空id号
    $bid = 1;
    while (file_exists(BLROOT . "../blog/content/" . $bid . ".json"))
        $bid = $bid + 1;

    return $bid;
}

function delete_blog($bid){//删除博客
    system("rm " . BLROOT . "../blog/content/" . $bid . ".json");
}
function alloc_blog($bid){//分配空博客
    if (blog_exists($bid)) return;
    $file = fopen(BLROOT . "../blog/content/" . $bid . ".json","w+");
    fwrite($file,'{"uid":"' . cookie_uid() . '","time":"' . date("Y-m-d H:i:s") . '","title":"QAQ","content":"Enter your content here..."}');
    fclose($file);
    return $bid;
}
function get_blog_info($bid){//获取博客信息
    if (!blog_exists($bid)) return;
    $file = fopen(BLROOT . "../blog/content/" . $bid . ".json","r");
    $attr = fgets($file);
    fclose($file);
    return json_decode($attr,true);
}

function set_blog_info($bid,$arr){//写入博客信息
    $file = fopen(BLROOT . "../blog/content/" . $bid . ".json","w+");
    fwrite($file,json_encode($arr));
    fclose($file);
}

function get_blog_uid($bid){//获取博客作者,以下类似
    $pinfo = get_blog_info($bid);
    return $pinfo["uid"];
}

function get_blog_title($bid){
    $pinfo = get_blog_info($bid);
    return $pinfo["title"];
}

function get_blog_time($bid){
    $pinfo = get_blog_info($bid);
    return $pinfo["time"];
}

function get_blog_content($bid){
    $pinfo = get_blog_info($bid);
    return $pinfo["content"];
}

function set_blog_uid($bid,$uid){//写入博客作者,以下类似
    $pinfo = get_blog_info($bid);
    $pinfo["uid"] = $uid;
    set_blog_info($bid,$pinfo);
}

function set_blog_title($bid,$title){
    $pinfo = get_blog_info($bid);
    $pinfo["title"] = $title;
    set_blog_info($bid,$pinfo);
}

function set_blog_time($bid,$time){
    $pinfo = get_blog_info($bid);
    $pinfo["time"] = $time;
    set_blog_info($bid,$pinfo);
}

function set_blog_content($bid,$cont){
    $pinfo = get_blog_info($bid);
    $pinfo["content"] = $cont;
    set_blog_info($bid,$pinfo);
}

function get_wiki_info(){
    $file = fopen(BLROOT . "../blog/wiki.json","r");
    $attr = fgets($file);
    fclose($file);
    return json_decode($attr,true);
}

function set_wiki_info($arr){
    $file = fopen(BLROOT . "../blog/wiki.json","w+");
    fwrite($file,json_encode($arr));
    fclose($file);
}

function get_prb_wiki($pid){
    $pinfo = get_wiki_info();
    return json_decode($pinfo[$pid]);
}

function set_prb_wiki($pid,$bid){
    $pinfo = get_wiki_info();
    $arr = json_decode($pinfo[$pid]);
    if ($arr === NULL) $arr=array();

    array_push($arr,$bid);
    $arr = array_unique($arr);
    $pinfo[$pid] = json_encode($arr);
    set_wiki_info($pinfo);
}

function blog_frame($bid){//输出博客框架
    echo '<div class="panel panel-default">
	<div class="panel-body">
		'. get_blog_content($bid) . '
	</div>
	<div class="panel-footer">' . username_colored(get_blog_uid($bid)) . ',' . get_blog_time($bid) . '</div>
    </div>';
}
创建blog/content存储博客,blog/show.php和blog/edit.php负责操作。
//blog/show.php
<?php
require_once("../library/liblog.php");
require_once("../library/libui.php");

if (isset($_GET["bid"])){//展示特定文章
    $bid = $_GET["bid"];
    echo html_head("Reading Blog - " . get_blog_title($bid));
    echo html_navbar();
    echo blog_frame($bid);
}else{//展示列表,类似status.php
    echo html_head("All Blogs");
    echo html_navbar();
    echo '<div class="container">
	<div class="row clearfix">
		<div class="col-md-12 column">
			<div class="panel-group" id="panel-890604">';

	exec("ls -t ./content",$arr);

	foreach ($arr as $cur){
	   $cu = strtok($cur,".");
	   echo '<div class="panel panel-default">
					<div class="panel-heading">
						 <a class="panel-title collapsed" data-toggle="collapse" data-parent="#panel-890604" href="#panel-element-' . $cu . '">Blog #' . $cu . ':' . get_blog_title($cu) . '</a>
					</div>
					<div id="panel-element-' . $cu . '" class="panel-collapse collapse">
						<div class="panel-body">
							 <a href="edit.php?bid=' . $cu . '">Original Link</a>' .
							 get_blog_content($cu) . '
						</div>
					</div>
				</div>';
			}

}

echo html_tail();
我们希望加入题解功能,其实特别简单,只要写入wiki.json就行了。
//edit.php
<?php
require_once ("../library/liblog.php");
require_once ("../library/libui.php");
require_once ("../library/libuser.php");

echo html_head("Edit your blog!");
if (!auth_cookie()){
    header("location:/user/login.html");//未登录
}else
    $uid = cookie_uid();

if (isset($_POST["bid"])){//修改特定bid
    $bid = $_POST["bid"];
    $title = $_POST["title"];
    $content = $_POST["content"];
    if (blog_exists($bid) && get_blog_uid($bid) != cookie_uid()){
        //echo (string)(get_blog_uid($bid)) . '&&' . (string)(cookie_uid());
        echo '<div class="alert alert-danger">Permission Denied.</div>';
        exit("");
    }

    alloc_blog($bid);
    set_blog_time($bid,date("Y-m-d H:i:s"));
    set_blog_title($bid,$title);
    set_blog_content($bid,$content);
    header("location:show.php?bid=" . $bid);
}elseif (isset($_GET["bid"])){
    if (isset($_GET["pid"])){//跳转至特定bid修改页
        //exit($_GET["pid"] . "****** " .$_GET["bid"]);
        set_prb_wiki($_GET["pid"],$_GET["bid"]);
        header("location:edit.php");
    }if ($_GET["bid"] == "NEW"){//新建博客
        $bid = find_idle_bid();
    }elseif (isset($_GET["delete"])){//删除博客
        delete_blog($_GET["bid"]);
        header("location:edit.php");
    }else{
        $bid = $_GET["bid"];
    }

    echo html_navbar();
    echo '<div class="container" >
           <div class="row clearfix">
	         <div class="col-md-12 column">
		         <form role="form" action="edit.php" method="post">
			        <div class="form-group">
				       <label for="bid">Blog ID</label>
				       <input type="text" class="form-control" name="bid" value = "' . $bid . '">
			        </div>
			         <div class="form-group">
				       <label for="title">Title</label>
				       <input type="text" class="form-control" name="title" value = "' . htmlentities(get_blog_title($bid)) . '">
			        </div>
			        <div class="form-group">
				       <label for="content">Content(In HTML):</label>
				       <textarea class="form-control" rows="15" name="content">'. htmlentities(get_blog_content($bid)) .'</textarea>
			        </div>
			        <button type="submit" class="btn btn-default">Publish</button>
		         </form>
	          </div>
	        </div>
          </div>';
}else{//显示“我的博客”
    echo html_navbar();
    echo '<div class="container">
	<div class="row clearfix">
		<div class="col-md-12 column">
		  <a class="btn btn-block btn-primary btn-lg" href="edit.php?bid=NEW" role="button">New Blog</a>
			<div class="panel-group" id="panel-260817">';

	exec("ls -tr content/",$arr);
	foreach ($arr as $cur){
	    $cu = strtok($cur,".");
	    if (get_blog_uid($cu) == cookie_uid()){
	        echo '				<div class="panel panel-default">
					<div class="panel-heading">
						 <a class="panel-title collapsed" data-toggle="collapse" data-parent="#panel-260817" href="#panel-element-' . $cu . '">Blog #' . $cu  . ':' . get_blog_title($cu) . '</a>
					</div>
					<div id="panel-element-' . $cu . '" class="panel-collapse collapse">
						<div class="panel-body">
						     <script>
                                function Subwiki(){
	                                   document.location="edit.php?bid=' . $cu . '&pid=" + document.getElementById("pid").value;//跳转至提交题解页面
                                }
                             </script>
						     <a href="show.php?bid=' . $cu .'">Preview</a><br />
							 <a href="edit.php?bid=' . $cu .'">Edit</a><br />
							 ProblemID:<input id="pid" />
							 <button type="button" class="btn btn-primary" onclick="Subwiki()">Submit to Wiki</button><br / >
							 <a href="edit.php?bid=' . $cu .'&delete=true">Delete</a><br />
						</div>
					</div>
				</div>';
	    }
	}
}
洛谷近期取消了全网犇犇,这让我很不开心。我希望在这个OJ里有全网犇犇。犇犇的本质不就是一个叫benben.json的博客吗?我们可以对博客系统稍加改进来支持这个功能。
~~有了犇犇就可以玩有趣的诗句接龙了呢~~~
首先我们在library/liblog.php中添加以下函数:
function benben_frame($sentence){//输出犇犇框架
    //if (!auth_cookie()) return;
    return '<div class="panel panel-default">
	<div class="panel-body">
		'. $sentence . '
	</div>
	<div class="panel-footer">' . username_colored(cookie_uid()) . ',' . date("Y-m-d H:i:s") . '</div>
    </div>';
}

function launch_benben($sentence){//发射犇犇!
    if (!auth_cookie()) return;
    $rst = get_blog_content("benben") . benben_frame(htmlentities($sentence));
    //exit($rst);
    set_blog_content("benben", $rst);
}

function clear_benben(){//清空犇犇
    set_blog_content("benben", benben_frame(htmlentities("Welcome to BenBen!")));
然后,我们对index.php稍加修改即可,具体请见代码。
我们注意到,html中的navbar无法随着libui.php的更新而改变,这是我们十分苦恼。
我决定将所有html都php化。 php大概是这样的
if (isset($_GET[某个参数])){
进行动作
}else{
显示网页
}
对所有html进行修改...好了!
Day13全部代码下载
由于需要在两周内写完这个项目,Day13将会是开发的最后一天。 提交记录不json化的话好不美观呀!不如把它JSON话呢。如果看过前面章节的话,一定知道怎么改吧。
最后是题面上传,有注释,请自行阅读代码。
/upload.php
<?php
require_once("library/libui.php");

if (isset($_POST["pid"])){ //有数据
    $pkg_url = $_POST["pkg_url"];
    $pid = $_POST["pid"];
    $name = $_POST["name"];
    $time_limit = $_POST{"time_limit"};
    $cover = $_POST["cover"];

    $pr_dir = "problems/" . $pid;
    mkdir($pr_dir);
    mkdir($pr_dir . "/data");//建文件夹

    $attr = fopen($pr_dir . "/attrib.json","w+");
    fwrite($attr,"{\"name\":\"" . $name . "\",\"time_limit\":" . $time_limit . ",\"cover\":\"" . $cover . "\"}");
    fclose($attr);//写入attrib.json

    system ("wget " . $pkg_url . " -O temp/" . $pid . ".zip");//下载数据
    system ("unzip temp/" . $pid . ".zip -d " . $pr_dir . "/data");//解压数据
    header("location:show.php?pid=" . $pid);
}else{
    echo html_head("Upload a problem.");
    if (!auth_cookie() || !auth_admin(cookie_uid())) exit("You aren't an admin!");//不是管理员
    else{
        echo html_navbar();
        echo '<div class="container">
	<div class="row clearfix">
		<div class="col-md-12 column">
		    <h3>Upload your problem</h3>
			<form role="form" action="upload.php" method="post">
				<div class="form-group">
					 <label for="pkg_url">Data Package Url(ZIP format)</label>
					<input type="text" class="form-control" name="pkg_url" />
				</div>
				<div class="form-group">
					 <label for="pid">Problem ID</label>
					<input type="text" class="form-control" name="pid" />
				</div>
				<div class="form-group">
					 <label for="name">Problem Name</label>
					<input type="text" class="form-control" name="name" />
				</div>
				<div class="form-group">
					 <label for="time_limit">Time Limit</label>
					<input type="text" class="form-control" name="time_limit" />
				</div>
				<div class="form-group">
					 <label for="cover">Problem Cover</label>
					<textarea class="form-control" name="cover" rows="15"></textarea>
				</div>
				<button type="submit" class="btn btn-primary">Upload</button>
			</form>
		</div>
	</div>
</div>';
    echo html_tail();
    }
}这样,访问/upload.php就可以导入题目了。
如果不在实体机上配置FreeOJ的话,就是纸上谈兵。所以要花一天的时间配置FreeOJ。
如果家里有树莓派或者香橙派的化就直接照做就行了,如果没有的可以到淘宝上买一个,不贵。或者如果有Ubuntu-x86的电脑的话也可以。下面的安装步骤是OrangePi PC2上的,其他平台类似。
首先刷上Armbian的包,然后通过SSH连接OrangePi,初始密码1234。然后会让你创建新用户,记得填user.
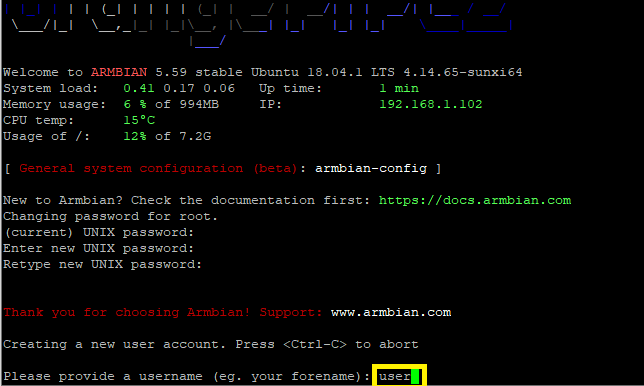
剩下的信息随便填即可。
填完之后输入以下命令:
sudo apt-get update
sudo apt-get upgrade
sudo apt-get install php apache2
然后就可以浏览器访问你的OrangePI的IP地址检查服务器搭建是否成功。
cd /var/www/html
wget https://github.com/team-alloca/FreeOnlineJudge-src/raw/master/FreeOJ_1.0.0Final.zip
unzip FreeOJ_1.0.0Final.zip
rm FreeOJ_1.0.0Final.zip
cd scripts
chmod 755 *
./setperm.sh
rm index.html
好了,访问你的IP,就可以使用FreeOJ了。
对了,如果发现编译时间过长,可以自行调整library/libjudge,php里的编译时限
exec("timeout 7 g++ " . $j_path . "/judge.cpp -std=c++11 -O2 -o " . $j_path . "/judge",$cot);//将7改为更大一点的数字
2周,仅仅2周的文章,但是花了我将近2个月。虽然只有只言片语,但是很多东西都是写了又改,改了又写。我不善文笔,让各位见笑了。
这个OJ,它很初级,工作量甚至不到UOJ的十分之一,但它确实是一个OJ,它的代码实现也很简单,在座的各位肯定能看懂。
如果有BUG的话,请私信我修改。如果有时间的话,我会尽量修复。
当然,这个OJ远没有完成,但由于学业上的原因,我不得不把这个项目搁置一下了。
最后,祝大家学习生活愉快!
VariousArtist,2019-03-17