Tutorial
The best way to explain how to use the library is probably with a simple example, in this case a rectangular arrangement of an LED strip which could be used for an infinity mirror or illuminated picture frame.

You might want to define a collection of animation patterns which are each mapped and repeated to each LED segment for a nice consistent, symmetric effect, instead of just a single pattern applied to the entire strip. That's what this library helps you do.
The first step is to define each segment (corresponding to each edge of the rectangle) in terms of their position on the LED strip. This is done by creating instances of StripSegment and specifying the segment start position, number of LEDS in the segment and total number of LEDs on the strip (see StripSegment reference for more details). The segments are numbered 1 to 4, starting with the vertical one on the right and going counter-clockwise.
#include <FastLED.h>
#include <LEDController.h>

#define VERTICAL_SEGMENT_LEN 8      // Number of LEDS on vertical segments
#define HORIZONTAL_SEGMENT_LEN 14   // Number of LEDS on horizontal segments
#define TOTAL_LEDS VERTICAL_SEGMENT_LEN*2 + HORIZONTAL_SEGMENT_LEN*2

StripSegment segment_1(0, VERTICAL_SEGMENT_LEN, TOTAL_LEDS);
StripSegment segment_2(VERTICAL_SEGMENT_LEN, HORIZONTAL_SEGMENT_LEN, TOTAL_LEDS);
StripSegment segment_3(VERTICAL_SEGMENT_LEN + HORIZONTAL_SEGMENT_LEN, VERTICAL_SEGMENT_LEN, TOTAL_LEDS);
StripSegment segment_4(2*VERTICAL_SEGMENT_LEN + HORIZONTAL_SEGMENT_LEN, HORIZONTAL_SEGMENT_LEN, TOTAL_LEDS);
Next we need some patterns to apply to the LED segments. Patterns define animation logic which updates every frame, and need to be able to return the RGB value for a given position along the pattern axis (or a given point in 3D space for SpatialPatterns). A simple example of a LinearPattern would be a pulse of light moving along a linear axis. The pattern would need to keep track of the position of the pulse and update it with each new frame. It would also need to be able to determine the RGB value for each position along the axis, perhaps based on how far away the position is from the pulse's position.
Each pattern instance needs to be initialized with a 'resolution', which for a LinearPattern is the number of distinct positions along the linear axis that the pattern logic applies to. This value does not need to be the same as the number of LEDS on each StripSegment, but think of it as 'virtual pixels' which will then be mapped to the actual strip segment LEDs using interpolation. Having the pattern resolution several times higher than the number of LEDS on a strip segment allows for smooth animations.See Pattern reference for more details on how patterns work and how to create your own. There is also a bunch of pre-made patterns included, some of which will be used here:
-
MovingPulse- Colourful pulse with bright head and tapering tail, which moves along the pattern axis. Initialise with pulse width, speed and colour palette -
RandomRainbows- Moving rainbow patterns using sine wave function, with randomly changing width, speed and colour. -
Twinkle- Pleasant golden twinkling lights fading in and out. Adapted from [Mark Kriegsman's example] (https://gist.github.com/kriegsman/756ea6dcae8e30845b5a) Initialise with colour palette and twinkle speed.
#define PATTERN_RESOLUTION HORIZONTAL_SEGMENT_LEN*6

MovingPulse<PATTERN_RESOLUTION> pulse_pattern(PATTERN_RESOLUTION/4, 2, RainbowColors_p);
RandomRainbows<PATTERN_RESOLUTION> random_rainbows;
Twinkle<PATTERN_RESOLUTION> twinkle_pattern(5, FairyLight_p);
The next step is to define mappings of the Patterns to the collection of StripSegments. For linear patterns this is done using LinearPatternMapping, providing the following parameters:
- Pattern instance
- Array of
StripSegmentsto map pattern to - Length of
StripSegmentarray - Frame delay for pattern (number of ms between frames)
- Name for pattern configuration (optional)
- Duration of pattern configuration (in seconds, defaults to 10) The pattern mapping will handle interpolation of the pattern from its 'virtual pixel' resolution to the actual number of LEDS in each strip segment.
// Define array of StripSegments
#define NUM_SEGMENTS 4
StripSegment all_segments[NUM_SEGMENTS] = {segment_1, segment_2, segment_3, segment_4};

// Define PatternMappings
LinearPatternMapping pulse_pattern_mapping(pulse_pattern, all_segments,  NUM_SEGMENTS, 15, "Moving Pulses");
LinearPatternMapping twinkle_pattern_mapping(twinkle_pattern, all_segments, NUM_SEGMENTS, 20, "Twinkle");
LinearPatternMapping rainbow_pattern_mapping(random_rainbows, all_segments, NUM_SEGMENTS, 20, "Random Rainbows");
Finally, the PatternController handles switching between and execution of the defined PatternMappings, and updating the state of the LED strip. It must be initialised with:
- CRGB array representing state of full LED strip (used by FastLED)
- Total number of LEDs in strip
- Array of pattern mapping pointers
- Number of pattern mappings
- Whether or not to randomise pattern order (optional boolean)
// Define array containing state of full LED strip
CRGB leds[TOTAL_LEDS];

// Define array of pattern mapping pointers
#define NUM_MAPPINGS 3
BasePatternMapping* mappings[NUM_MAPPINGS] = {
   &pulse_pattern_mapping,
   &twinkle_pattern_mapping,
   &rainbow_pattern_mapping
};

// Define controller
PatternController controller(leds, TOTAL_LEDS, mappings, NUM_MAPPINGS, true);
Now you just need to initialise FastLED and the PatternController in setup(), and run it within loop().
#define LED_DATA_PIN 5

void setup() {
  // Configure FastLED max power usage (optional)
  FastLED.setMaxPowerInVoltsAndMilliamps(5, 5000);
  // Register LED array with FastLED
  FastLED.addLeds<NEOPIXEL, LED_DATA_PIN>(leds, NUM_LEDS).setCorrection(TypicalLEDStrip);
  // Initialise controller
  controller.initialise();
}

void loop() {
   // Run controller (animates pattern and updates LED state)
   controller.loop();
   // Any other project activity (read inputs, etc)
}
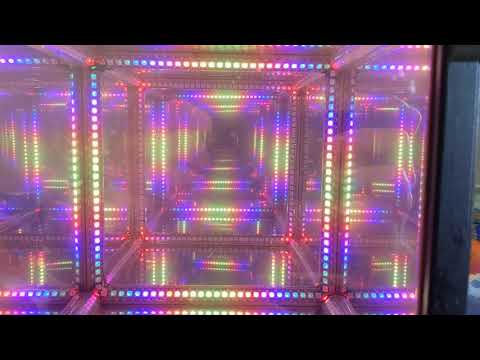
That's it! Here's a video of this simple example applied to my Infinity Cube (Segment lengths were adjusted to LED length of cube edges):
This tutorial covers the basics, but there are more cool features to explore like Spatial Patterns and Multiple Pattern Mappings. Check out the Reference page for more in-depth details and also some more Examples.